You're offline — changes are saved and will sync when you reconnect.
AllQuote guide
In-app guides
Detailed help for estimating, trade services and commercial project workflows. Open a full guide for preparation, step-by-step instructions, a worked example, result checks and limitations. Each guide names its minimum plan; role permissions, enabled areas, connected providers, and supported devices can add further requirements.
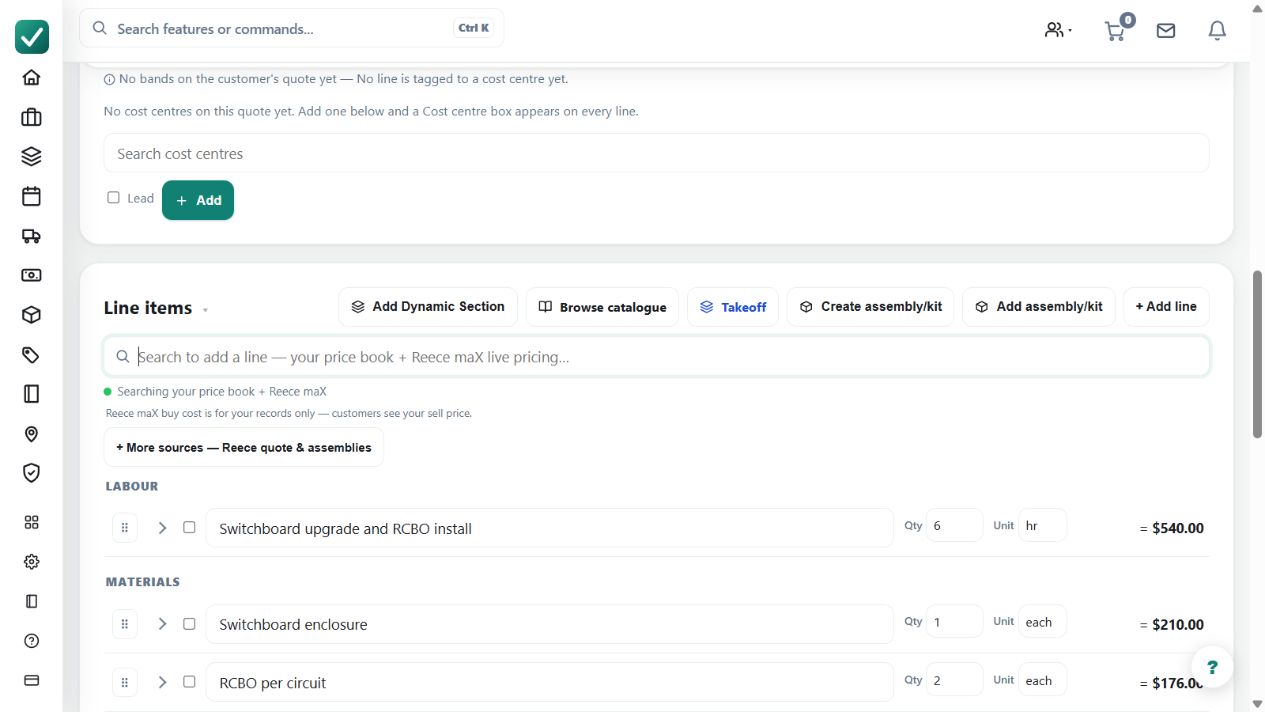
Demo screenshot. An example switchboard estimate separates labour, enclosure and circuit-protection quantities. Check each description, unit and price before issuing the quote. Select the image to enlarge.
What
Builds a customer quote from the business's own labour, materials, assemblies, scope, discounts, deposits, and terms.
How
Open New quote from the app or go to /quote/new.
Choose the manual quote path, add or select the customer, then enter the job name, site details, and scope.
Add labour, price book materials, assemblies, discounts, deposit settings, terms, and any customer options.
Review quantities, sell prices, tax, margin, wording, and the customer document before finalising or sending.
Demo screenshot. The real quote editor with populated labour and material rows. After editing, wait for the save status and reopen the record to verify it; this still image does not demonstrate an autosave completing. Select the image to enlarge.
What
Autosaves settled edits on reviewed draft and finalised quotes while keeping approval and customer actions explicit.
Roles
owneroffice
How
Open the quote from Jobs. Autosave runs on reviewed draft and finalised quotes; sent, accepted and needs-review quotes still use the explicit Save action.
Edit the supported quote fields and give every priced row a description so the row can be saved safely.
Pause after an edit and check the status beside the totals: Saving means it is still working; Saved means the change is stored.
Autosave never finalises or sends a quote. Review the totals and customer document, then use the separate finalise or send action when ready.
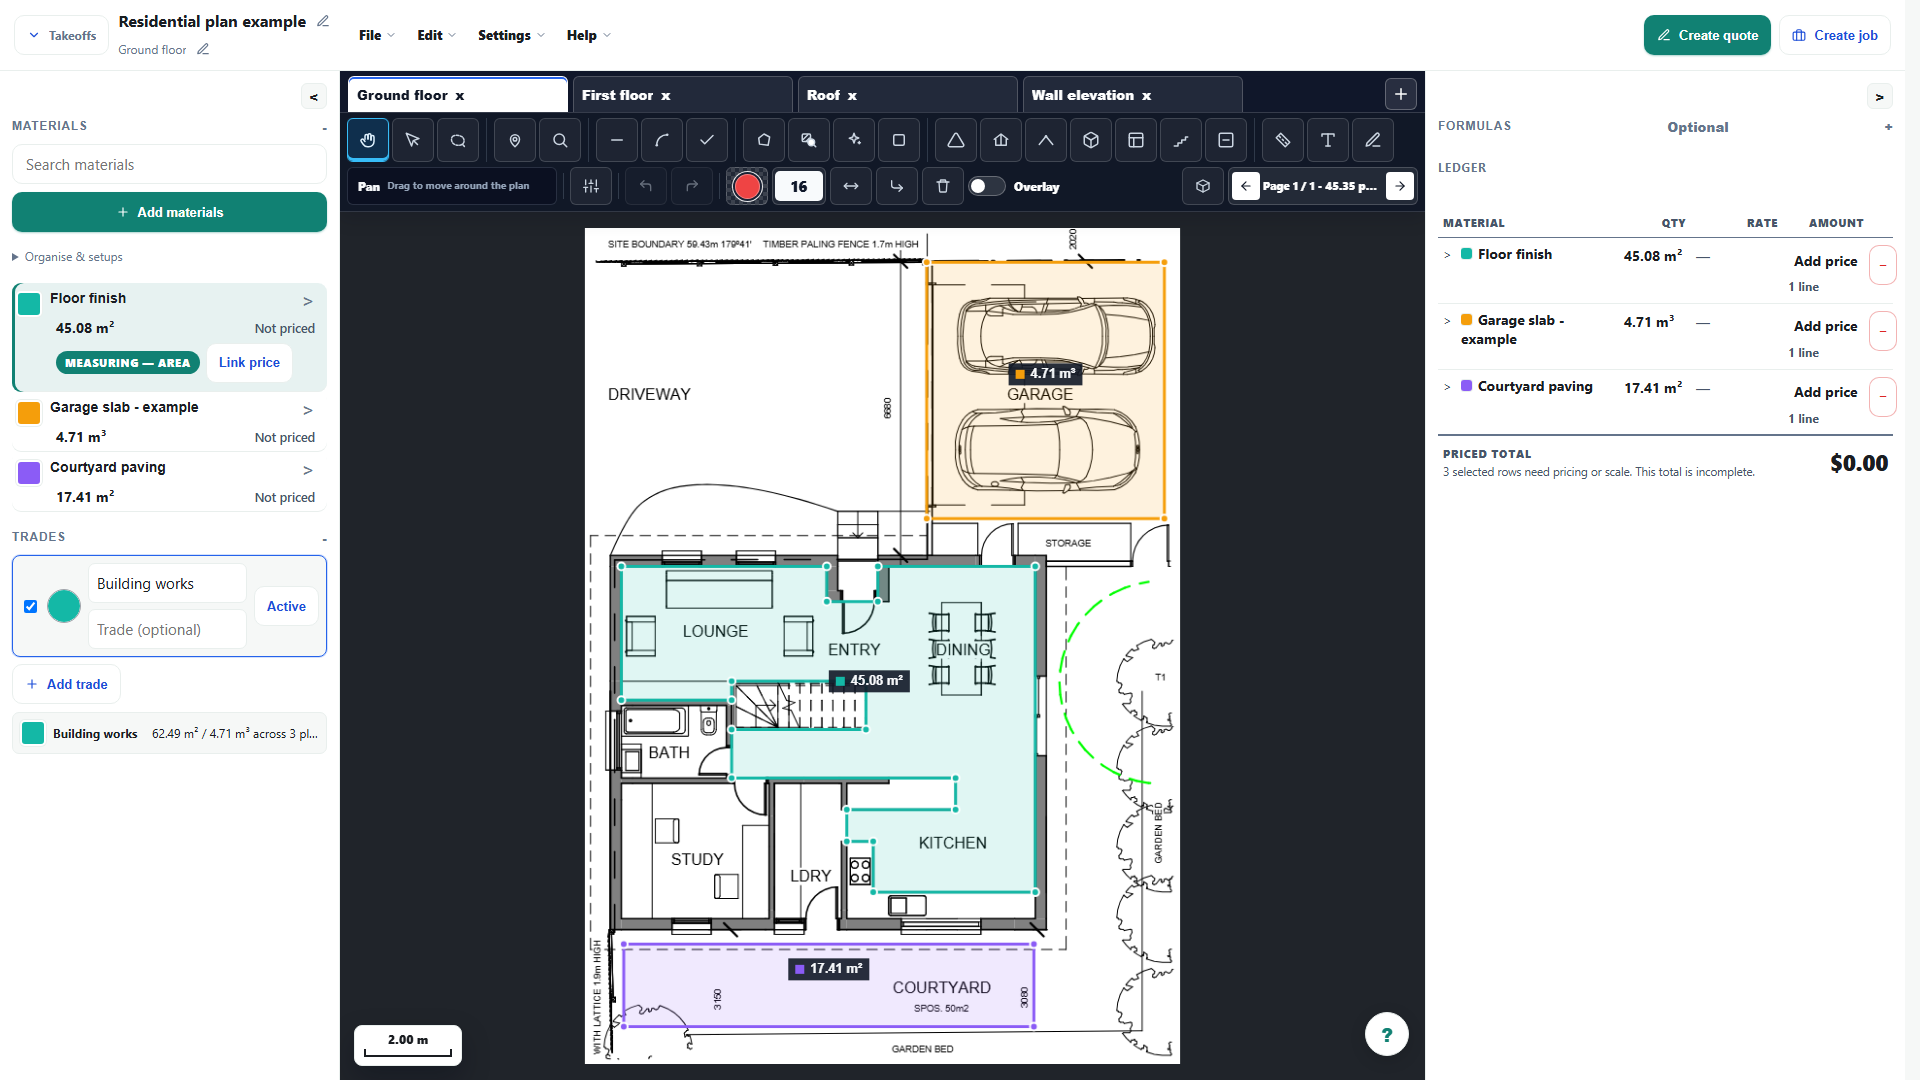
Measured floor finish, garage slab and courtyard paving in the real takeoff workspace. Quantities and rates are teaching examples. Select the image to enlarge.
What
Measures lines, areas, pitched areas, volumes and counts on plans. The takeoff guide includes driveway depth, measured formulas, material and labour assemblies, and revision overlay examples.
Roles
owneroffice
How
Open Takeoffs, create or open a takeoff, then upload a PDF, JPG or PNG plan or use a plan already linked to the job.
Check the page scale, then choose Line, Area, Pitched area, Volume or Marker and mark the plan.
Choose Text and click the plan where the note belongs, then type the note directly in place.
Review each measurement and the live ledger, fix anything that is off, then save before inserting priced rows into a quote.
Right-click a measurement for the actions available to its type: Edit points / properties, Duplicate, Add deduction or Apply as deduction, Convert to pitched area (which opens the Roof pitch prompt), or Delete. On touch, long-press instead.
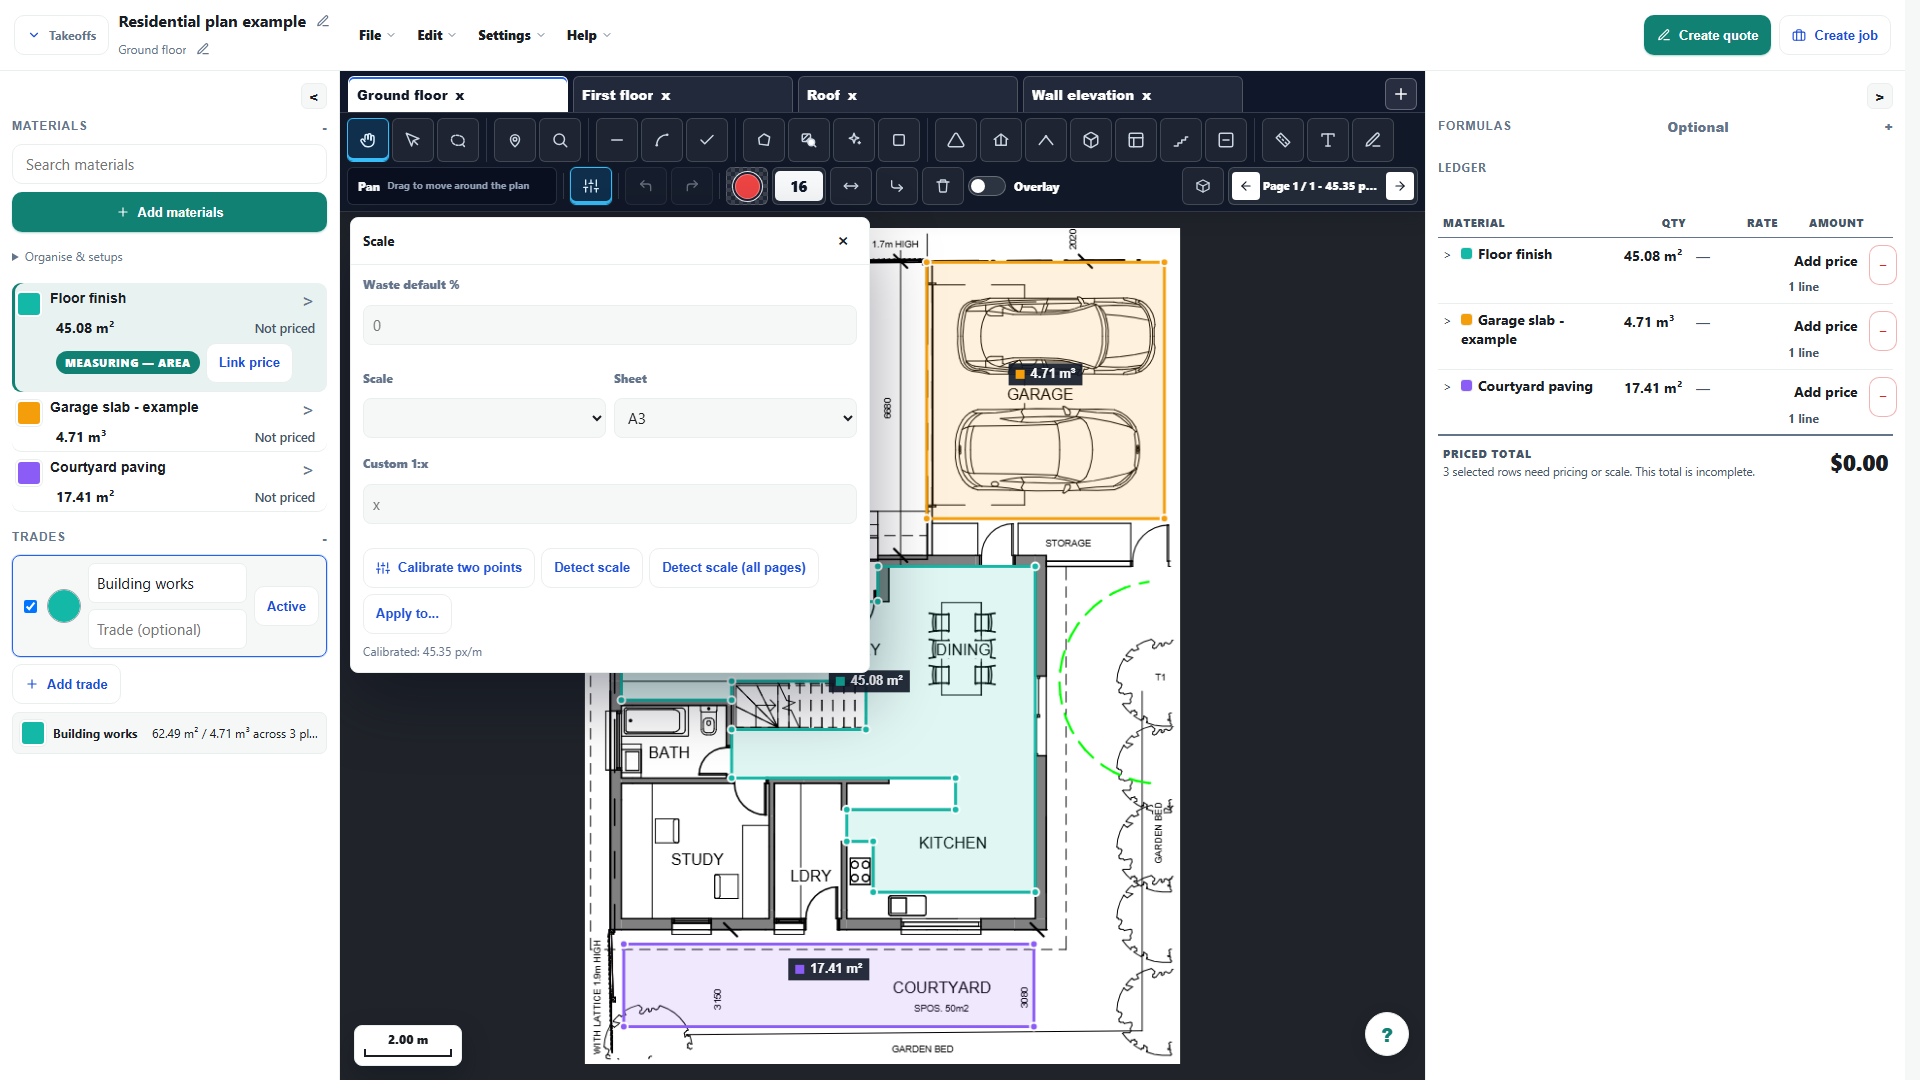
Check the cropped drawing's calibration before measuring. Cropping changes sheet dimensions, so do not reuse an A3 paper-size preset for the excerpt. Select the image to enlarge.
What
Checks plan and title-block scale details, then lets you calibrate a page against a known dimension when needed.
Roles
owneroffice
How
Choose Detect scale (all pages) to scan the drawing and title block for a proposed scale on each page.
Review the units and ratio on every page before using them; pages in the same PDF can have different scales.
If a page's scale is missing or wrong, choose Calibrate two points, click the two ends of a printed dimension, then enter its real length and unit.
Measure another known dimension as a check before completing the rest of the takeoff.
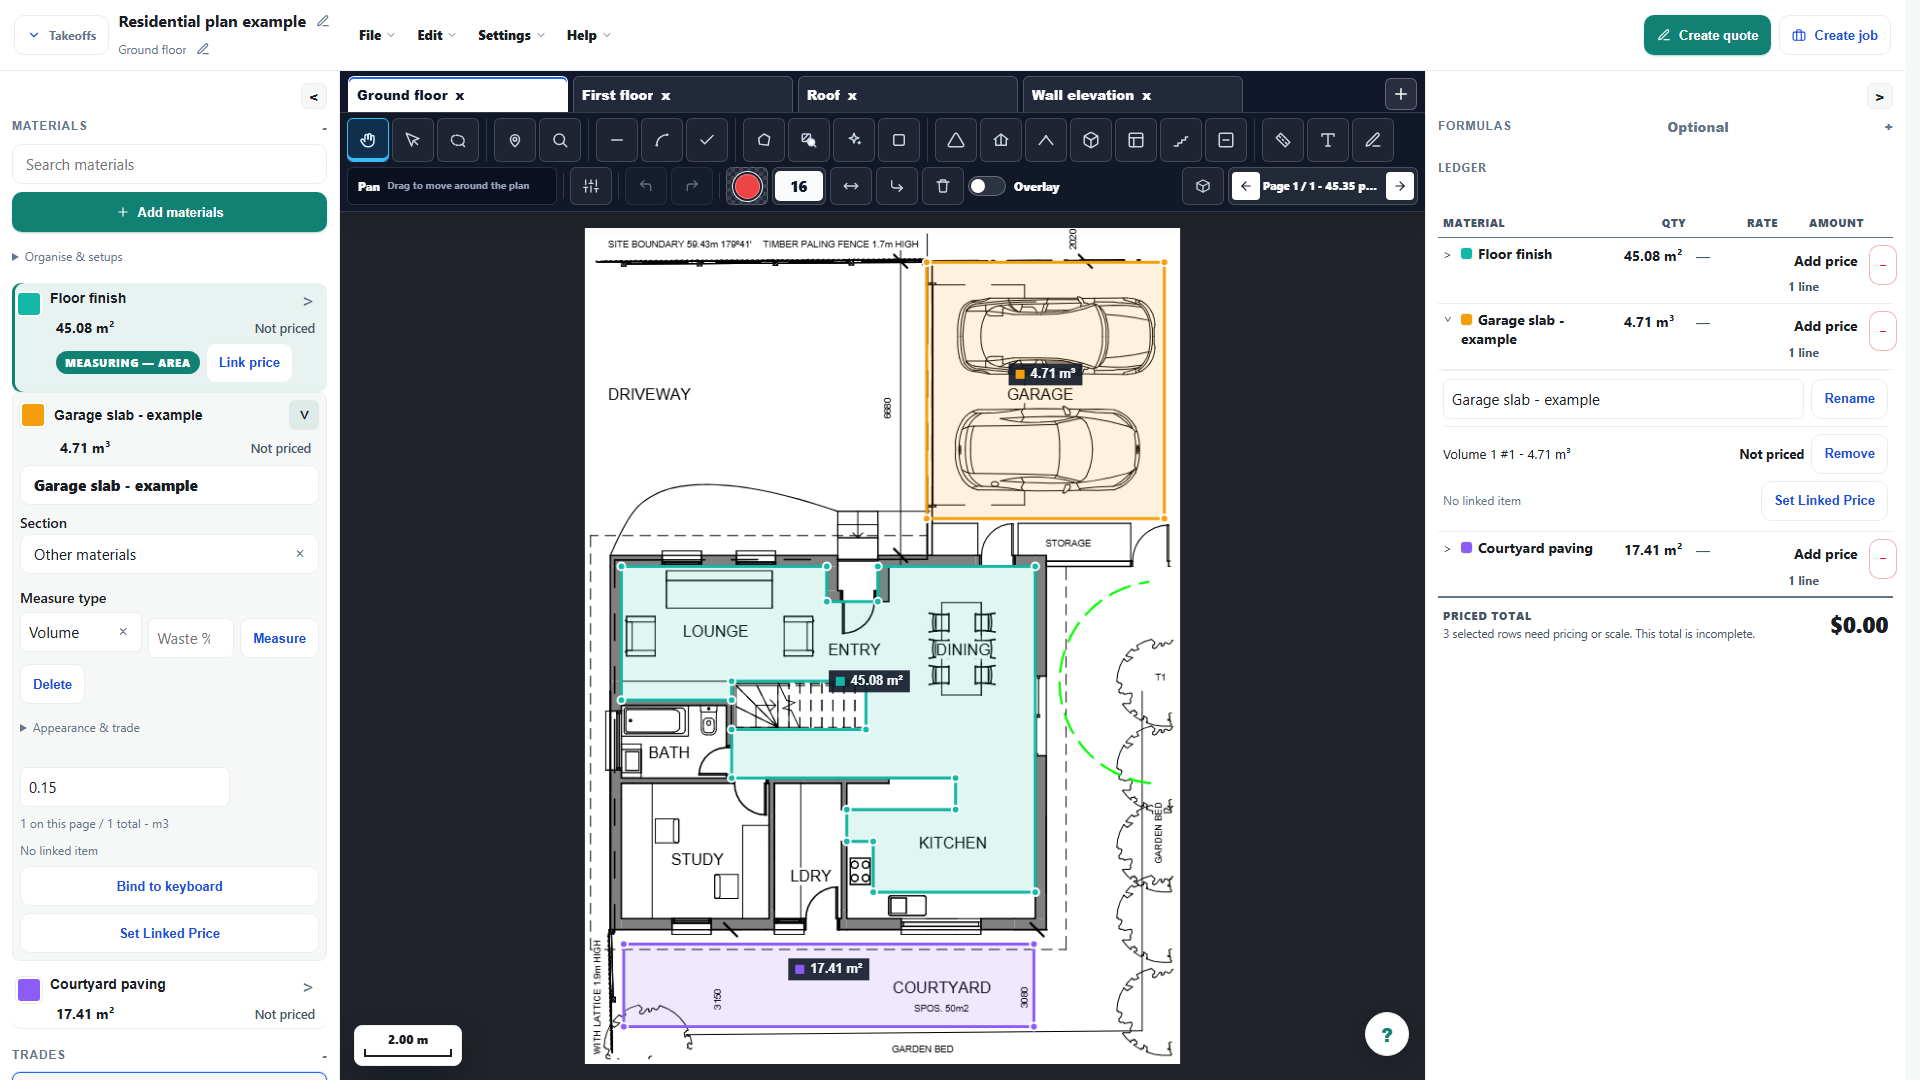
Garage slab example: approximately 31.42 m² × 0.15 m depth = 4.71 m³. The expanded material editor shows 0.15 m; this is an illustrative depth, not a specification from the plan. Select the image to enlarge.
What
Lasso selects several existing mark-ups together; Pitched area and Volume separately ask for pitch or depth as you measure.
Roles
owneroffice
How
Choose Lasso and draw around the existing mark-ups you want to select together.
Use the selection actions to move or delete the selected mark-ups together, then clear the selection.
For a new roof face choose Pitched area and enter the requested pitch; for a volume choose Volume and enter the requested depth.
Review the calculated area or volume in the ledger. Lasso selection does not set pitch or depth for a batch.
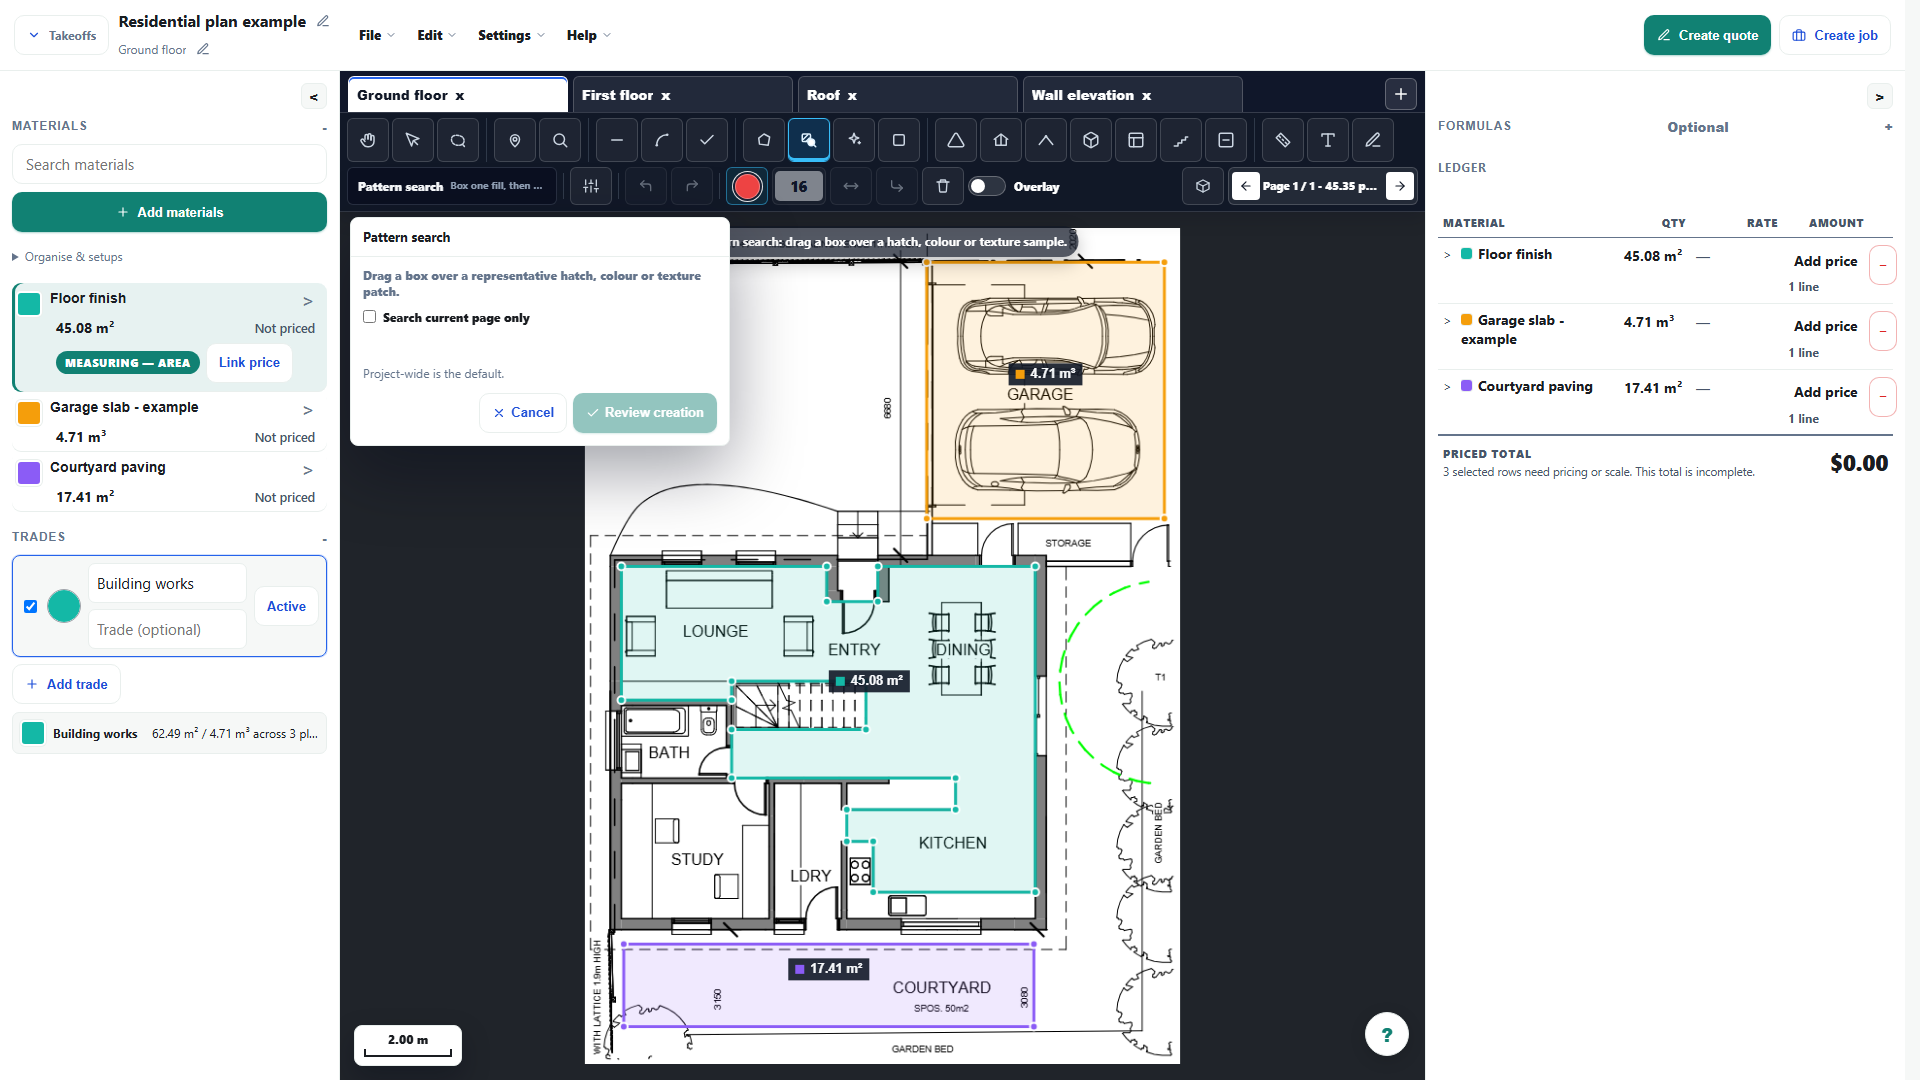
Pattern Search setup on the plan. Select a sample, search and review candidates before confirming; this screenshot does not show confirmed detections. Select the image to enlarge.
What
Samples a hatch, colour or texture and finds matching regions across the takeoff for review before anything is added.
Roles
owneroffice
How
Choose Pattern Search and draw a tight sample around the hatch, colour or texture you want to find.
Let the search run across the takeoff; there are no detection settings to tune.
Choose Review creation to build the review set, then reject anything that is not the sampled finish or material.
Choose Confirm create areas to add the reviewed matches. Cancelling leaves the plan unchanged.
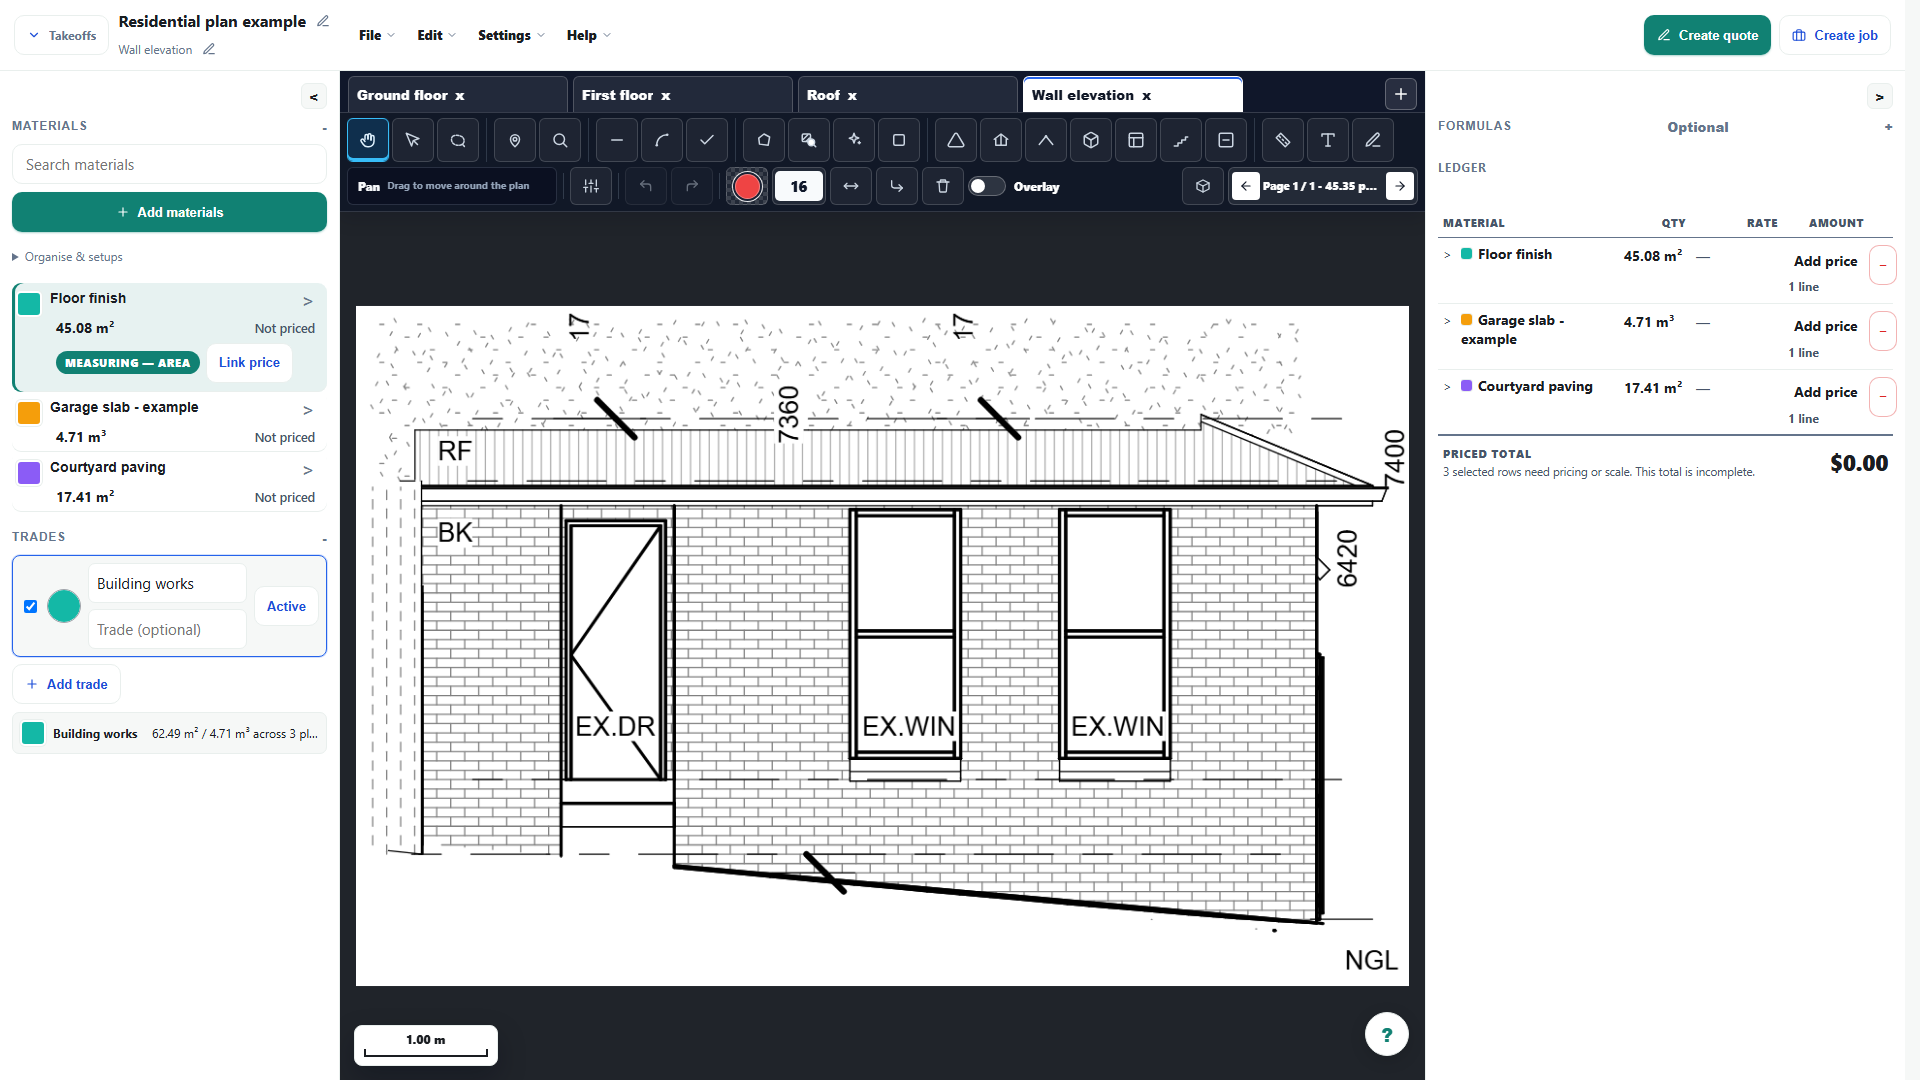
A real vector elevation excerpt without a surface legend. Review surfaces is conditional and is not offered here; use manual measurements when no supported surfaces are detected. Select the image to enlarge.
What
Extracts named legend surfaces from a vector PDF and creates editable, unpriced areas only after review.
Roles
owneroffice
How
Open a vector PDF page and choose Review surfaces when the plan contains named surfaces in its legend.
If no named legend surfaces are found, keep measuring manually; Review surfaces does not guess unnamed finishes.
Compare each extracted legend name with the highlighted regions and reject any incorrect placement.
Apply only the reviewed surfaces, then check and price the new editable, unpriced areas against the drawing.
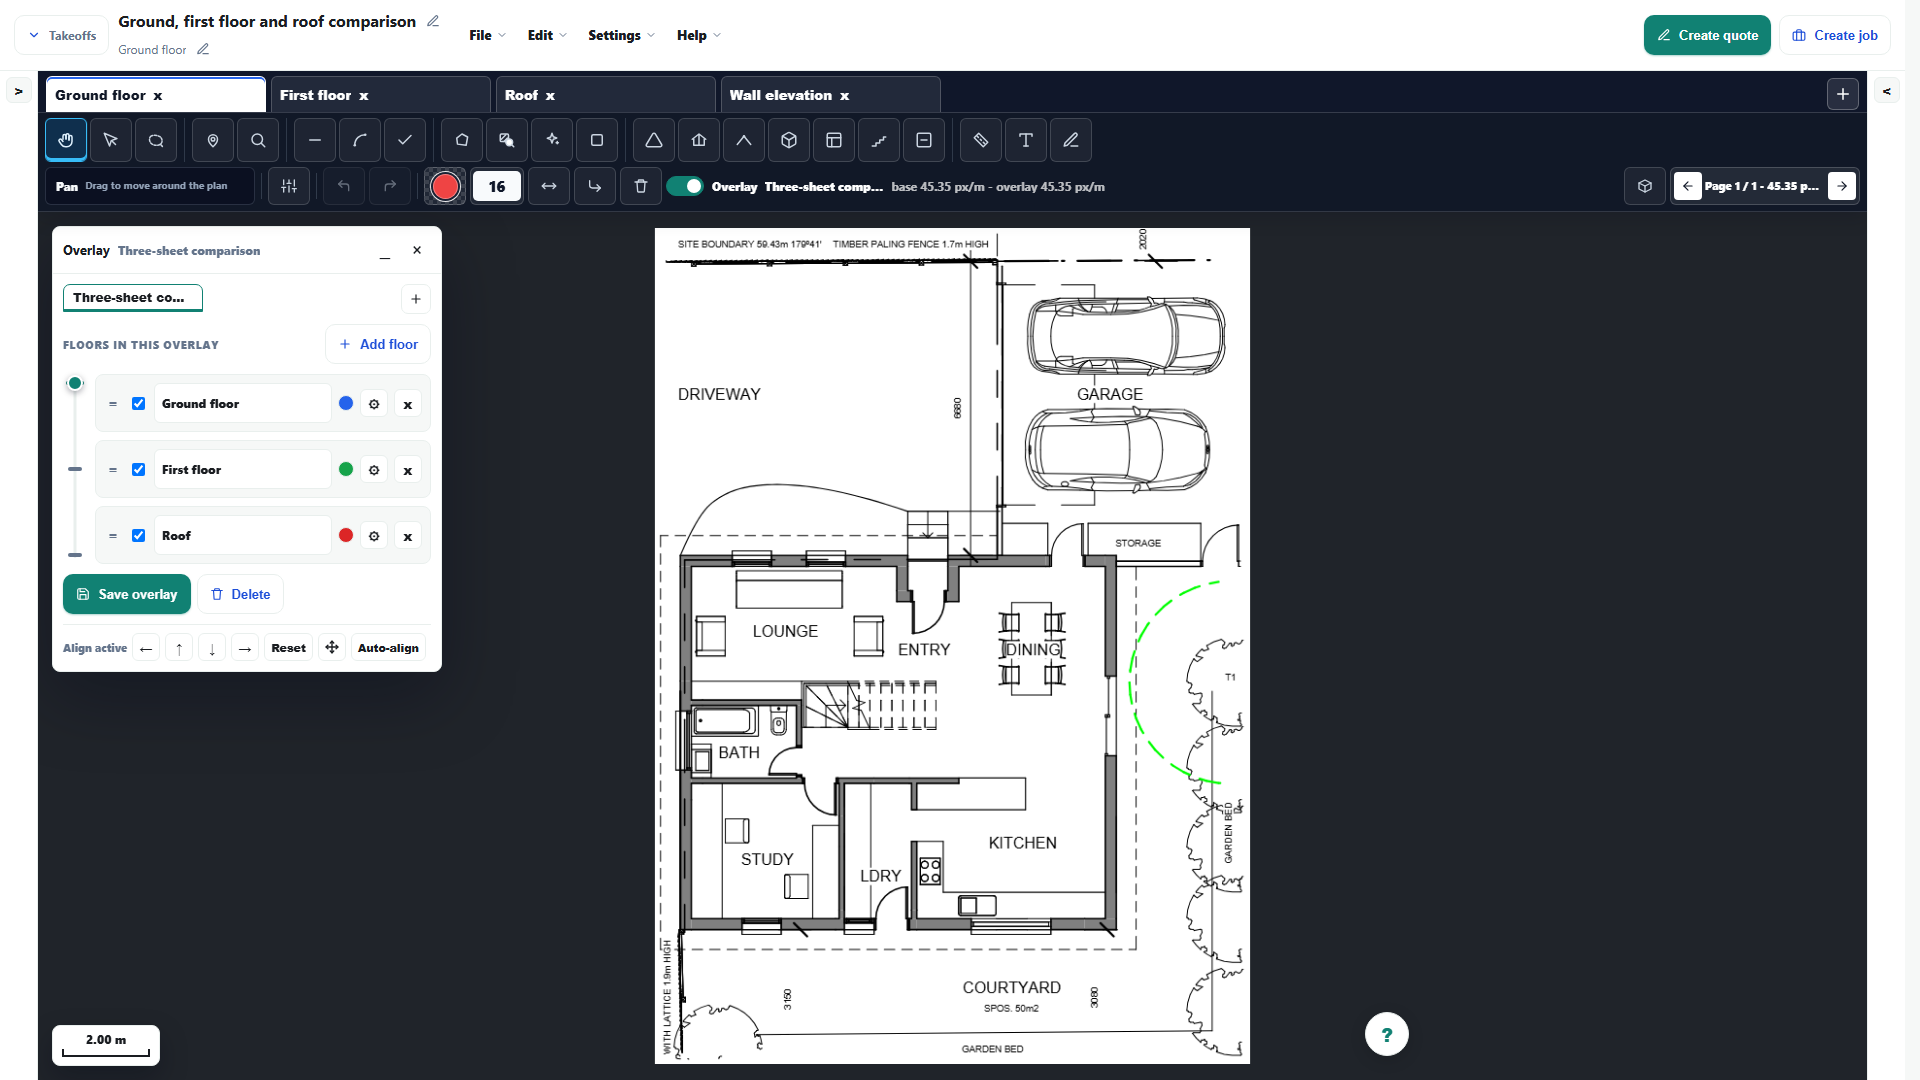
Press Play to watch the ground-floor, first-floor and roof sheets blend using the overlay slider. The crop includes the garage and courtyard. This demonstration is silent.Open overlay video demo
What
Places other floors or revised sheets over a base page so you can line them up and check what changed.
Roles
owneroffice
How
Open the base page, turn on Overlay and add the comparison floor or revised sheet.
Calibrate both pages to the same scale, then align the active layer using shared plan points.
Compare the layers and check changed walls, openings, fixtures or quantities before updating measurements.
Reorder floors, set a tint and cross-fade between the checked layers to inspect the revision clearly.
Right-click blank canvas for available Paste, Select all on page, Start tool (including Count / marker), Zoom to fit, Turn overlay on or Turn overlay off actions. On touch, long-press the canvas with Pan or Select active.
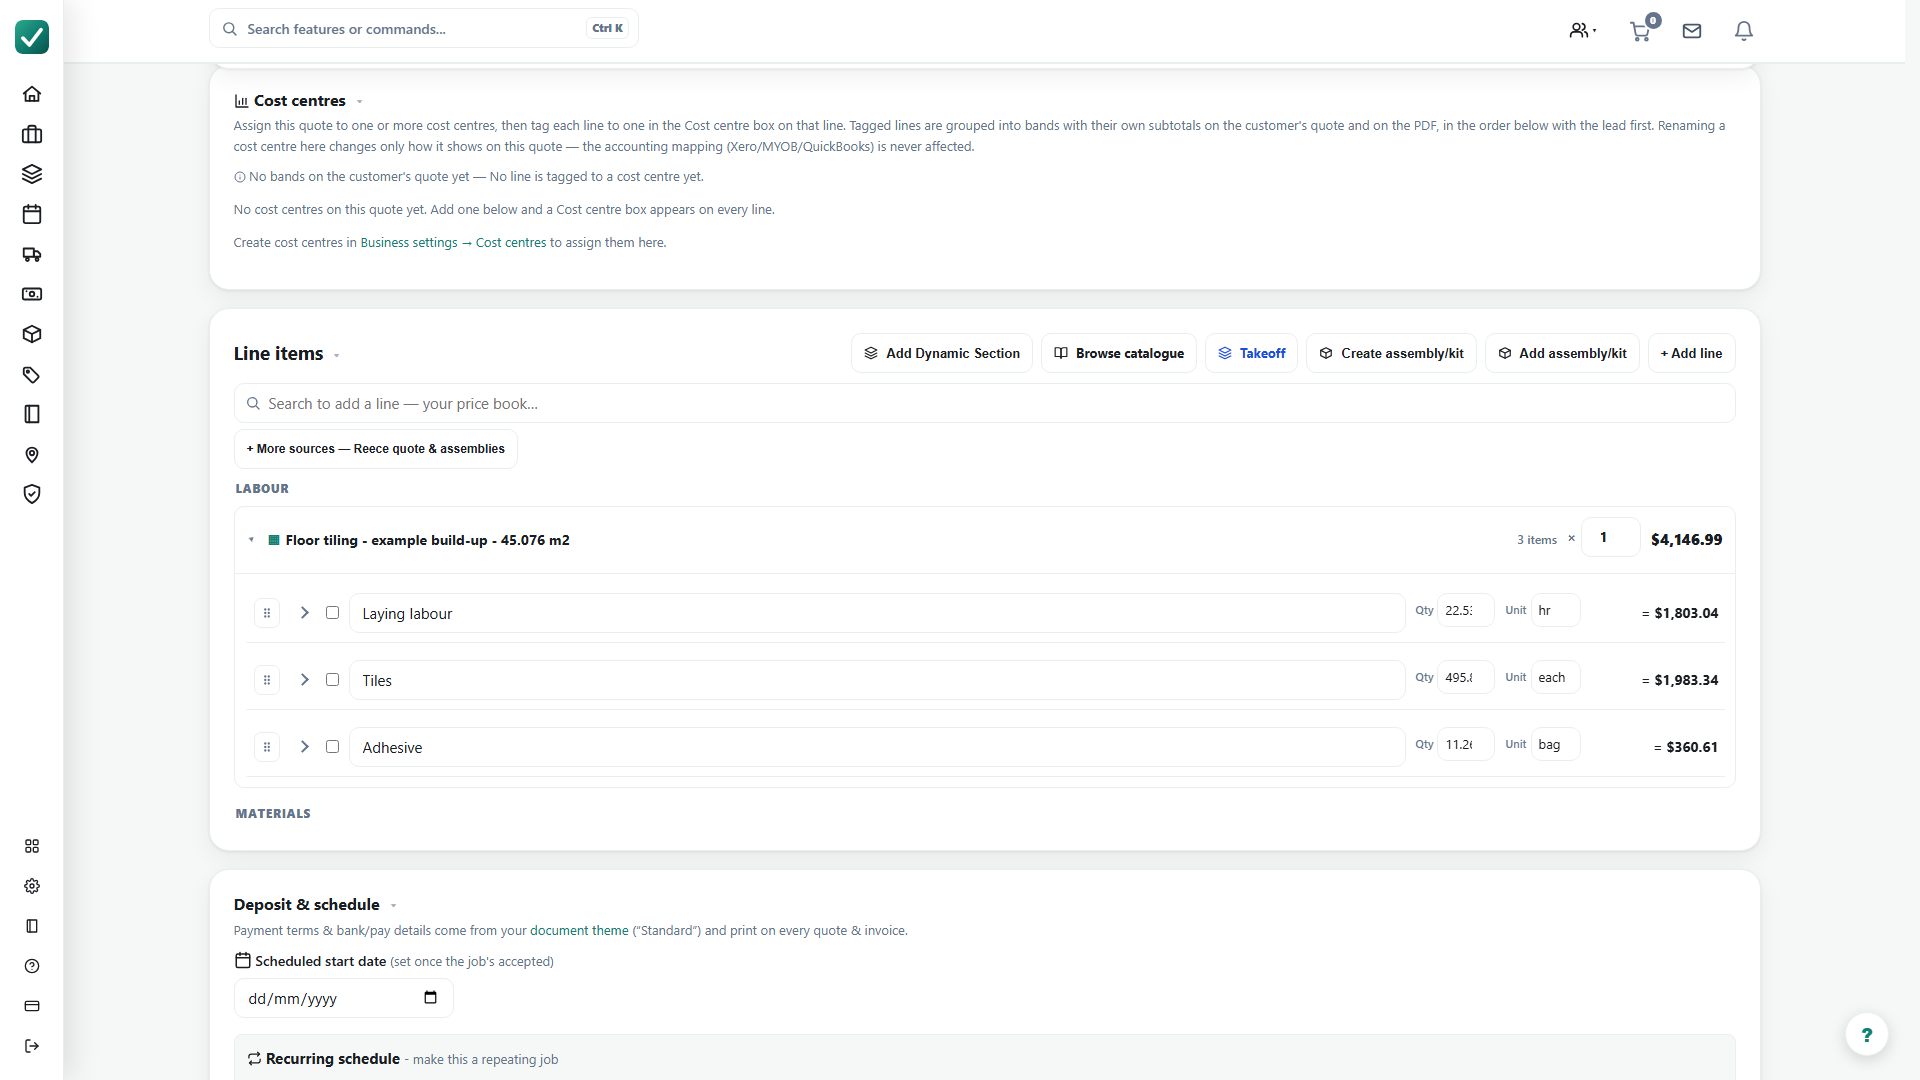
The measured floor-finish assembly expands into labour, tile and adhesive rows in a draft quote. Unpriced garage and courtyard work still needs review. Select the image to enlarge.
What
Turns reviewed takeoff ledger rows into quote lines without retyping the measured quantities.
Roles
owneroffice
How
Finish the measurements and map each ledger row to the right price book item or assembly.
For a takeoff opened from a quote, use Edit > Insert to quote and review the rows that are ready to add.
For a standalone takeoff, use Create quote after the ledger descriptions, units, quantities and mappings are ready.
Check the inserted quote lines for cost, sell price, margin, tax and customer wording before finalising.
Right-click a ledger row for available actions such as Zoom to placements, Rename or Change material / linked item. On touch, long-press the row.
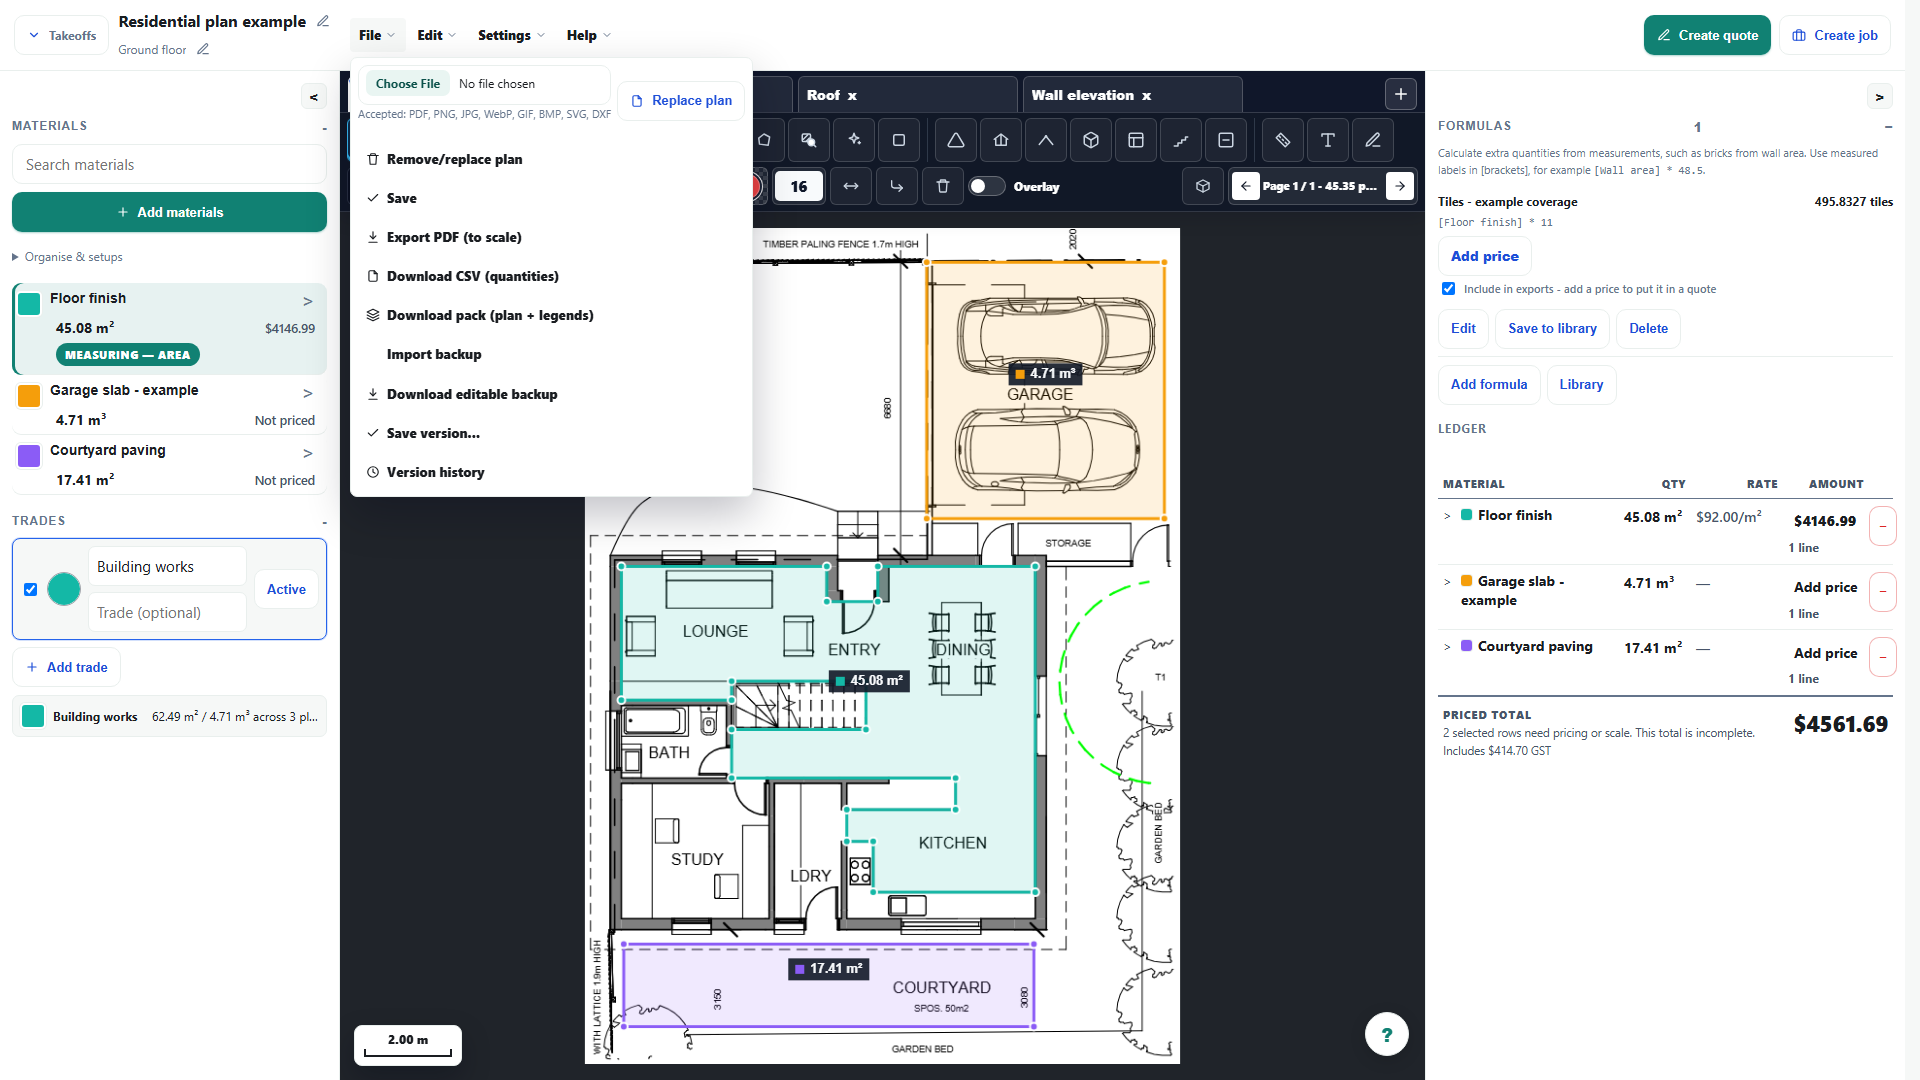
File > Export PDF (to scale) exports the measured drawing. Confirm calibration and print at Actual size. Select the image to enlarge.
What
Draws the measurements and markup as vectors onto the original plan sheet at its own size, with a scale bar on every calibrated page.
Roles
owneroffice
How
Calibrate each page you want measured, then mark up the plan as usual.
Choose File, then Export PDF (to scale), and wait for the PDF to download. Only sheets carrying measurements are included.
Print or plot at 100%, sometimes called Actual size. Fit to page shrinks the sheet, so a scale rule no longer reads true; the drawn scale bar stays correct at any size.
Check the exported sheets: an uncalibrated page is marked NOT TO SCALE with no scale bar, and an uncalibrated image plan is left out because its real sheet size cannot be worked out.
A calibrated image plan has no sheet size of its own, so it is placed on a synthesised sheet at a standard ratio, bounded by A0.
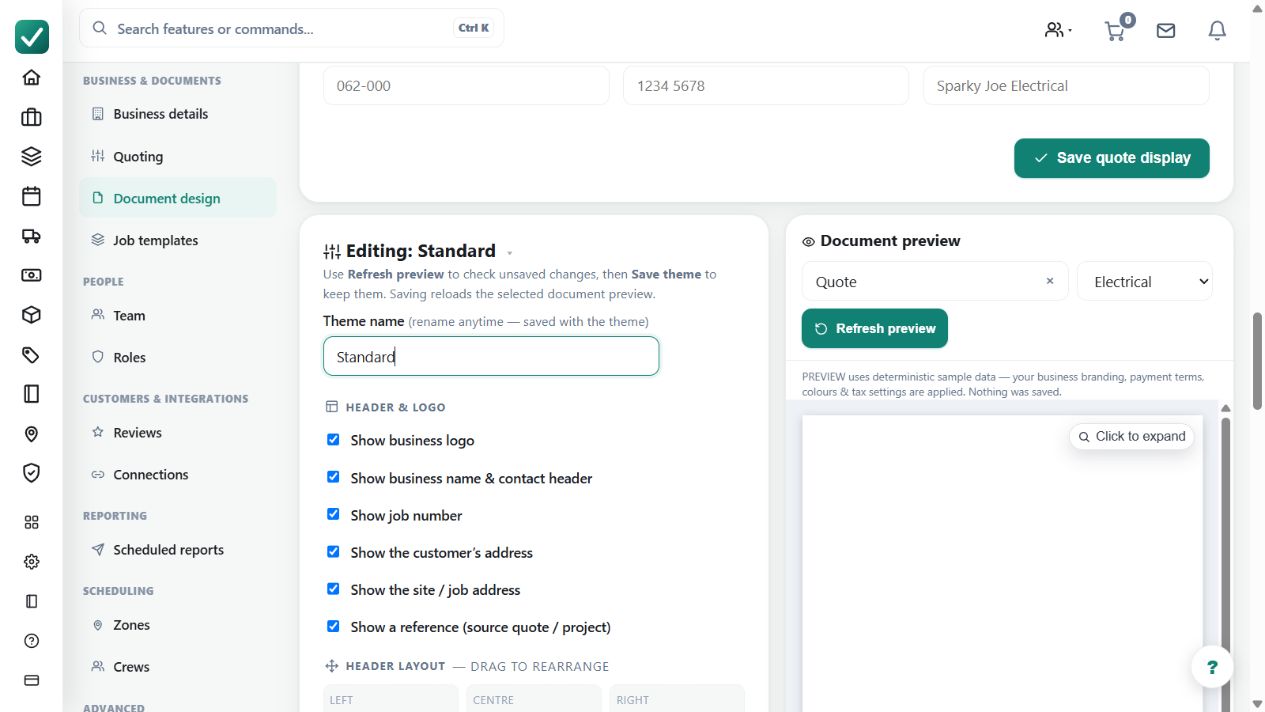
Demo screenshot. The document theme editor controls customer-facing presentation. Save a theme and inspect an actual quote or invoice PDF before using it for customers. Select the image to enlarge.
What
Controls document branding, colours, headers, line columns, terms, payment text, and PDF presentation.
Roles
owneroffice
How
Open Business settings > Documents or go to /group-settings?tab=documents.
Use the theme list to edit, duplicate, preview, or set the default document theme.
Set the theme colours, logo/header options, line display, terms, payment text, and invoice wording.
Save the theme, then open a quote or invoice PDF to confirm the customer document looks right.
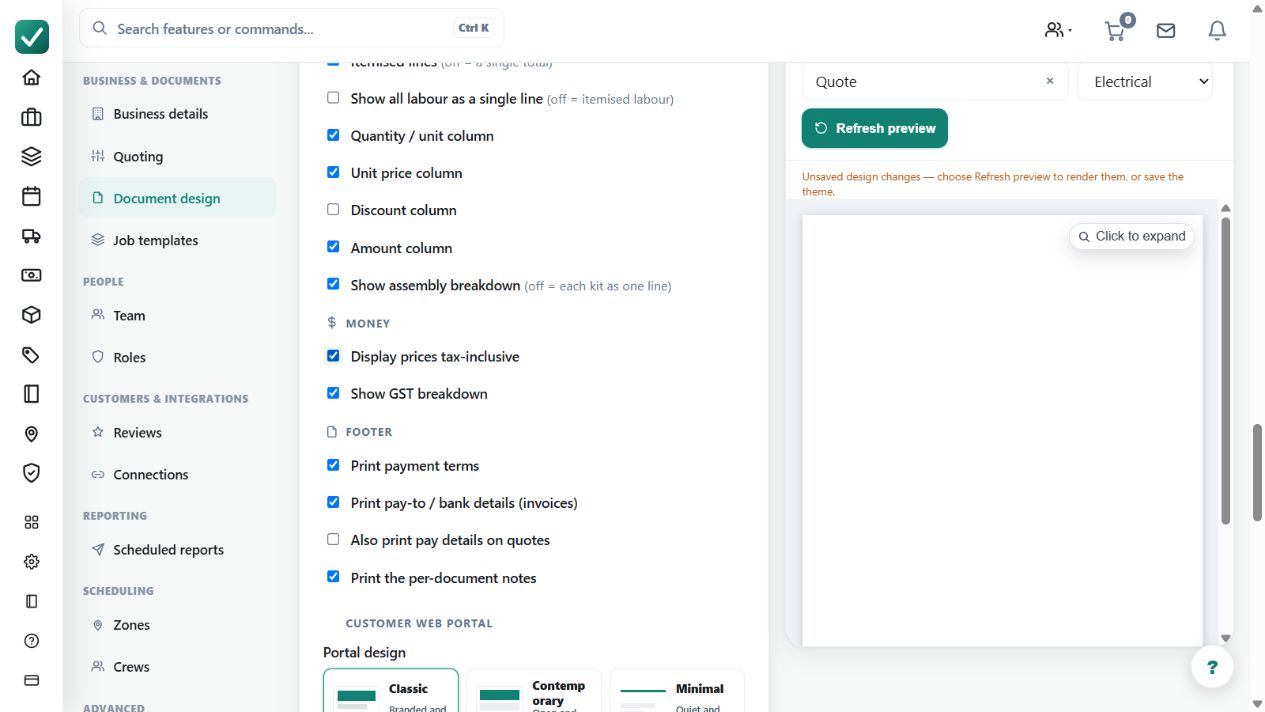
Demo screenshot. The theme's tax-inclusive display option is selected in this example. Display settings and the business's tax registration and rate are separate decisions. Select the image to enlarge.
What
Sets whether new quotes and invoices treat typed prices as tax-inclusive or tax-exclusive when tax is enabled.
Roles
owneroffice
How
Open Business settings > Documents at /group-settings?tab=documents.
Confirm the business tax setting is on in the business/accounting settings if the business is registered.
Edit the active document theme and choose whether customer prices display tax-inclusive or tax-exclusive.
Create a quote or invoice and check the totals area before sending so tax is shown the way the business expects.
Demo screenshot. The theme's line-display controls let you choose how labour appears on the customer document. Preview the PDF to check the resulting layout. Select the image to enlarge.
What
Collapses all labour on customer documents into a single labour line when the theme toggle is enabled.
Roles
owneroffice
How
Open Business settings > Documents.
Edit the customer document theme used for quotes and invoices.
Turn on the labour single-line option when customers should see one labour total instead of every labour task.
Save the theme and preview a quote/invoice PDF to confirm labour is collapsed for the customer copy.
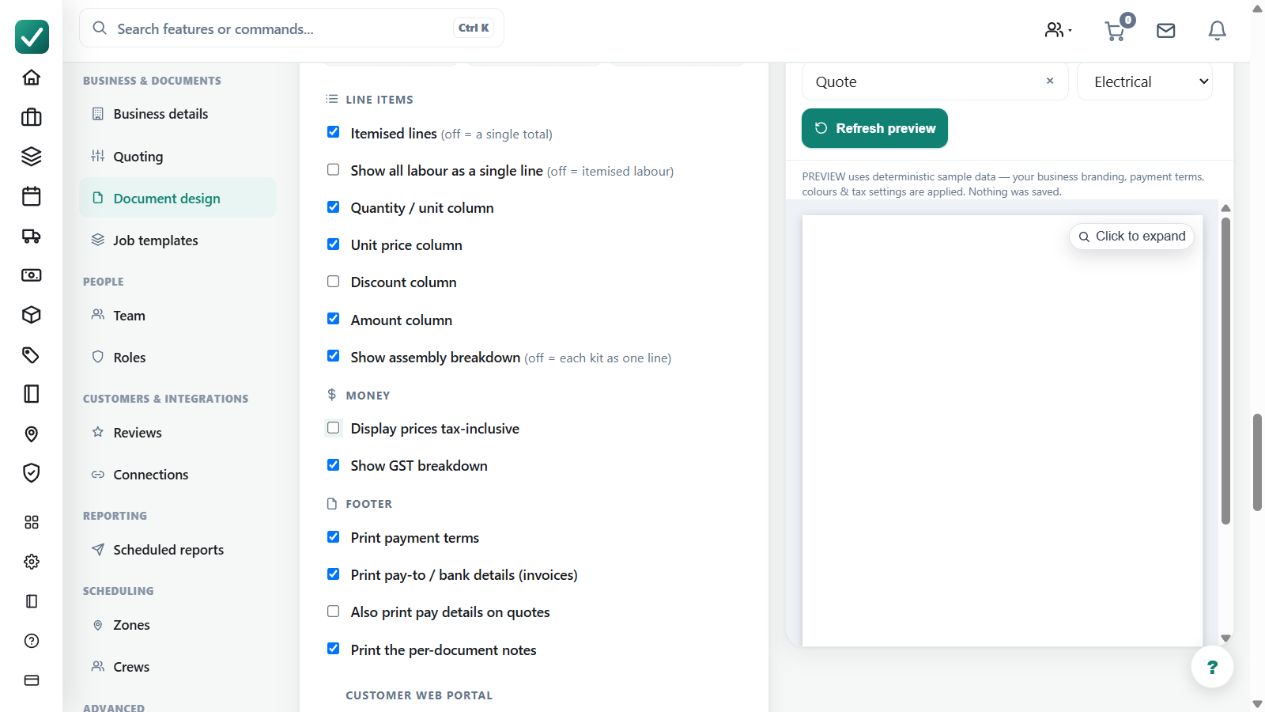
Demo screenshot. Assembly and line-display options in the document theme. Changing customer presentation does not remove the assembly's underlying cost and quantity detail. Select the image to enlarge.
What
Controls whether assemblies and kits show their component breakdown or collapse to one customer-facing line.
Roles
owneroffice
How
Open Business settings > Documents and edit the active quote/invoice theme.
Find Show assembly breakdown (off = each kit as one line).
Turn it on when customers should see every kit component; turn it off when each kit should print as one summary line.
Save the theme, then open a quote that contains a kit and preview the customer PDF.
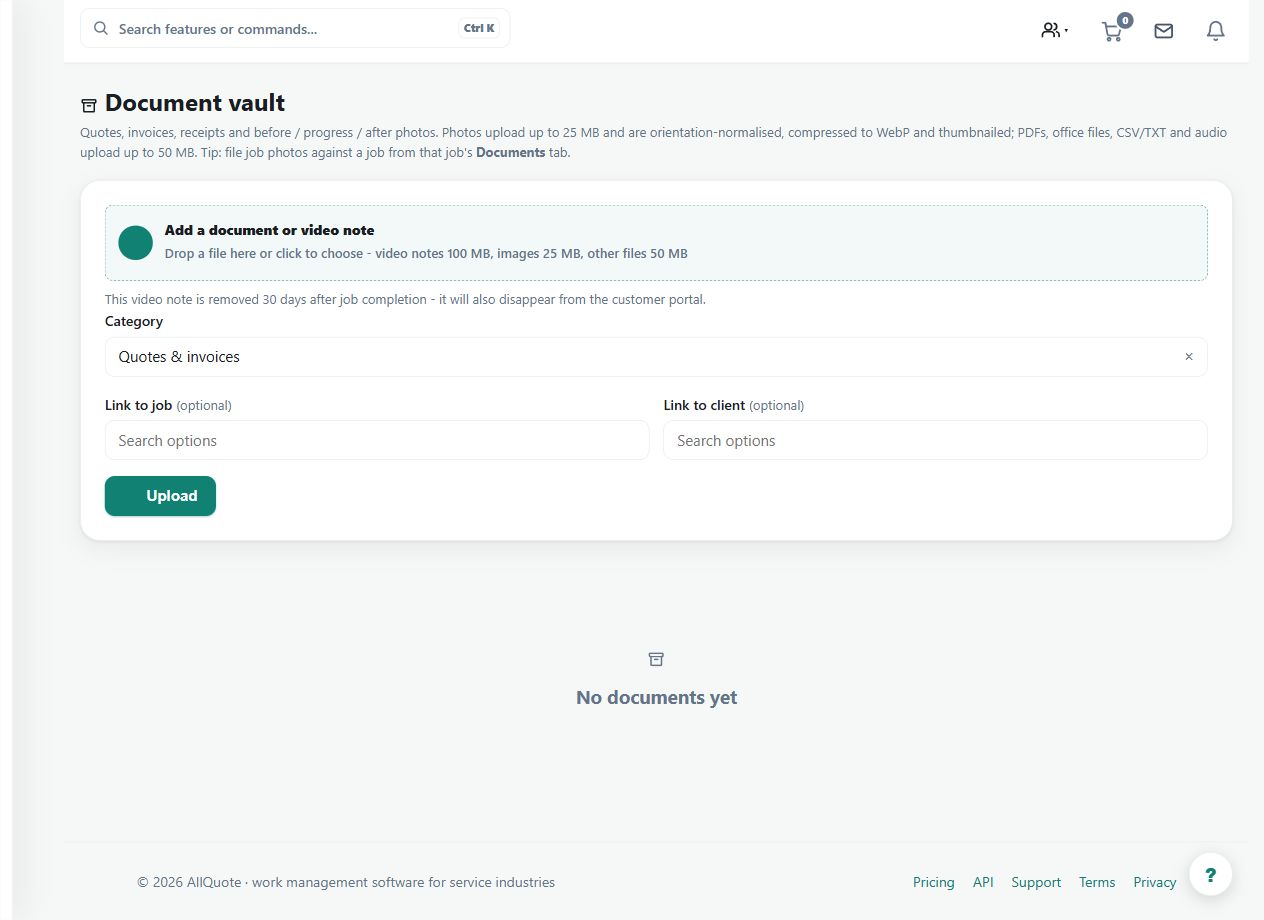
Demo screenshot. The Document vault's upload and access controls. This example shows the setup screen, not an uploaded customer document; choose the intended audience before uploading. Select the image to enlarge.
What
Stores job and customer documents - photos, plans, receipts, PDFs, office files, audio and video notes - in one searchable vault. Paid plans include 100 GB; extra 100 GB blocks are available.
How
Open the vault at /documents.
Upload or find documents by job, customer or category.
Open a document for its preview and linked records.
Watch storage usage; additional 100 GB blocks can be added on paid plans.
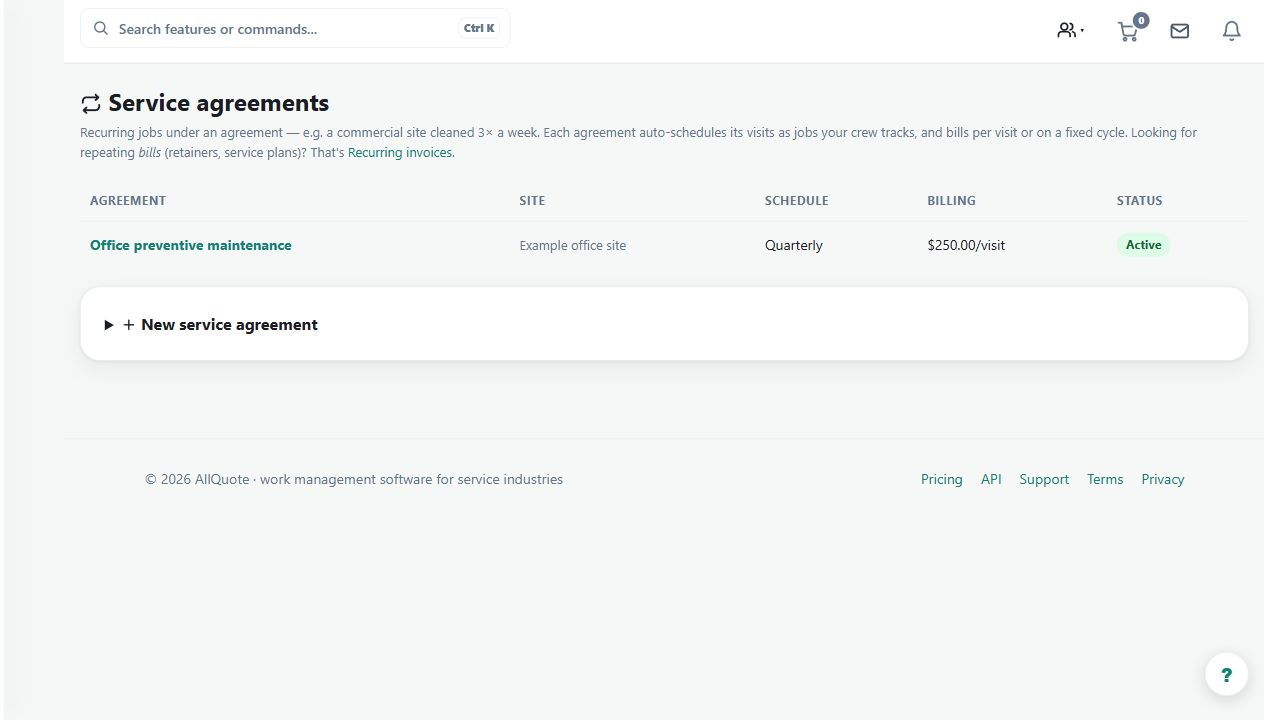
Demo screenshot. A fictional quarterly office-maintenance agreement is listed in the service-agreement register. Review its recurrence, billing mode and generated visits before scheduling work. Select the image to enlarge.
What
Creates repeat service visits and billing from a saved agreement, recurrence, scope, and billing mode.
Roles
owneroffice
How
Open Service agreements from Jobs and create an agreement for the customer and site.
Set the service scope, recurrence, start date, visit settings, and billing mode.
Review each generated visit in Jobs or Calendar before assigning crew and completing the work.
Pause or end the agreement when visits should stop, and review generated invoices before sending.
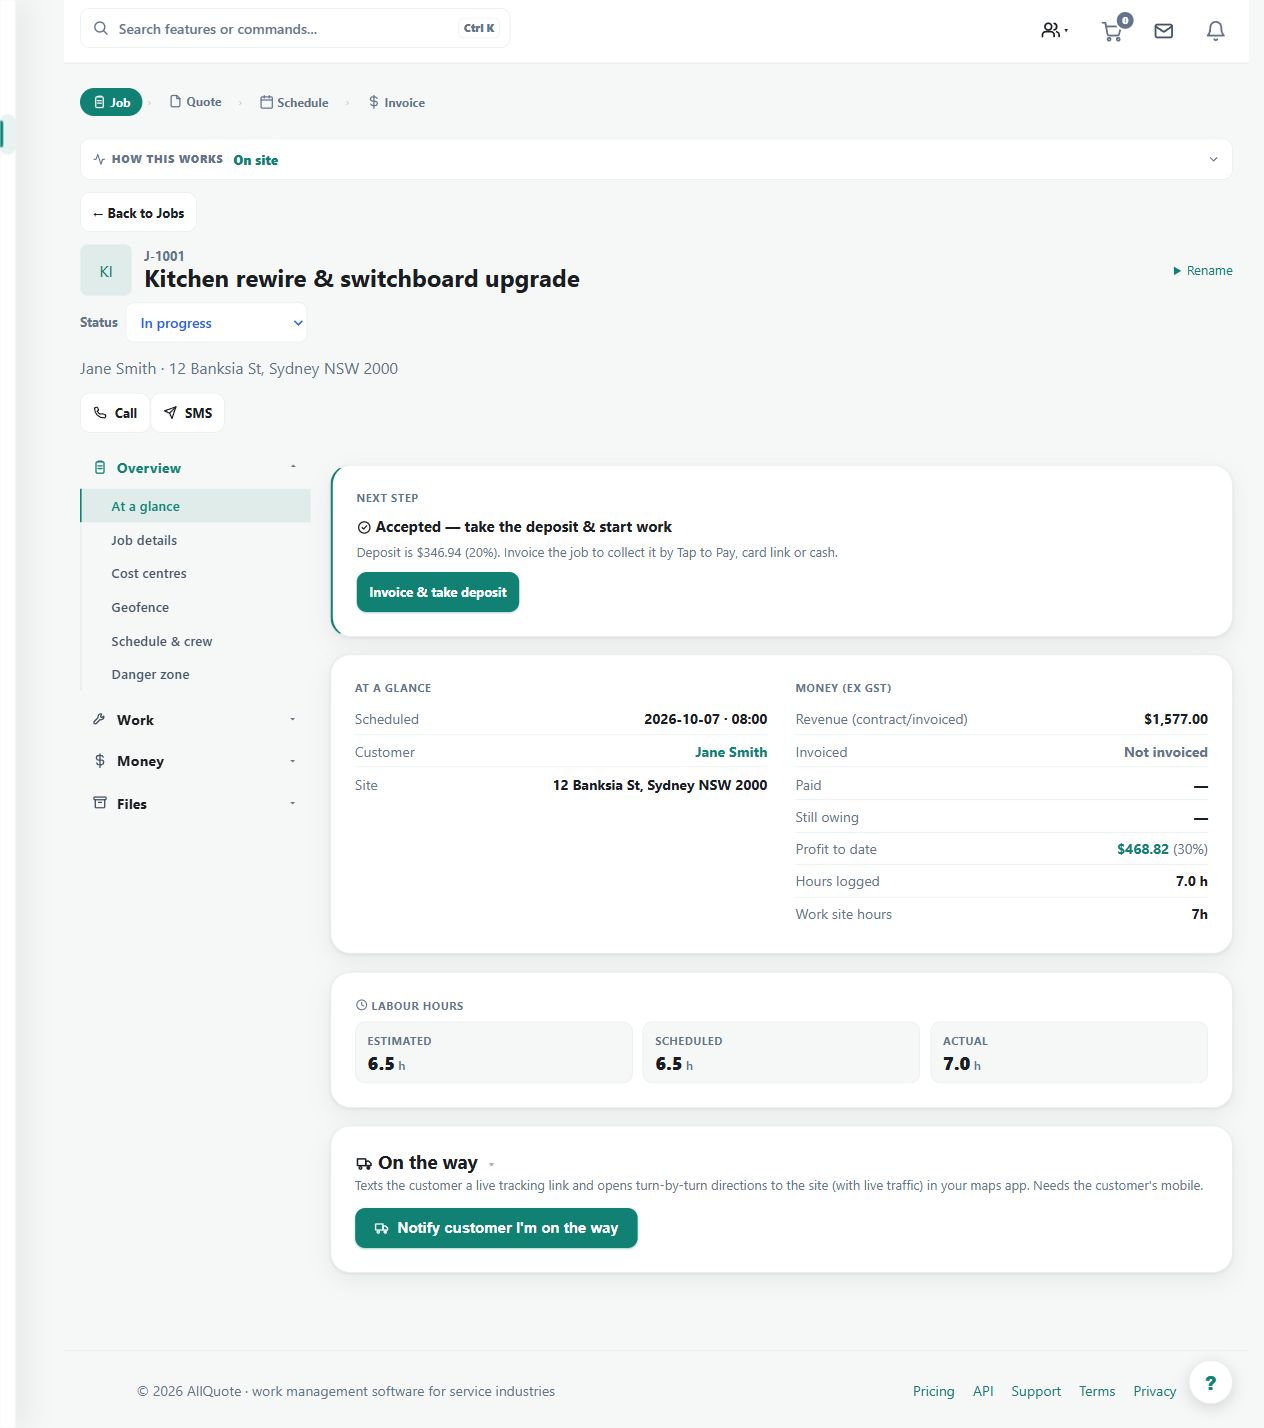
Demo screenshot. A populated job links its accepted quote, deposit, schedule, hours and financial position. A work status alone does not establish that every invoice has been paid. Select the image to enlarge.
What
Tracks the work path from quote, accepted quote, deposit, scheduled work, invoice, balance paid, and completion.
How
Create a quote from /quote/new or open an existing quote from the jobs/quotes list.
When the customer accepts, open the linked job from Jobs at /jobs.
Use the job's lifecycle/status controls to move from scheduled work to in progress, invoiced, paid, and complete.
Keep schedule, crew, files, costs, invoice, and payment details on the linked job so the audit trail stays together.
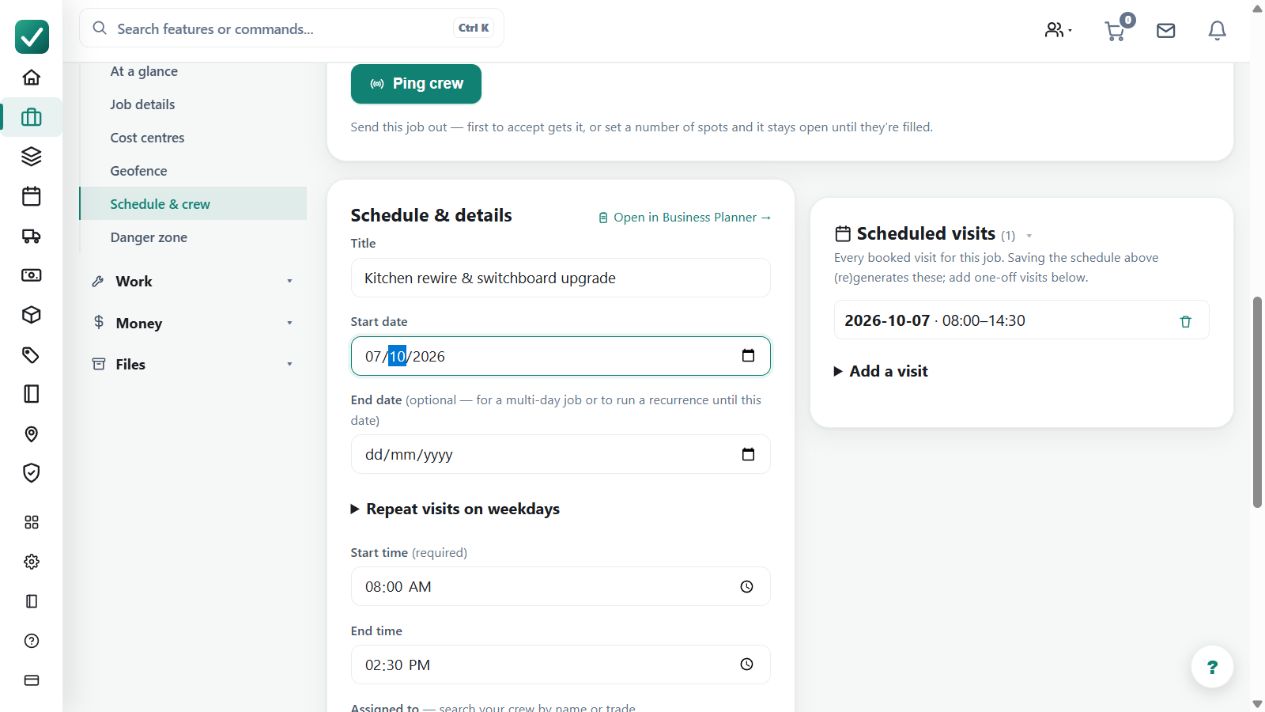
Demo screenshot. A saved example visit runs from 08:00 to 14:30 with Mia Harper assigned. Schedule dates, work completion and payment completion are separate records. Select the image to enlarge.
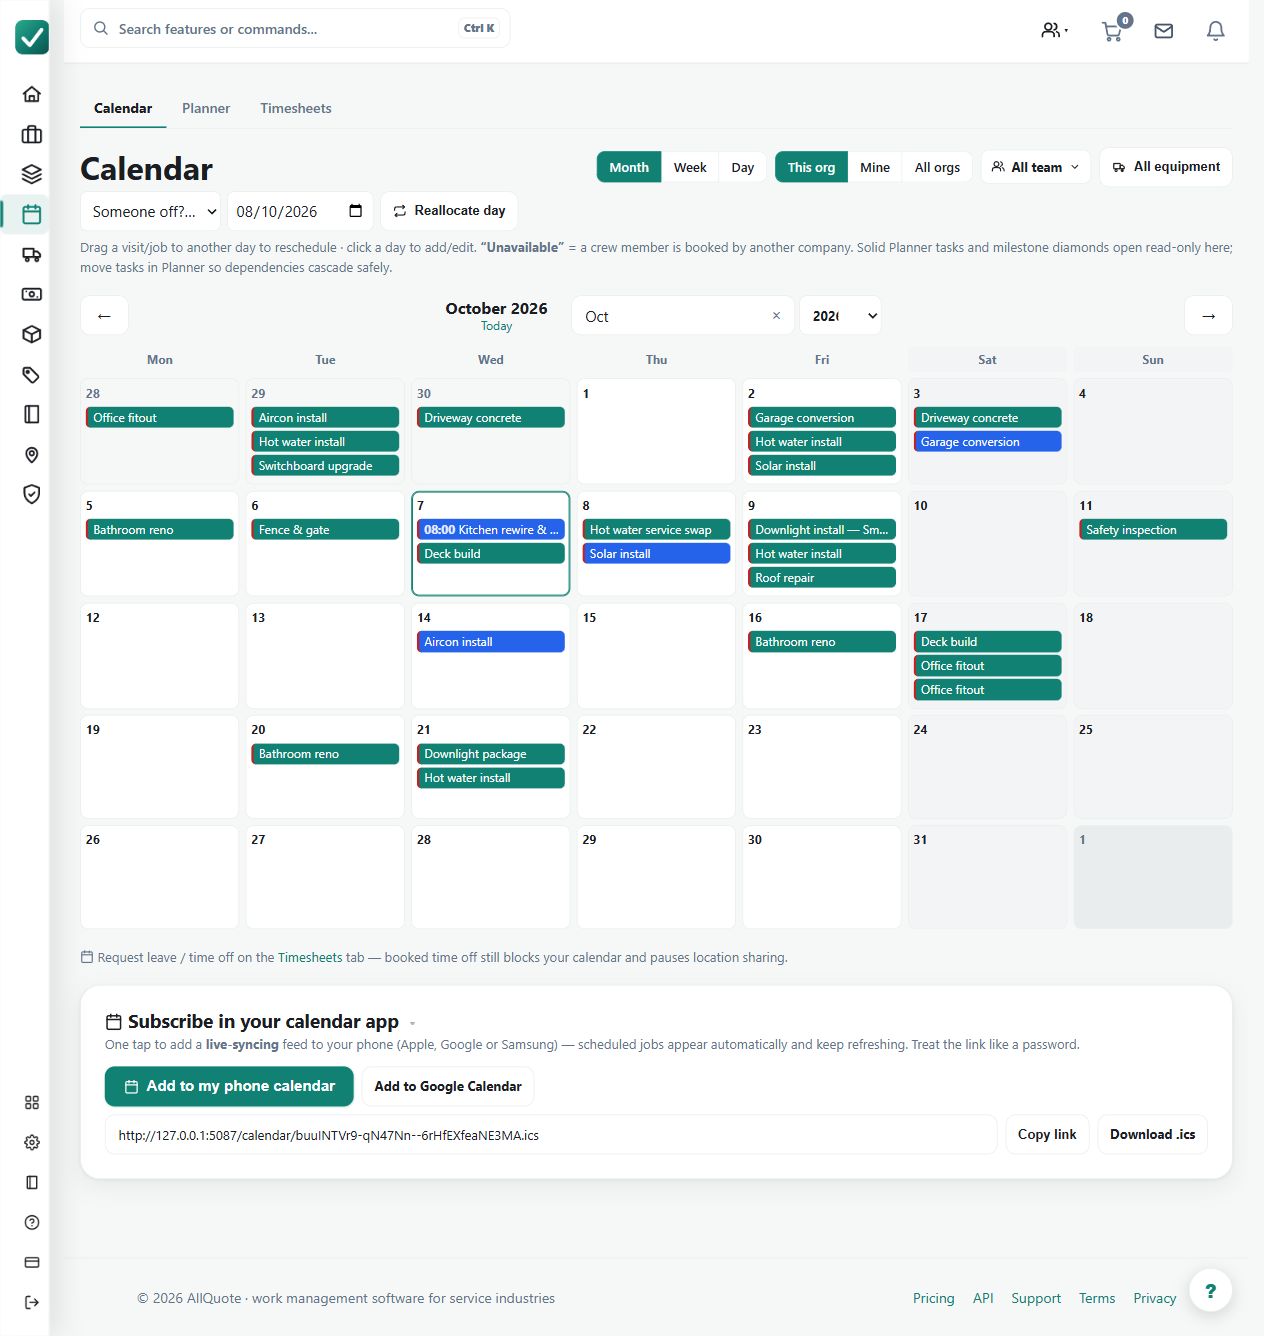
Demo screenshot. The calendar displays the demo job schedule. External calendar availability requires its own feed setup; a populated calendar does not prove that an external feed is connected. Select the image to enlarge.
What
Shows scheduled work in month, week and day views and can expose the schedule to external calendars over iCal where configured.
How
Open the jobs calendar at /jobs/calendar.
Switch between month, week and day views for the period being planned.
Open a job from the calendar to check or change its schedule.
Configure iCal sync where an external calendar should carry the AllQuote schedule.
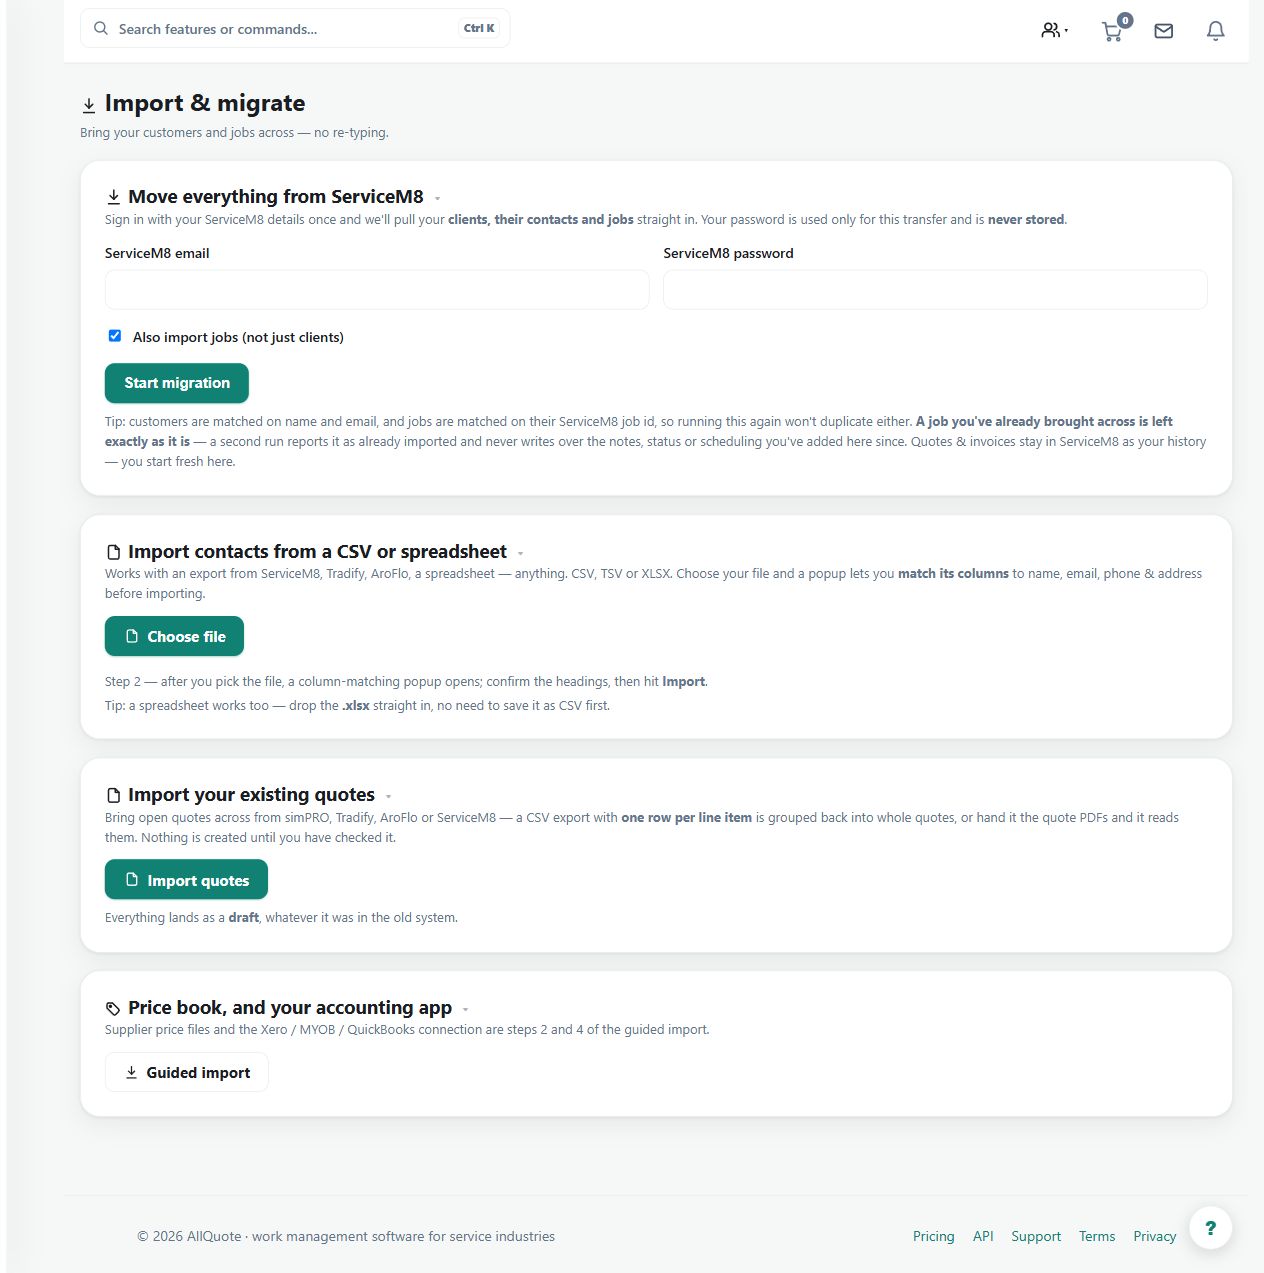
Demo screenshot. The import screen offers data-source and file choices. Review the mapping and preview before importing your own customer, job or catalogue data. Select the image to enlarge.
What
Brings existing customers, jobs and operating data into AllQuote from CSV files or a ServiceM8 export, so setup does not start from a blank account.
How
Open Import at /import.
Choose the CSV import or the ServiceM8 import for the data being moved.
Upload the file and review what will be created before confirming.
Check the imported records in Contacts and Jobs before quoting against them.
Demo screenshot. The supplier-price CSV panel provides an import matcher and CSV export. This image demonstrates the CSV entry point; email-in additionally requires the configured inbound address and an actual received file. Select the image to enlarge.
What
Imports supplier price files from CSV or an email-in flow so price book rows stay close to the supplier data used for quoting and purchasing.
How
Open the Price book at /pricebook.
Import the supplier's price file from CSV, or send it to the email-in address where configured.
Review the updated supplier rows and effective prices.
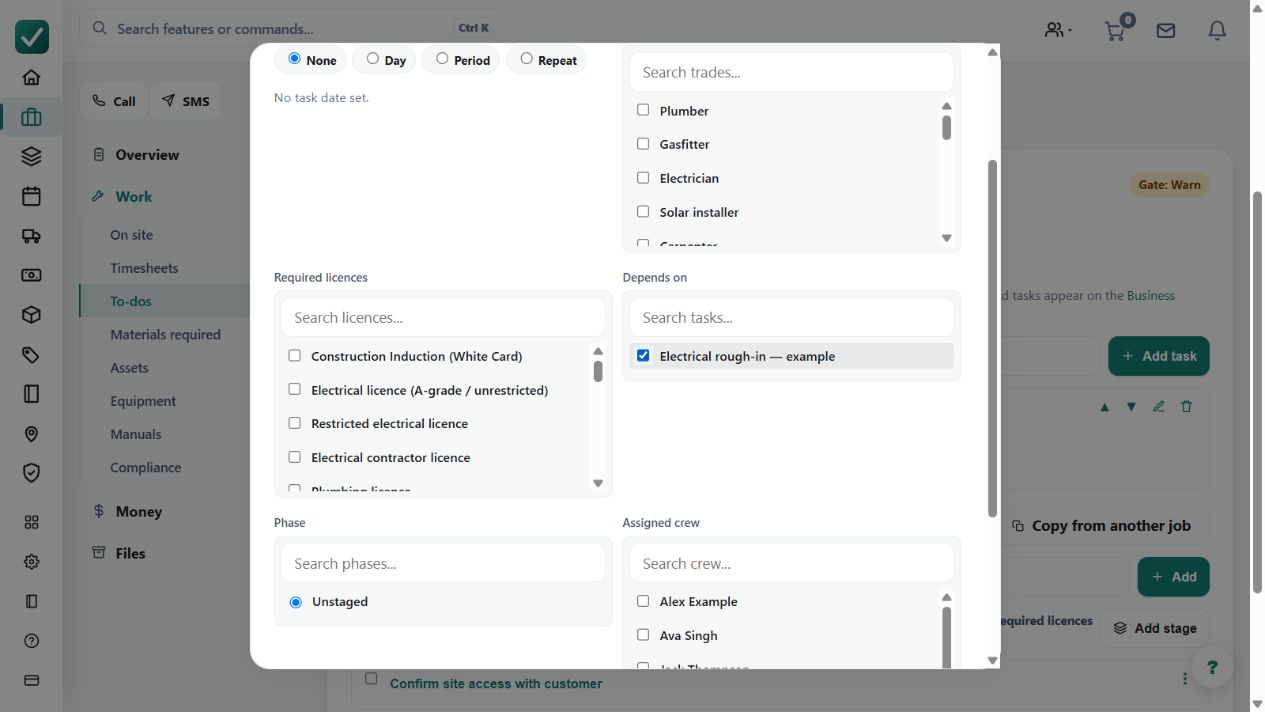
Demo screenshot. The fit-off example selects Electrical rough-in as its predecessor in the task editor. Save the task and check its dependency before assigning or completing downstream work. Select the image to enlarge.
What
Links tasks so one task depends on another; completing a task before its parent is done warns by default, and can be set to block or to show the link only.
How
Open the job and its tasks.
Link the dependent task to its parent task.
Choose the enforcement in Business settings > Features: Warn, Hard or Disabled.
Complete tasks in dependency order, or record an override where Warn allows it.
Demo screenshot. The job-costing report separates revenue and cost information for the example business. For a no-quote job, select and verify its billing method separately; this report alone does not set Cost + Margin. Select the image to enlarge.
What
Bills no-quote jobs as materials and receipt costs x (1 + markup%) plus approved labour at charge-out rate. Labour and expense/material billing can be toggled.
Roles
owneroffice
How
Open Jobs, choose a job that does not have a linked quote, then open the Money tab.
Turn on Cost + Margin for the job.
Set the margin percentage and choose whether labour and expense/material costs are billable.
Use the billing action for unbilled costs only after the costs and approved labour are correct.
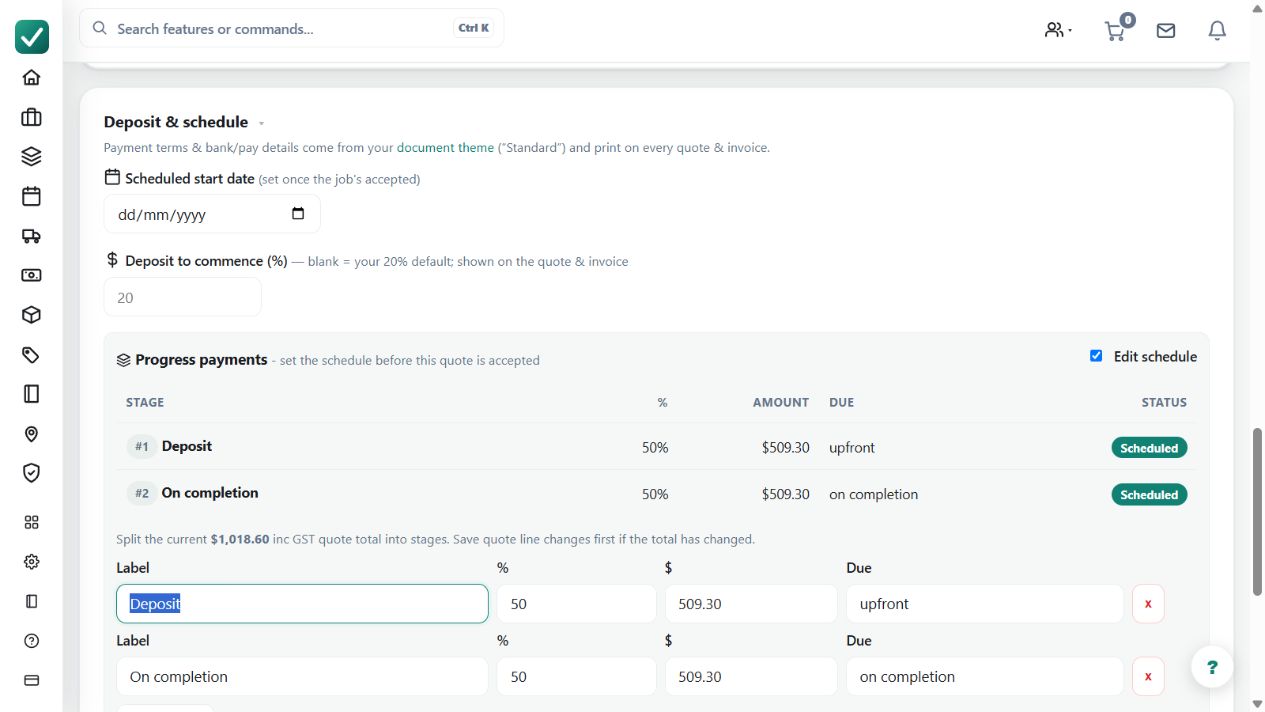
Demo screenshot. The quote's Deposit & schedule panel shows the deposit setting and two 50% payment stages. These are scheduled amounts, not evidence of money collected. Select the image to enlarge.
What
Lets the business request and track deposits before work starts, including defaults and customer payment flow.
Roles
owneroffice
How
Open Business settings > Quoting at /group-settings?tab=quoting.
Set the default deposit percentage or wording the business wants on new quotes.
Send the quote and let the customer pay from the customer copy, or record the deposit from the quote/job/invoice flow.
Open the linked job or invoice list to confirm the deposit is shown before scheduling or final invoicing.
Demo screenshot. The example quote splits $1,018.60 into a $509.30 deposit and a $509.30 completion stage. Review the full 100% schedule before acceptance; each stage still needs its proper invoice and payment record. Select the image to enlarge.
What
Splits accepted work into payment stages so invoices can be raised as milestones are reached.
Roles
owneroffice
How
Open the accepted quote or its linked job.
Set up the payment stages/milestones before invoicing begins.
When a milestone is reached, raise the matching stage invoice from the job or invoice screen.
Track the stage invoice in Invoices at /invoices until it is sent, paid, or reconciled.
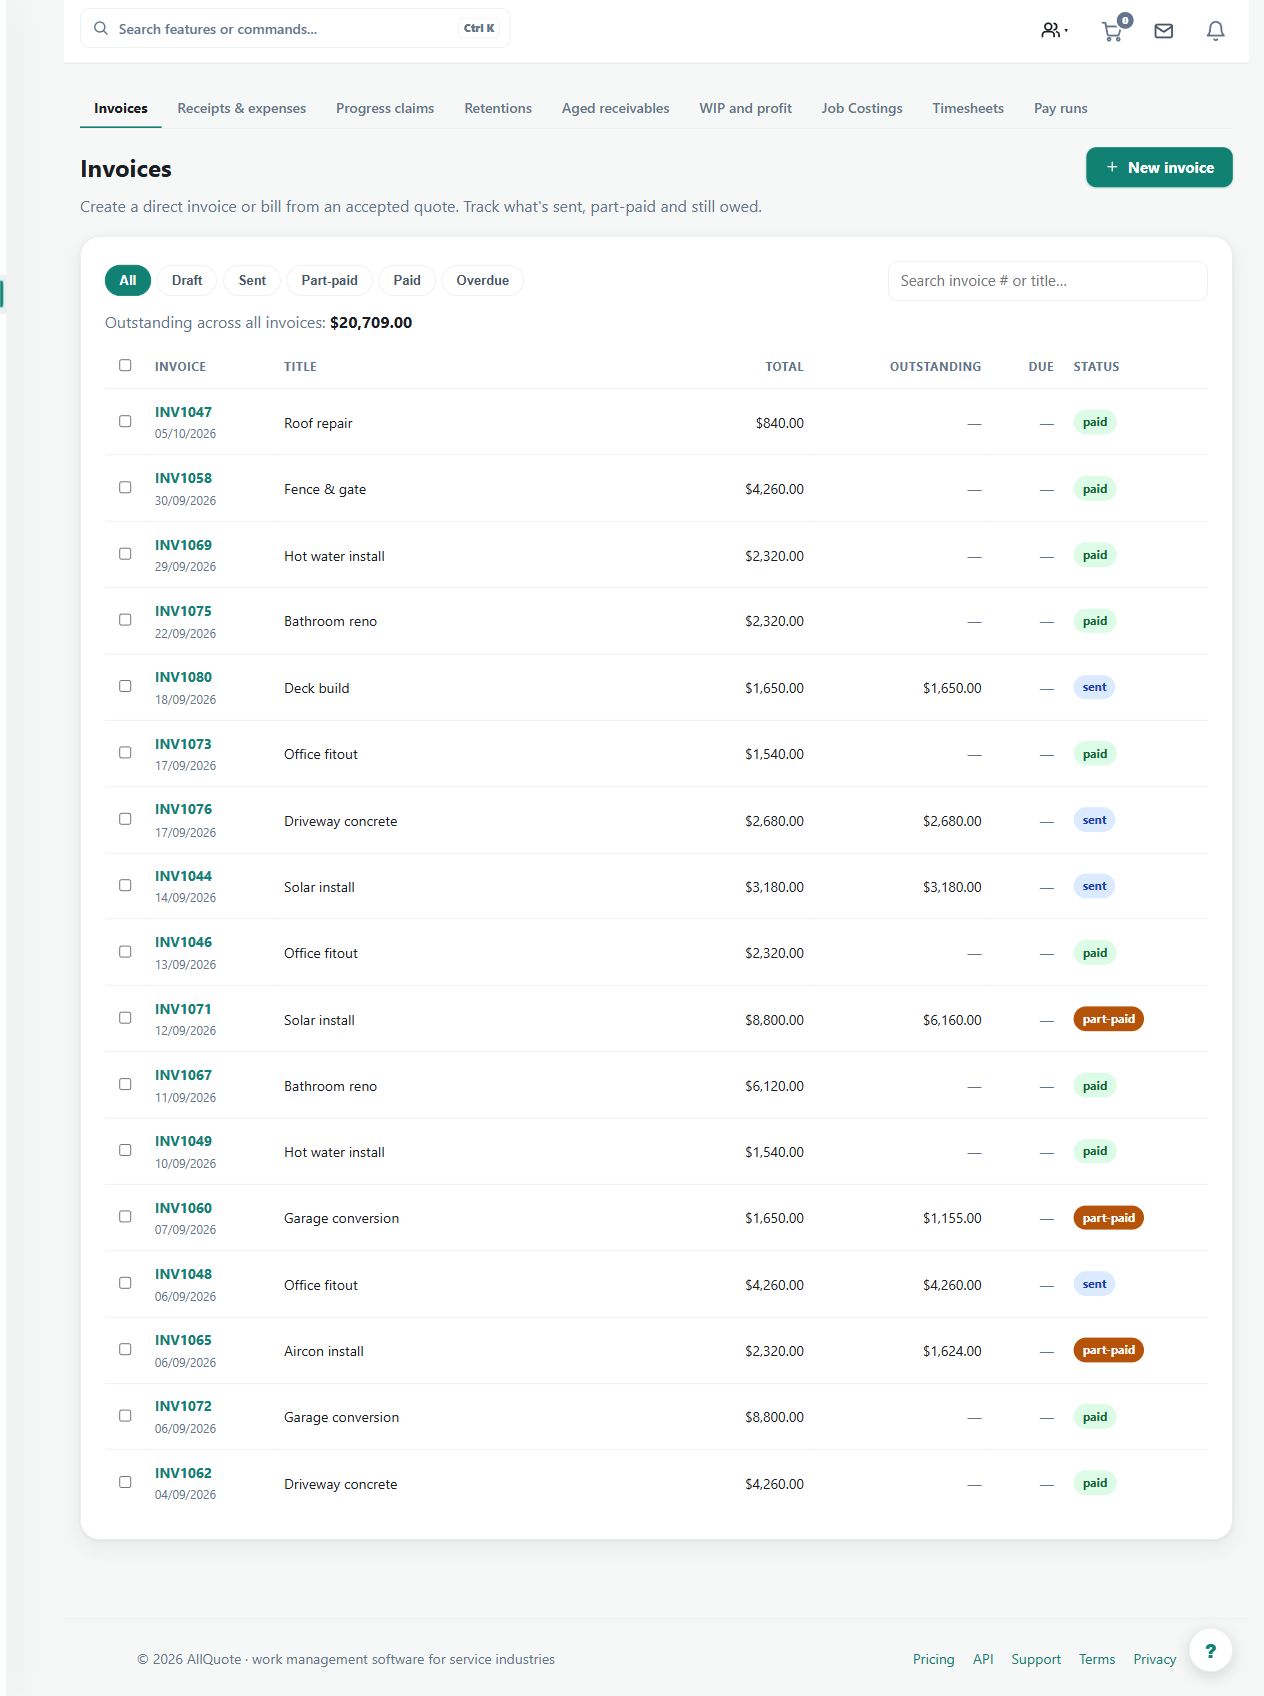
Demo screenshot. The Money list shows fictional paid, part-paid and sent invoices with outstanding balances. Open the correct invoice before recording or collecting a payment. Select the image to enlarge.
What
Shows draft, outstanding, paid, deposit, stage, and final invoices, including payment status and customer payment links.
Roles
owneroffice
How
Open Invoices from the sidebar or go to /invoices.
Filter or open the invoice you need, then check whether it is draft, sent, outstanding, paid, deposit, stage, or final.
Use the invoice actions to send, record payment, or use the connected payment/accounting provider where configured.
Return to the linked job's Money tab to confirm the job balance and payment status now match.
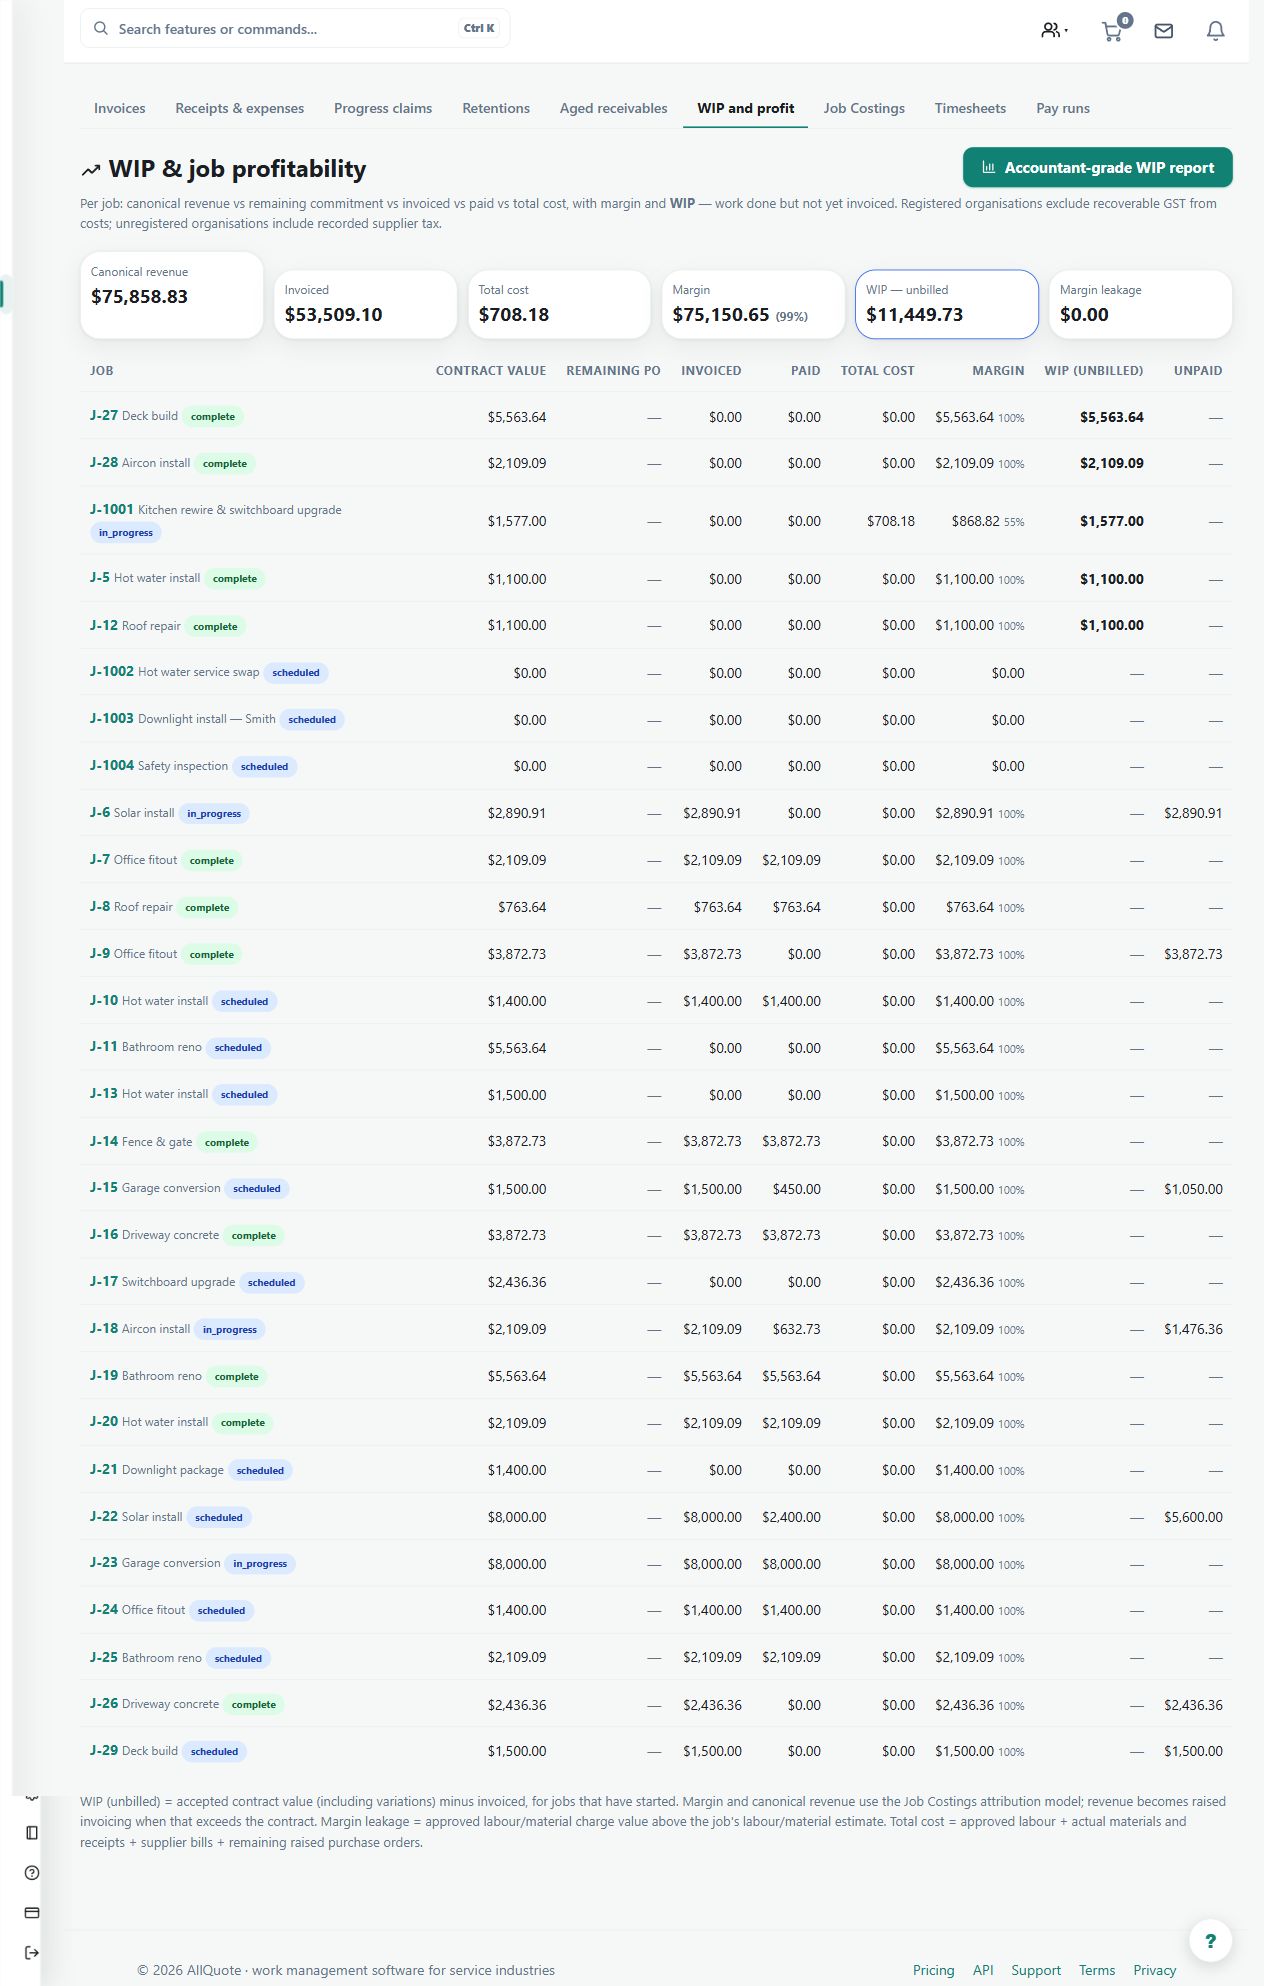
Demo screenshot. The WIP screen shows the example business's job and billing position. Use actual costs and approved revenue inputs when assessing live job profitability. Select the image to enlarge.
What
Shows Team-plan job profitability and work in progress from the money already recorded against each job.
Roles
owneroffice
How
Open WIP & job profitability at /wip to review the current Team-plan dashboard.
Review each open job's quoted or contract value, recognised work, invoiced amount, costs and current profit position.
Open a job when a figure needs checking, then correct the source invoice, approved time, receipt, expense or supplier bill rather than editing the report.
For an as-at date, use the Business Job Costings workspace at /job-costings or the Accountant-grade WIP report at /wip/report; the Team /wip dashboard has no reporting-date control.
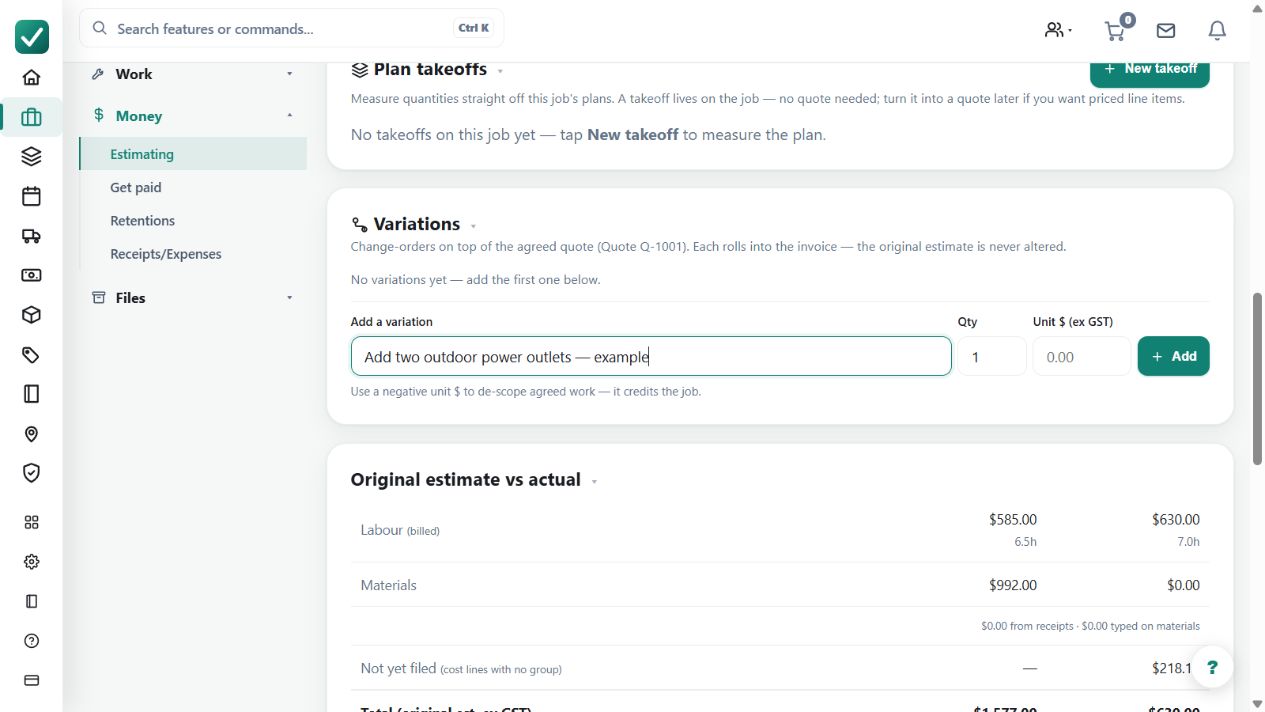
Demo screenshot. The variation entry area contains a draft request for additional work. This is a preparation example; it does not show customer approval or an issued variation invoice. Select the image to enlarge.
What
Records extra or changed work against the job's quote, tracks whether each variation is still open or billed, and names the document that billed it.
Roles
owneroffice
How
Open the job and use Add variation, describing the extra or changed work it covers.
Check the amount: a credit is refused only if it would take the quote, or an open invoice, below zero. Reducing below money the customer has already paid is allowed on purpose -- a deposit-heavy job can lose scope.
Bill the variation with the next invoice, or leave it open -- the job shows which variations are still unbilled.
The customer's document folds the variation into the quote it belongs to, so they read one coherent total rather than a pile of addenda.
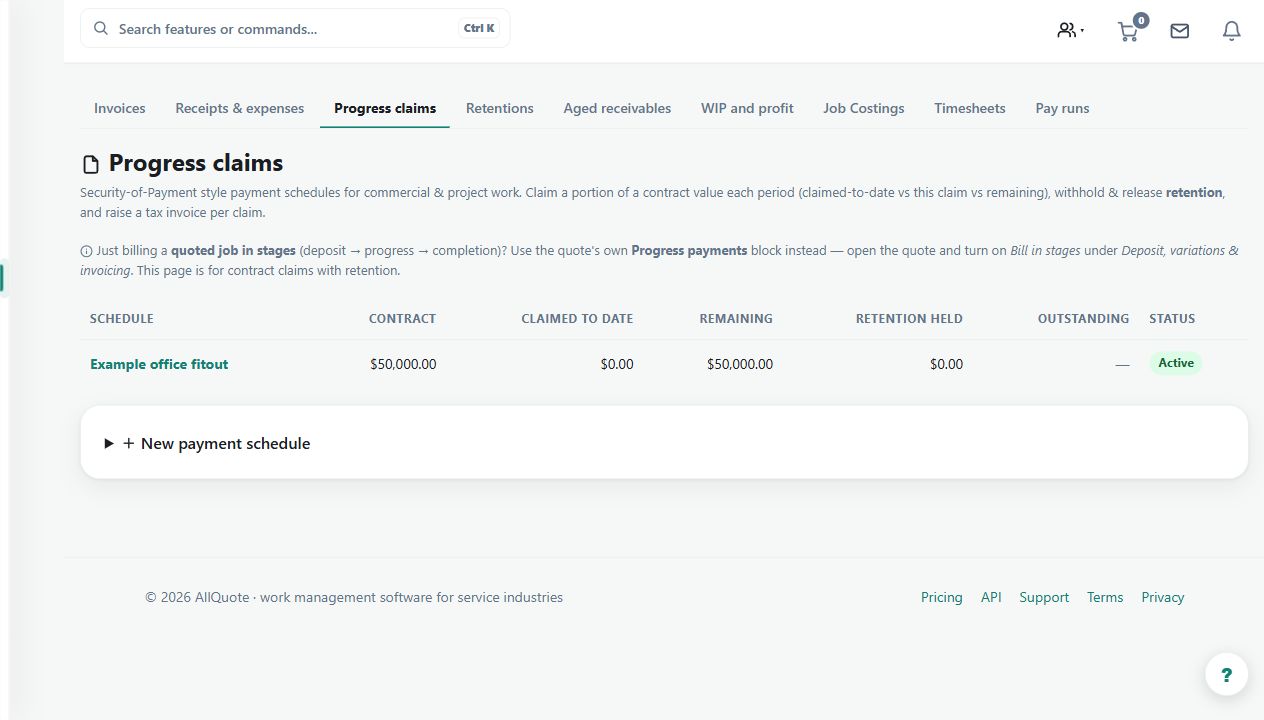
Demo screenshot. A $50,000 office-fitout claim schedule is listed with rough-in and fit-off scope prepared in the demo business. A schedule is not a certified claim or a payment. Select the image to enlarge.
What
Tracks cumulative work claimed against a contract value and raises the matching progress invoice without losing earlier claims.
Roles
owneroffice
How
Open Progress claims and create a claim schedule for the customer, job and contract value.
Add the claim stages or claim-to-date figures, then check the amount for this claim, retention and remaining value.
Issue the claim invoice only after the cumulative totals and customer details are right.
For a later correction, return to the claim schedule so the issued claim stays in the history and the next claim carries the adjustment.
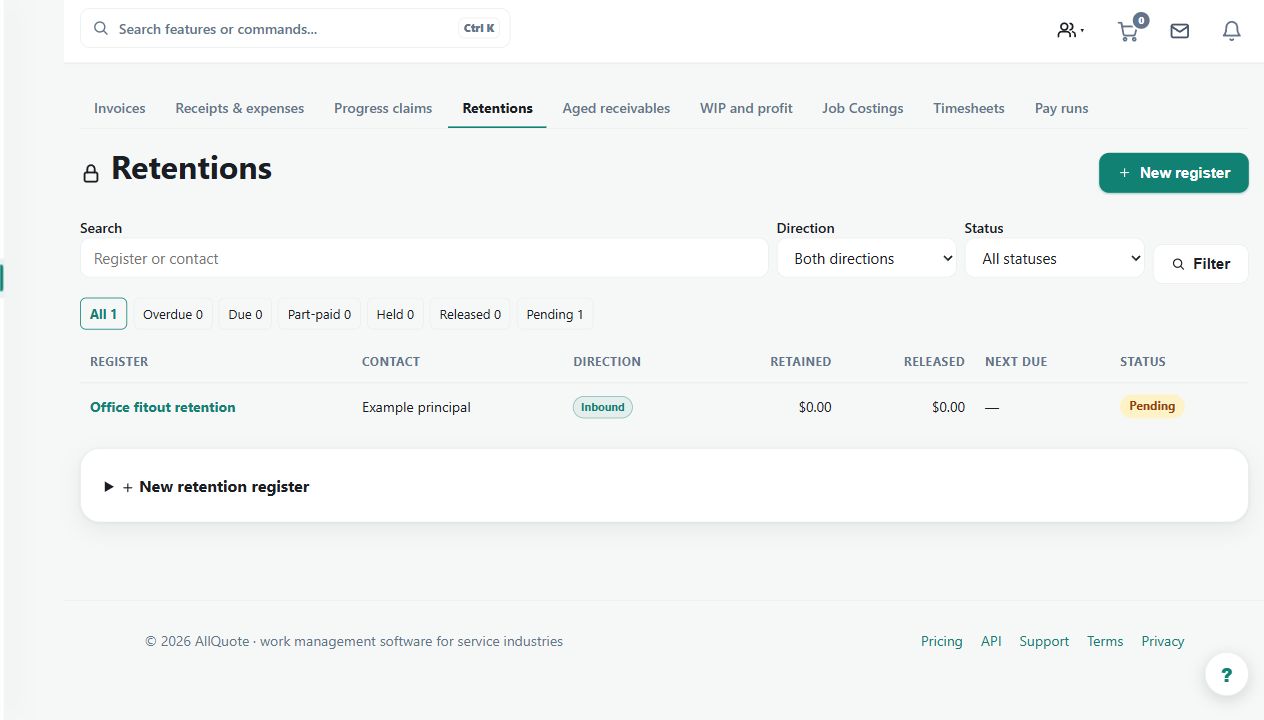
Demo screenshot. An inbound Office fitout retention register links the example principal and job. Record withholding and release events against the agreed contract; an empty register is not a retained balance. Select the image to enlarge.
What
Keeps retention held, due and released in a register linked to the job and its Money tab.
Roles
owneroffice
How
Open Retentions or start a new register from the job's Money tab.
Choose the job, counterparty and inbound or outbound direction, then enter the retained value and release rules.
Record each amount withheld, adjusted or released so the remaining balance and due status stay current.
Use the job Money tab to review linked registers, progress-claim links, releases and the event history.
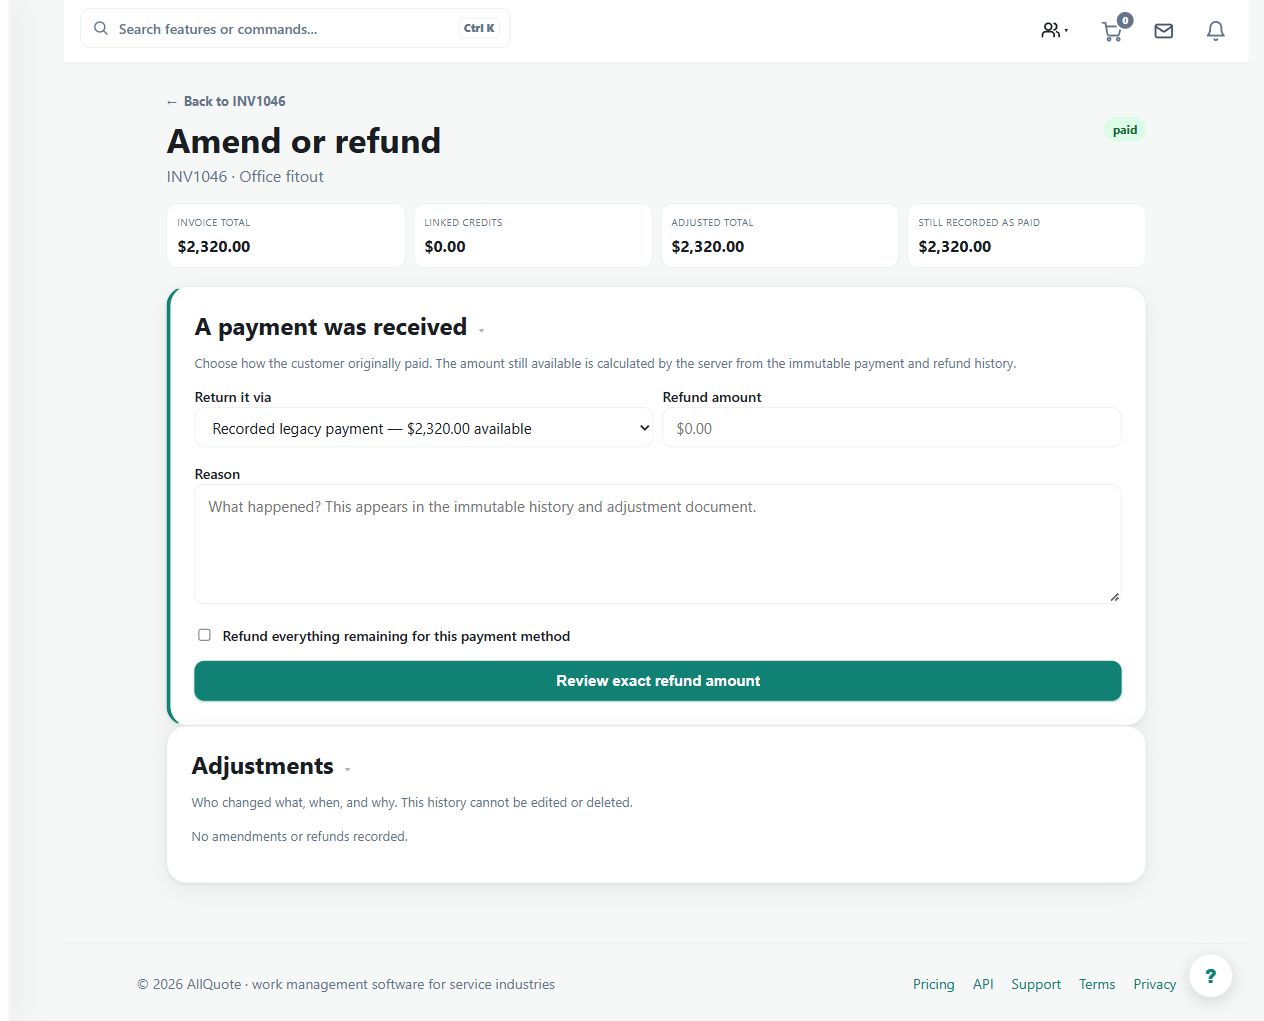
Demo screenshot. The paid invoice opens the amendment/refund chooser with its recorded payment balance. No refund has been submitted; review the exact amount, method and reason before confirming any return. Select the image to enlarge.
What
Uses one decision flow for unpaid corrections, cancellations and paid refunds while keeping an immutable money history.
Roles
owneroffice
How
Open the invoice from Invoices or the job's Money tab, then choose Amend or refund.
Follow the questions about invoice type and money received; progress invoices return to their stage or claim history instead of being rewritten.
Enter the reason and amount. A refund cannot exceed money received and still available after earlier refunds.
Review the outcome, complete the final confirmation, then check the uneditable adjustment history and accounting-sync result before retrying or making a provider-side correction.
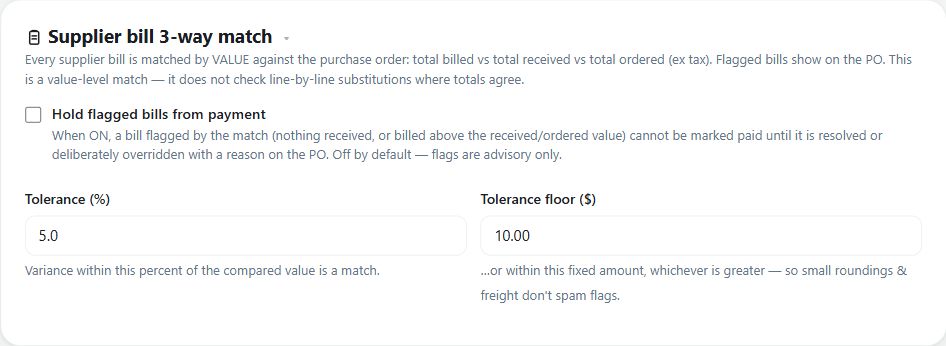
Demo screenshot. The matching settings explain the value-level comparison of billed, received and ordered amounts, tolerance and optional payment hold. Matching totals do not prove line-by-line substitutions are correct. Select the image to enlarge.
What
Matches every supplier bill by value against its purchase order - total billed vs total received vs total ordered, ex tax - and flags mismatches on the PO. It is a value-level match, not a line-by-line substitution check.
Roles
owneroffice
How
Open Purchase orders and choose the order; flagged bill matches show on the PO with their status.
Receive the goods against the PO so the match can re-evaluate - a late receipt clears a nothing-received flag automatically.
To deliberately accept a flagged bill, override the match on the PO; a reason is mandatory and the actor and time are recorded.
To hold flagged bills from payment, turn on Hold flagged bills from payment under Business settings > Quoting > Supplier bill 3-way match. It is off by default; tolerances follow the percent-of-baseline plus cents-floor rule.
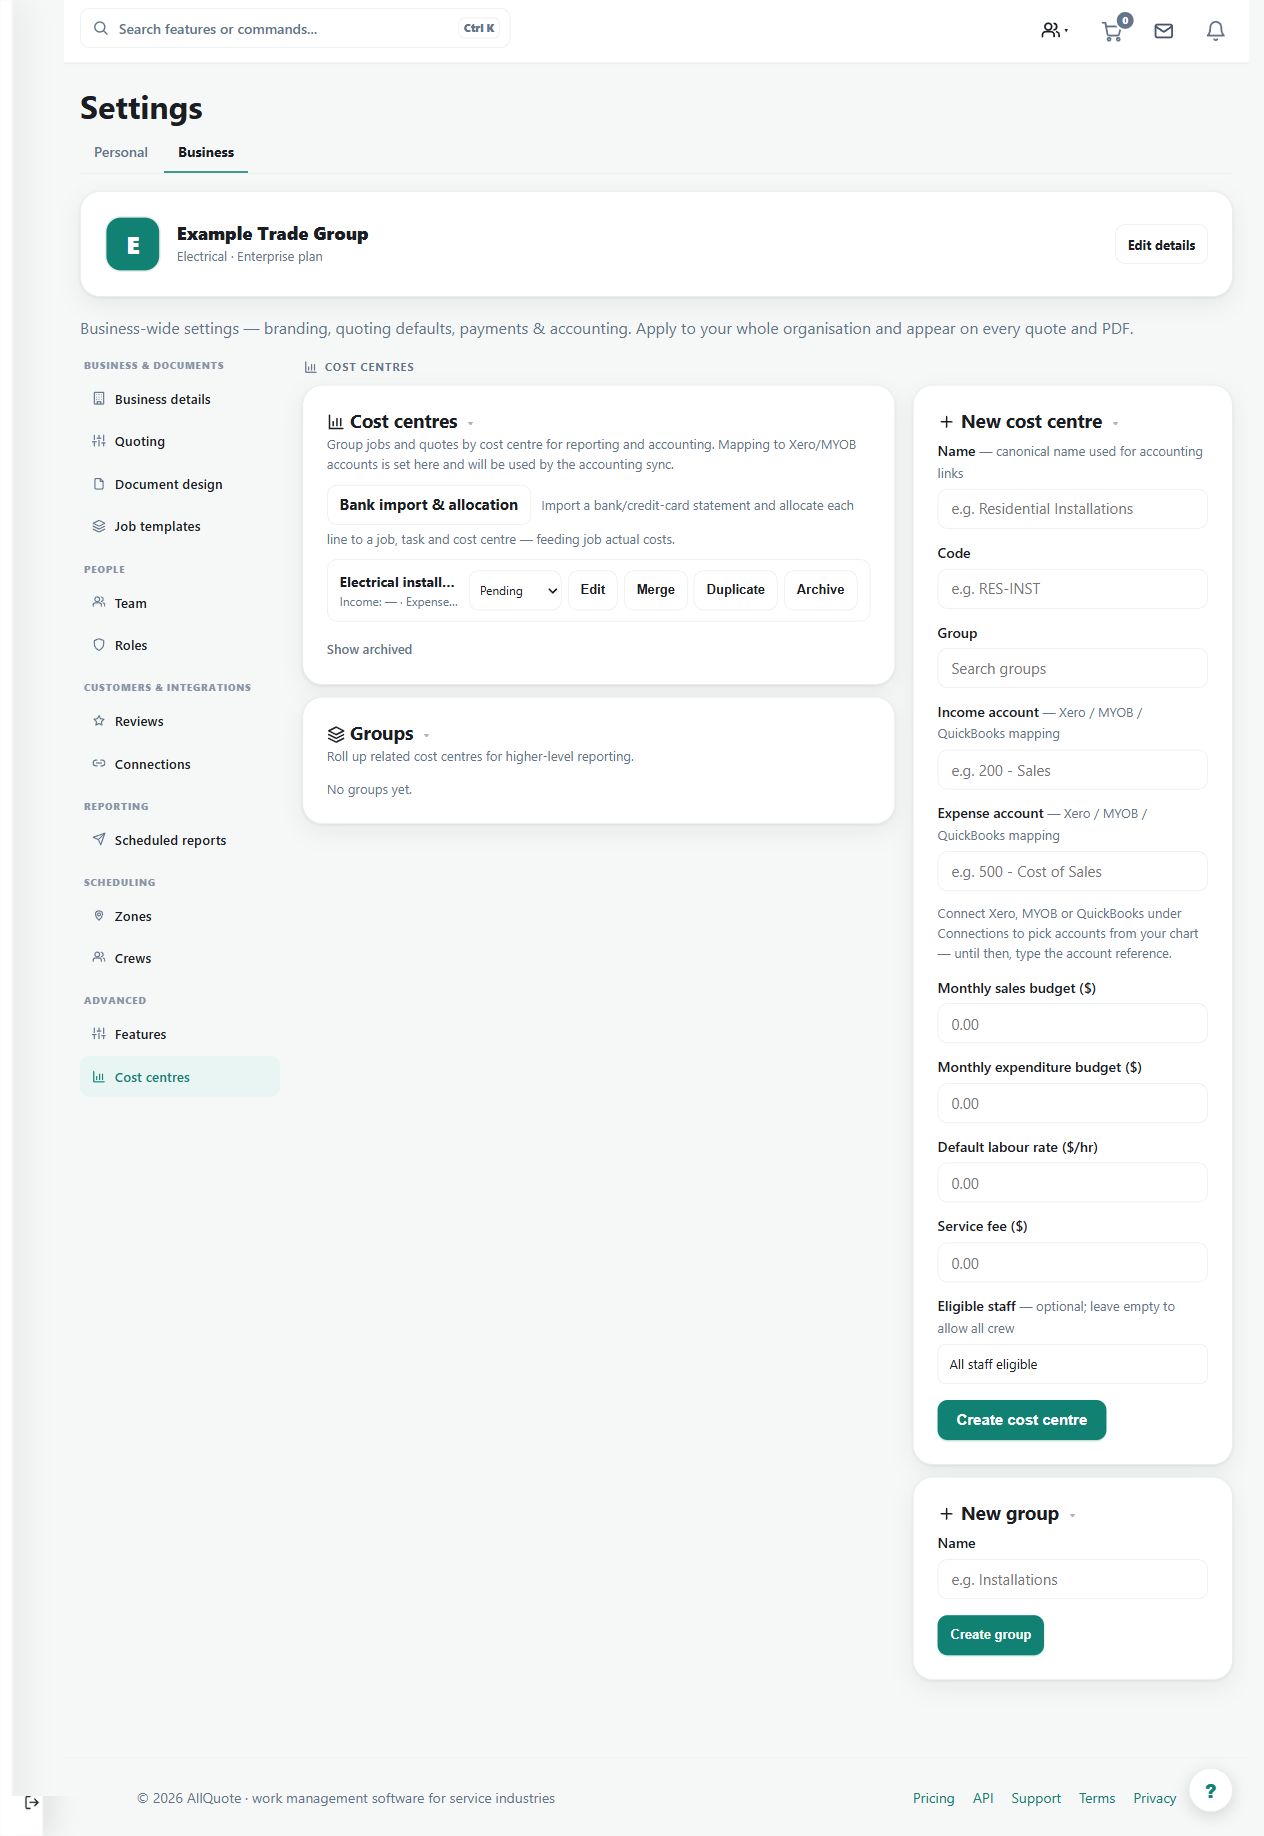
Demo screenshot. Electrical installation is an example business cost centre. Allocate the correct quote, job and cost lines, and verify accounting mappings independently. Select the image to enlarge.
What
Tracks income and expenditure against named cost centres, maps them to Xero/MYOB accounts, and assigns them to jobs, quotes and imported bank lines.
Roles
owneroffice
How
Open Business settings > Cost centres at /group-settings?tab=cost_centres.
Create the cost centres the business reports on and map each to its Xero/MYOB account where connected.
Assign cost centres to jobs and quotes so income and costs land against the right centre.
Allocate imported bank statement lines to job, task or cost centre during bank import review.
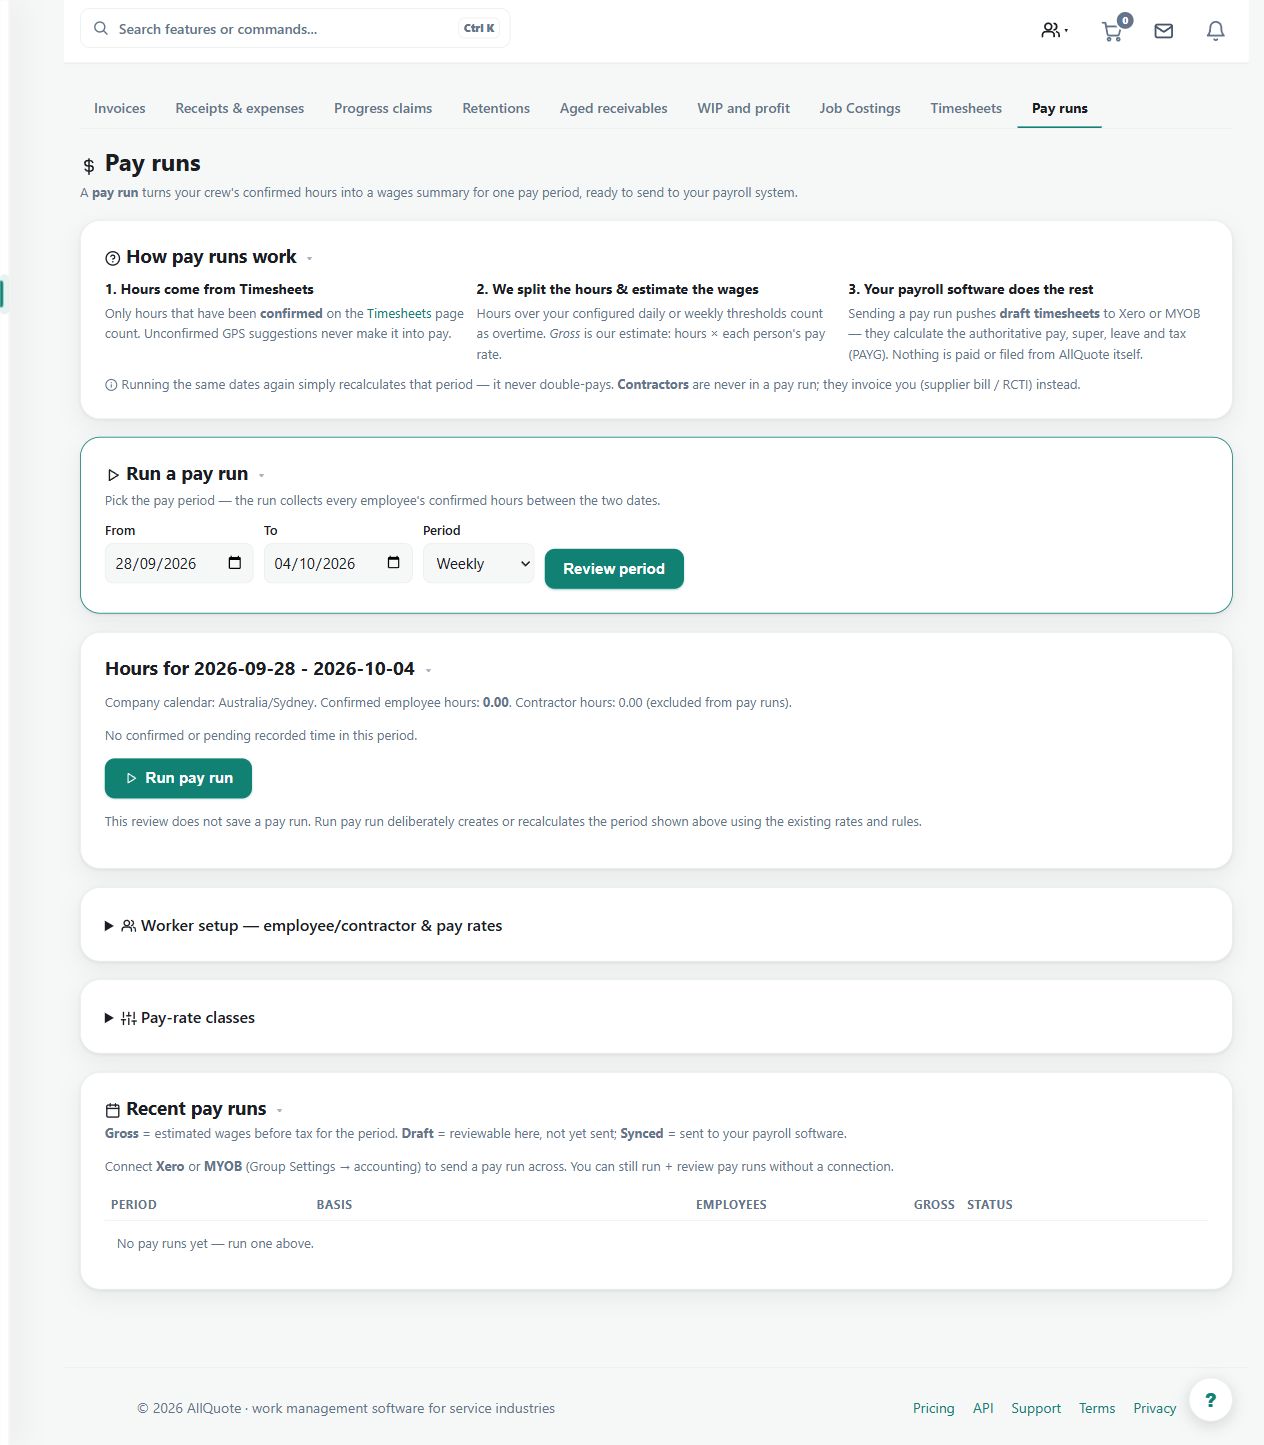
Demo screenshot. The pay-run screen shows period and worker controls. A displayed period is not an approved or exported payroll run; review submitted time and payroll settings first. Select the image to enlarge.
What
Prepares pay runs from approved timesheets and payroll-connected worker data, with hours and earnings sync to Xero/MYOB. Owner and payroll managers only.
Roles
owner
How
Open Pay runs at /payroll.
Check worker pay data and pay rate classes before the run.
Review the period earnings computed from approved timesheets.
Sync hours and earnings to the connected Xero/MYOB payroll once the run is right.
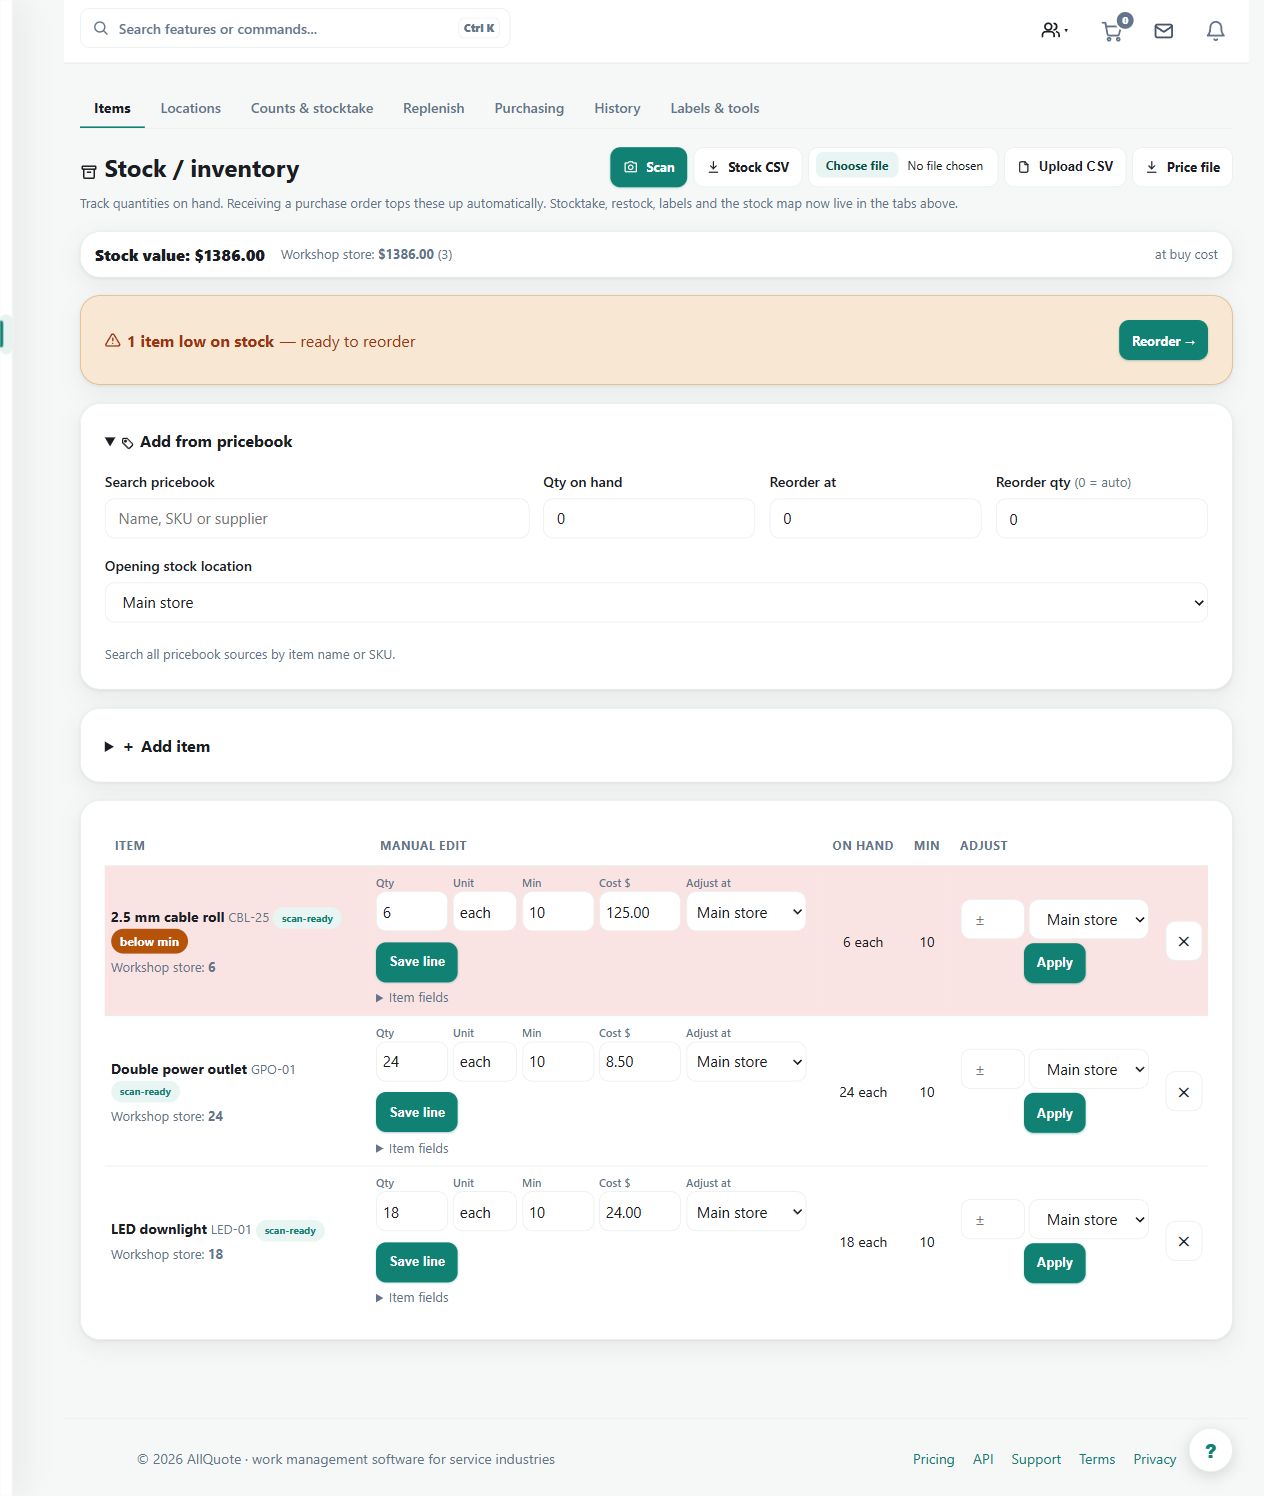
Demo screenshot. The stock screen exposes the Add from pricebook controls above the example inventory. Select the intended item and location, then verify the resulting stock record. Select the image to enlarge.
What
Creates stock items from existing pricebook rows while keeping the linked material, supplier, SKU, barcode, and cost source.
Roles
ownerofficeteam
How
Open Stock from the sidebar or go to /stock.
If the item is not in the pricebook yet, open Pricebook from the sidebar, add the row, then return to Stock.
On Stock, open Add from pricebook, search the row, enter Qty on hand, Reorder at, Reorder qty, and Opening stock location if locations are enabled.
Press Add so the stock item links back to the pricebook SKU, barcode, supplier, and cost source.
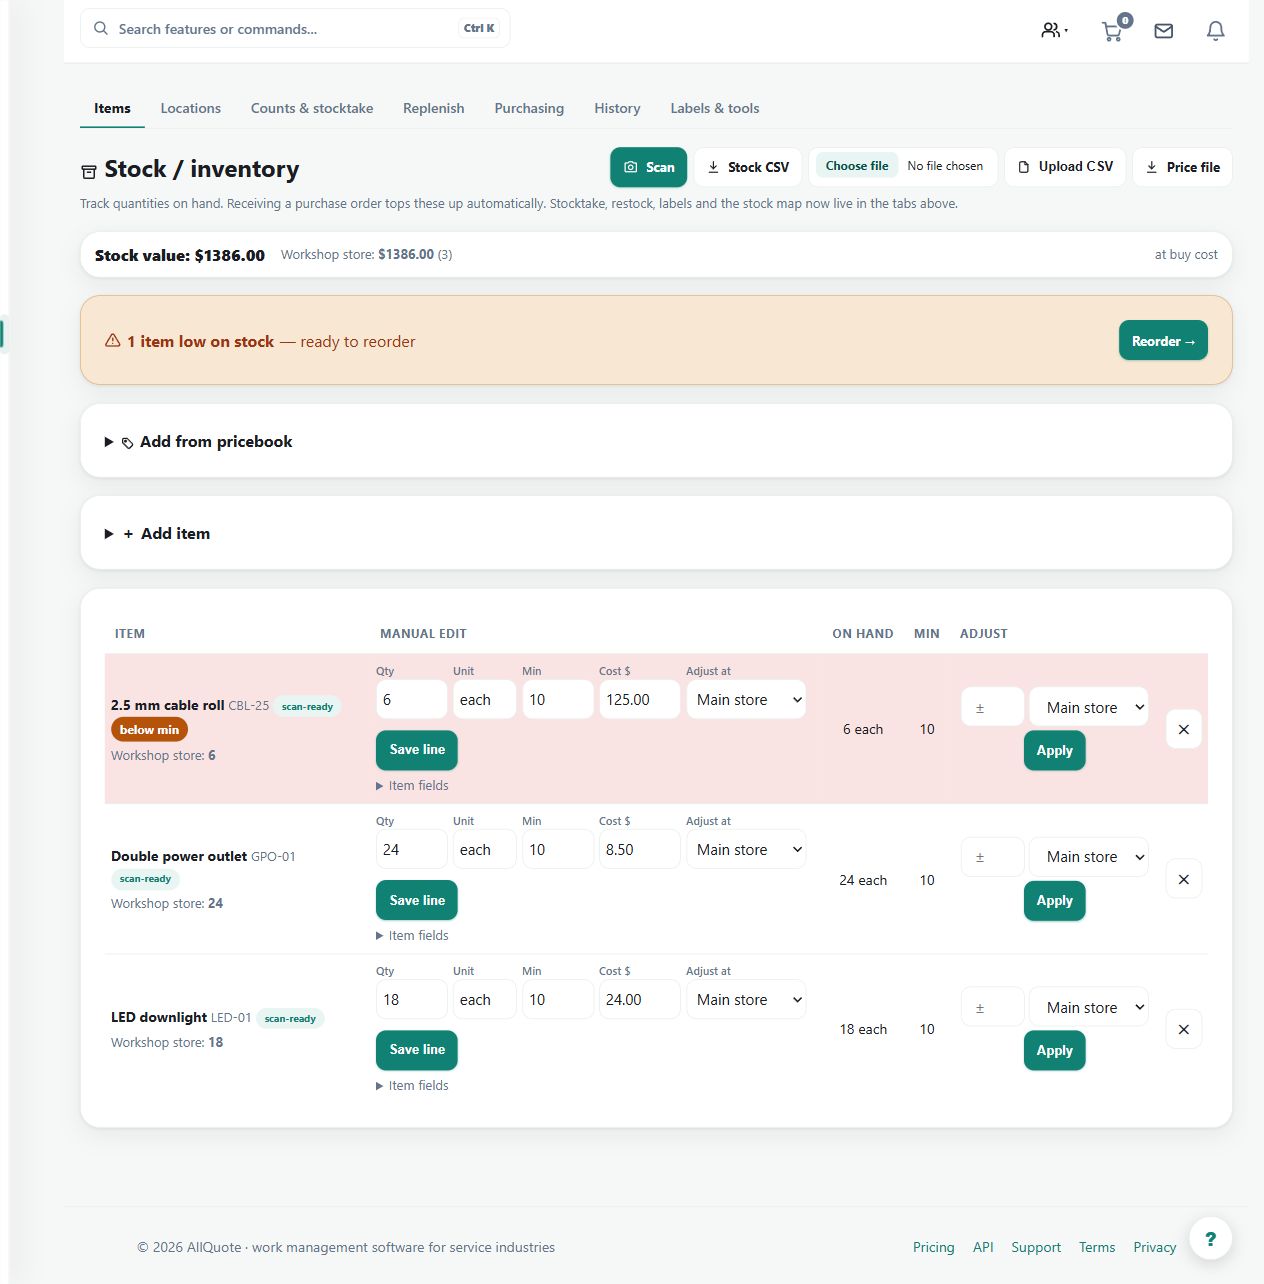
Demo screenshot. Three fictional inventory items show quantity, unit, minimum, cost and location controls. Review the adjustment location before saving a quantity change. Select the image to enlarge.
What
Lets you add or adjust stock names, SKUs, barcodes, quantities, costs, reorder levels, and preferred vendors by hand.
Roles
ownerofficeteam
How
Open Stock from the sidebar or go to /stock.
Use + Add item to enter SKU, Name, Barcode, Preferred supplier, Qty on hand, Reorder at, Reorder qty, Unit cost $, and Opening stock location, then press Add.
For existing rows, edit the line fields and press Save line.
To change quantity, use the row's Adjust column: enter a +/- delta, pick a location if shown, and press Apply.
If the adjustment would breach reserved stock, review the warning and only press Force <delta> anyway when the business intentionally overrides it.
Demo screenshot. The CSV panel offers column matching for imported item prices and an export. Price-book cost data and physical stock quantities are distinct; verify the import type and stock ledger separately. Select the image to enlarge.
What
Moves inventory in and out of AllQuote using CSV, including a review step before import changes are applied.
Roles
owneroffice
How
Open Pricebook from the sidebar or go to /pricebook.
In Price book CSV / spreadsheet, press Download CSV to export the current pricebook.
Press Import CSV / spreadsheet, choose Select file..., and match spreadsheet columns in the column-match popup.
Leave Also re-cost matching stock items (by barcode / SKU / name) checked when existing stock costs should update from matching pricebook rows.
Press Import, then return to Stock and review the affected items.
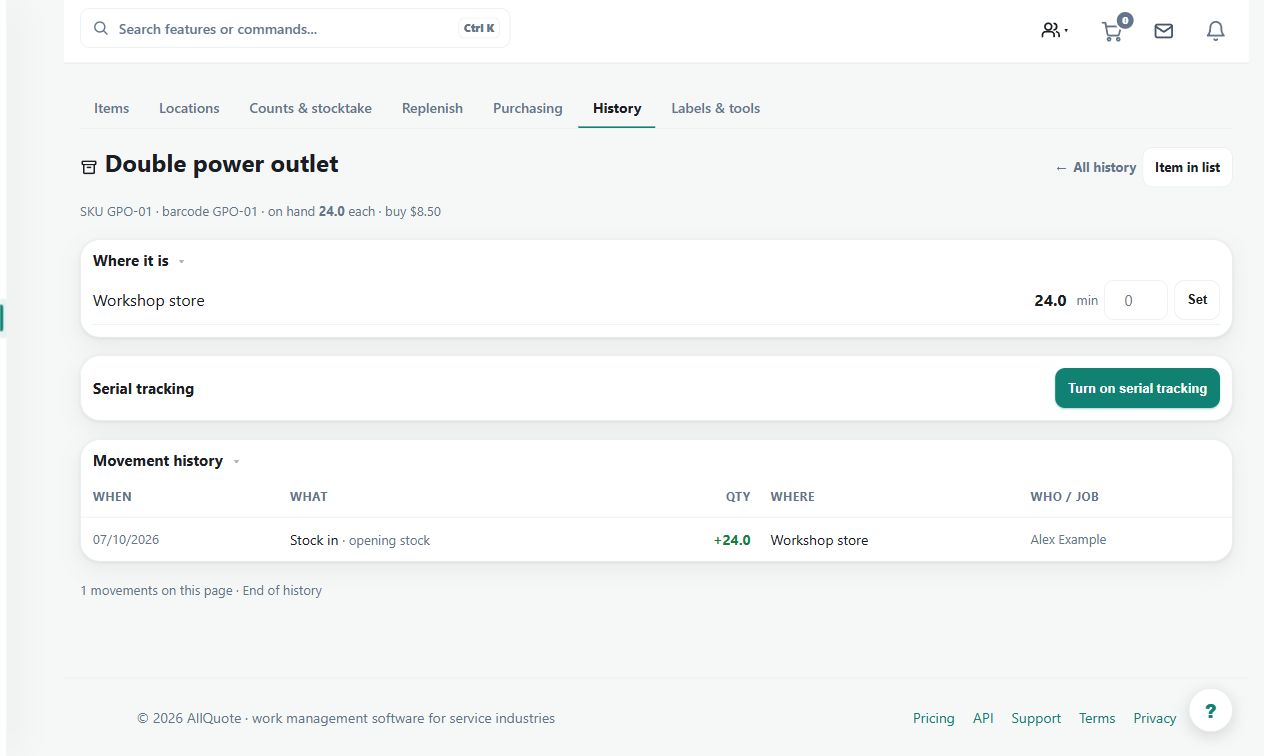
Demo screenshot. The GPO-01 item has a linked barcode and a recorded opening-stock movement at Workshop store. This shows the record a scan identifies; it is not a demonstration of camera recognition. Select the image to enlarge.
What
Scans or types barcodes to look up stock, receive items, move stock, link unknown barcodes, or create stock from a pricebook match.
Roles
ownerofficeteam
How
Open Stock > Scan or go to /scan.
Choose the mode: Stock in, Stock out, Use on job, or Transfer.
Pick Into location, From location, Job, or To location when the selected mode asks for it.
Scan with the camera or type a barcode in Type a barcode.
For a known item, choose the +/- quantity and press Confirm; for an unknown code, use Link to item or Create item, then press Link barcode or Create & continue.
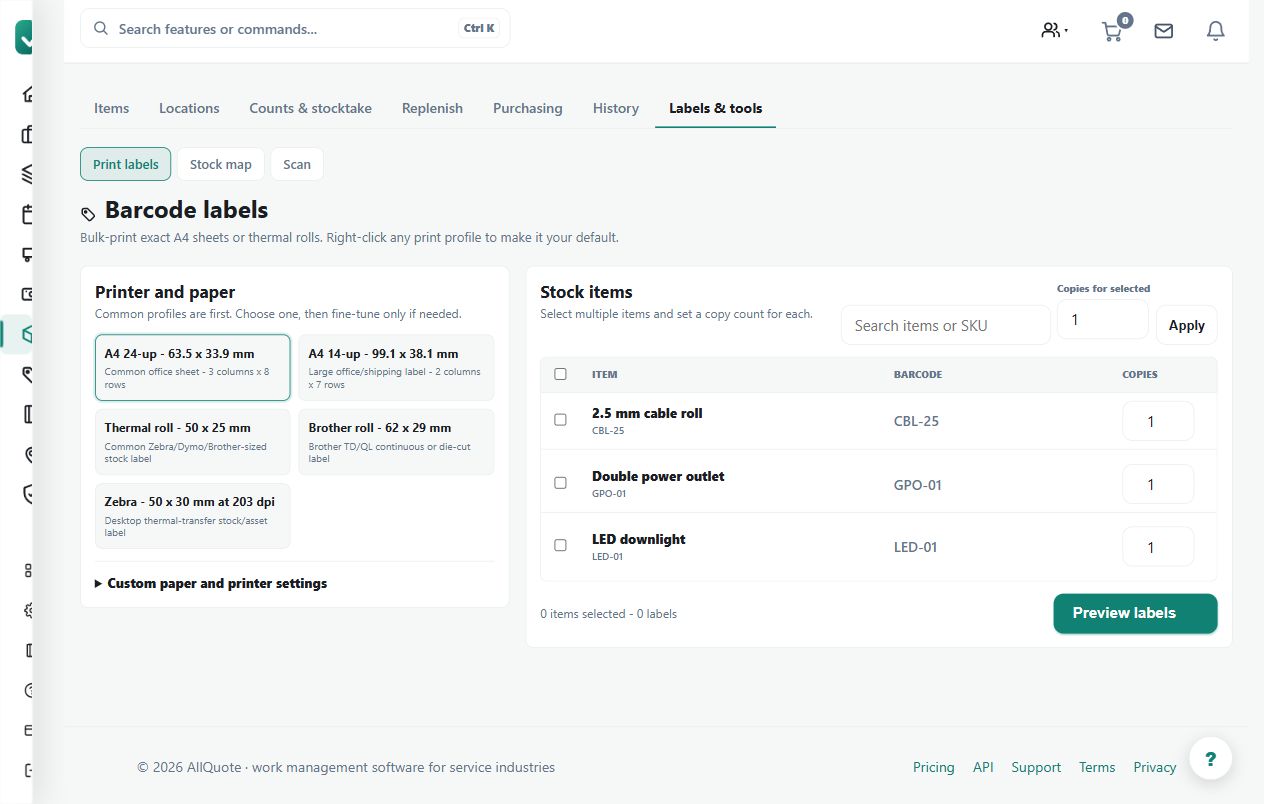
Demo screenshot. Printable label controls with the demo stock catalogue. Print a sample and verify its barcode resolves to the intended item before labelling a batch. Select the image to enlarge.
What
Prints Code128 barcode labels and assigns internal AQ codes to items that do not already have a barcode.
Roles
ownerofficeteam
How
Open Stock > Labels or go to /stock/labels.
Tick the stock items that need labels, or use Select all.
Press Generate label sheet -> to build the printable sheet.
Use Print on the generated sheet and apply the labels to bins, shelves, vans, or gear.
Use saved label batches to reprint or delete your own labels when they are no longer needed.
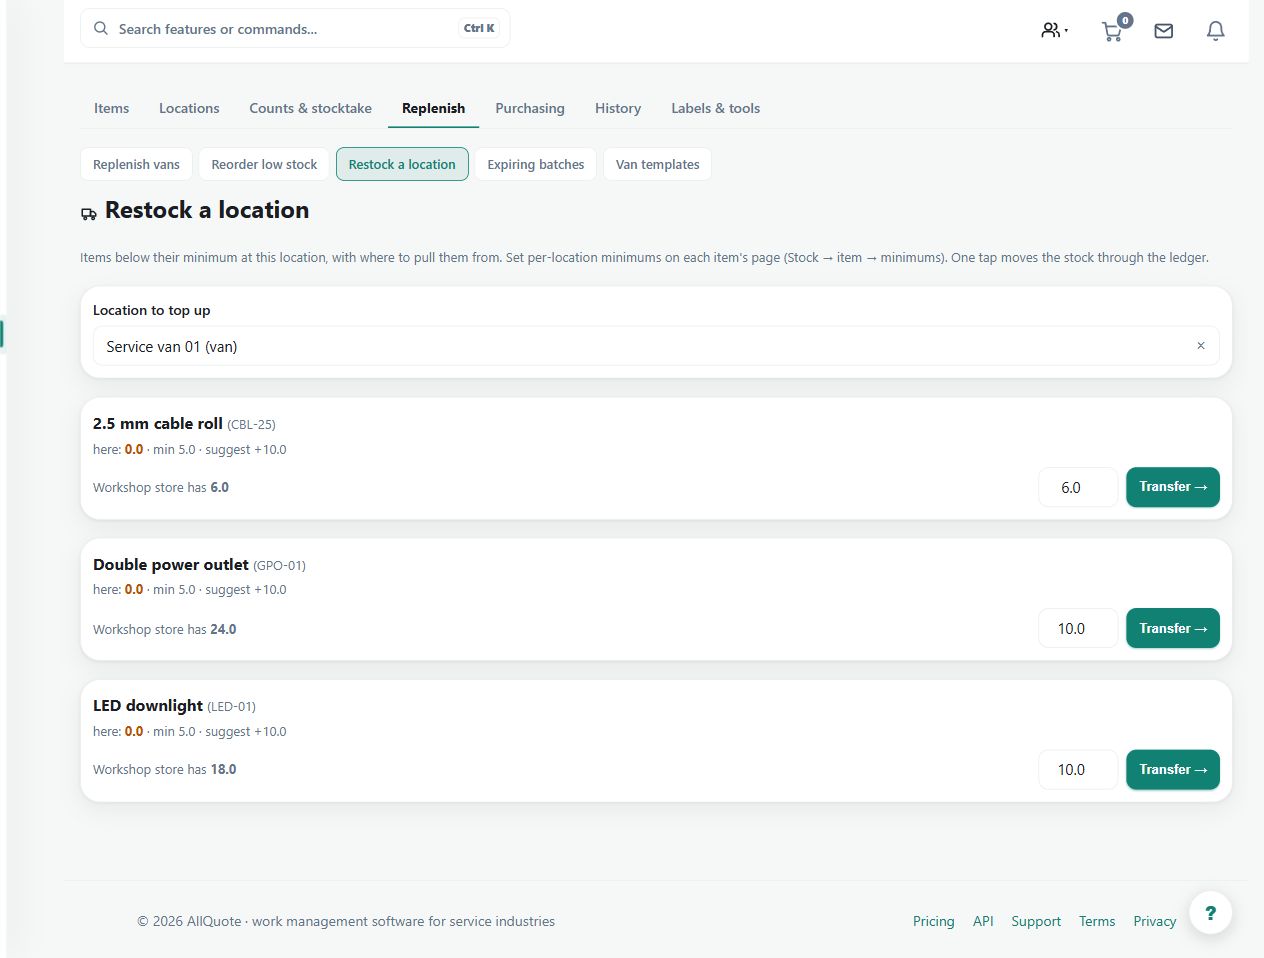
Demo screenshot. Service van 01 has item minimums and the restock screen identifies stock available at Workshop store. Review the source and transfer quantity before moving inventory. Select the image to enlarge.
What
Finds items below their per-location minimum and suggests transfers or reorder actions to top a location back up.
Roles
ownerofficeteam
How
Open Stock, then open an item and set reorder levels and per-location minimums where needed.
Open Stock > Restock or go to /stock/restock.
Choose the Location to top up.
For each low item, use Transfer -> to move available stock from another location, or Reorder -> when there is no source stock.
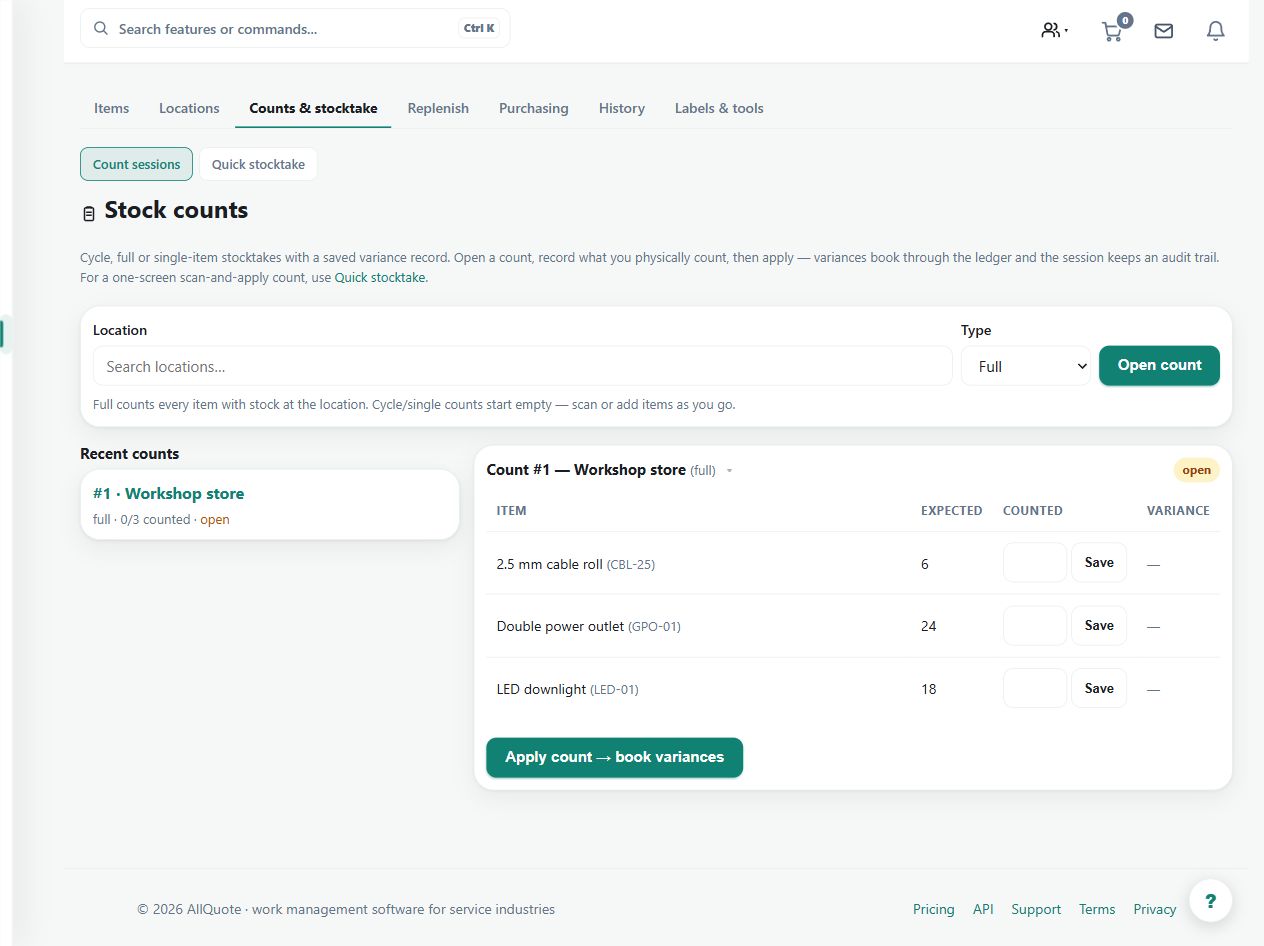
Demo screenshot. An open Workshop store count contains three stock lines. Enter physical counts, review variances and apply deliberately; opening the session does not alter stock. Select the image to enlarge.
What
Runs location-based count sessions with scan support, expected quantities, counted quantities, and variance application.
Roles
ownerofficeteam
How
Open Stock > Stocktake or go to /stock/stocktake.
Pick the Location being counted; the Expected column is the snapshot from when the page loaded.
Use Scan to count or type counted quantities into the count rows.
Review the variance list, then press Apply stocktake when the count is ready.
If stock moved while counting, refresh before applying so live on-hand is correct.
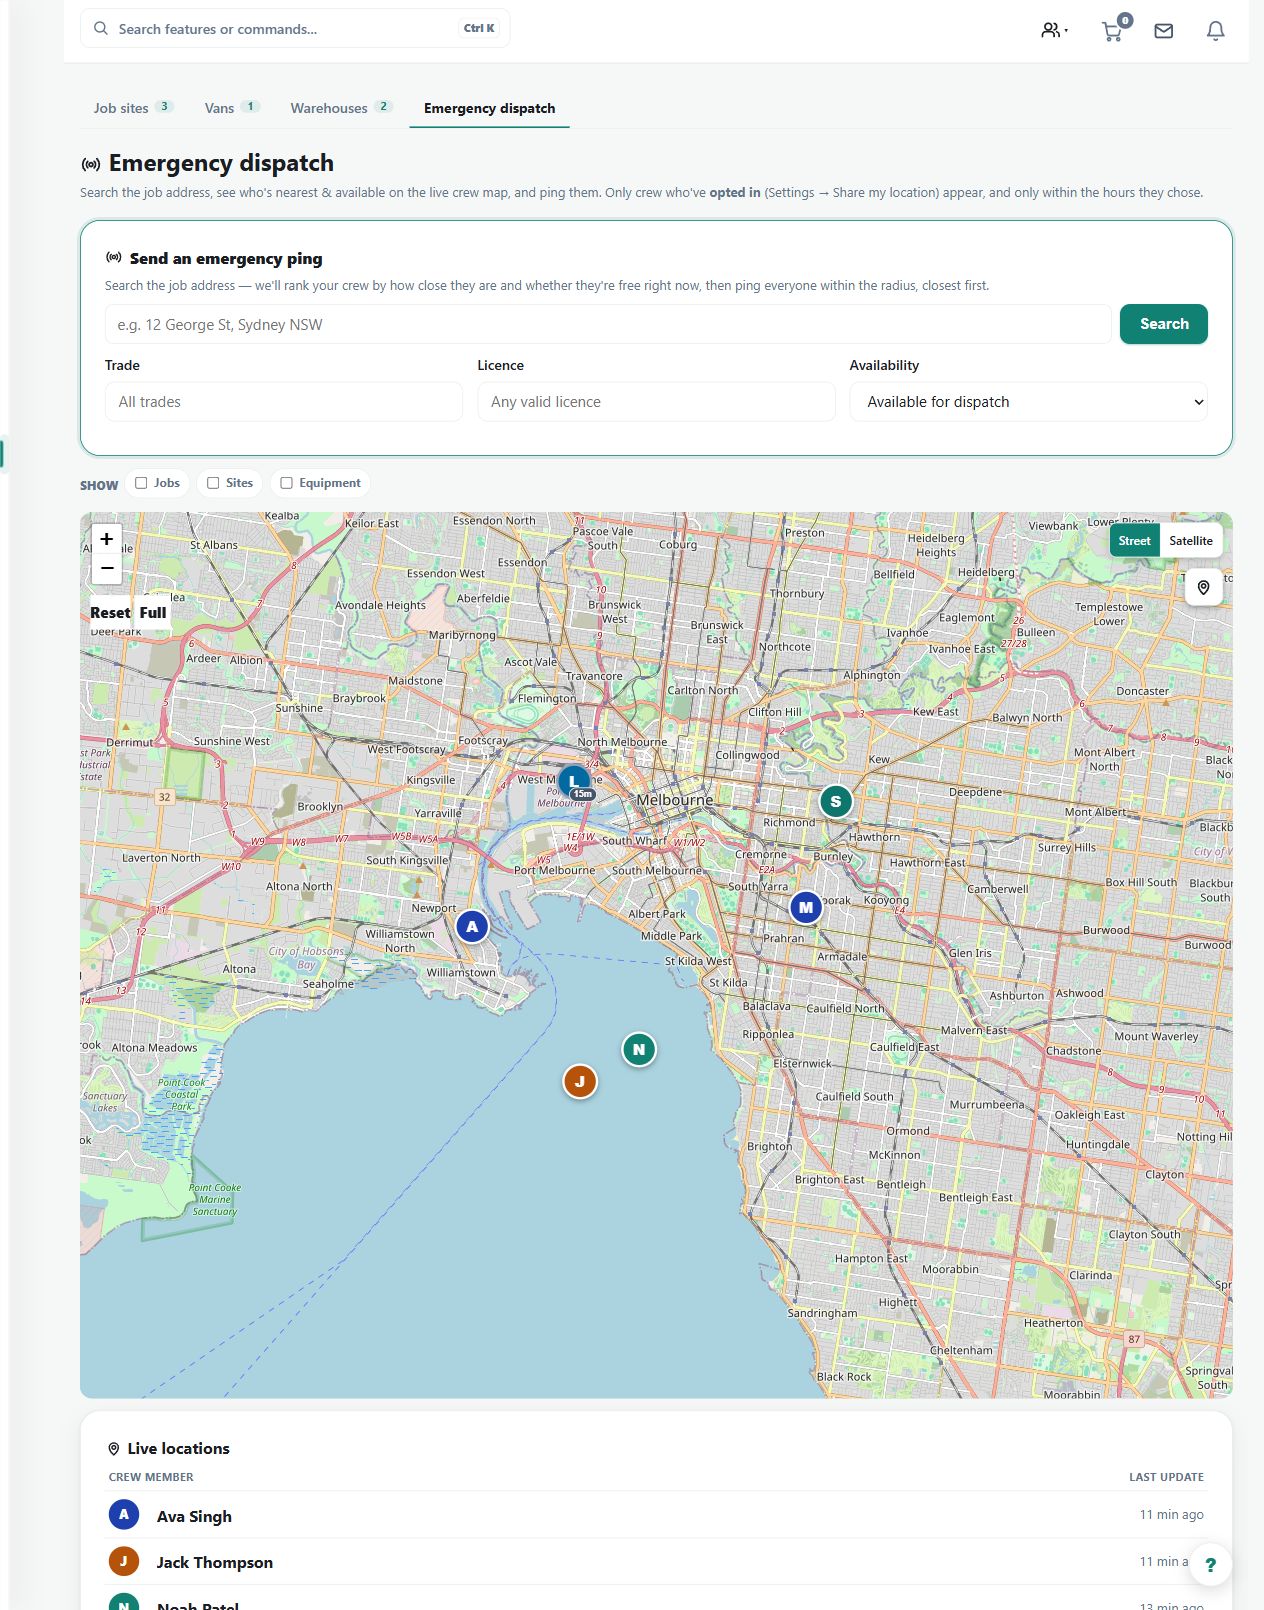
Demo screenshot. The emergency-dispatch screen shows fictional opted-in crew, last-update ages and an address search. No emergency ping was sent for this screenshot. Select the image to enlarge.
What
Shows live opted-in crew pins, active job sites, nearest-worker search, and radius pings for urgent work.
Roles
owneroffice
How
Open Crew locations at /team/locations.
Use the map to review opted-in crew pins, stale markers, active job sites, distance, accuracy, and time at the current spot.
Search near a job or address to find the closest available worker.
Use the ping controls for selected or nearby available crew when urgent work needs a response.
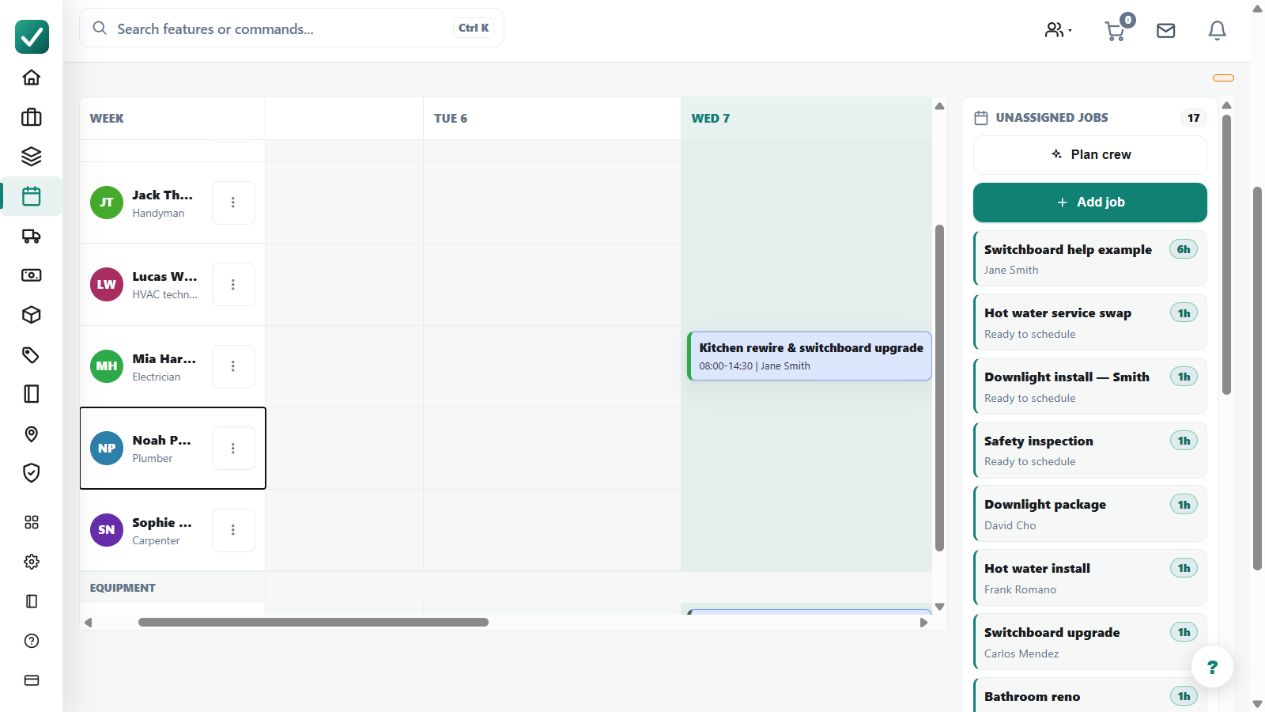
Demo screenshot. The timeline places a scheduled visit alongside people and equipment rows, with unassigned work available for planning. Check hours and conflicts before saving changes. Select the image to enlarge.
What
Schedules the day by dragging crew and equipment onto jobs in a snapshot or calendar view.
Roles
owneroffice
How
Open Business Planner from the sidebar or go to /dispatch.
Pick the date or snapshot you are planning.
Review unassigned jobs, available crew, and available equipment.
Drag crew or equipment onto jobs, then adjust assignments as the day changes.
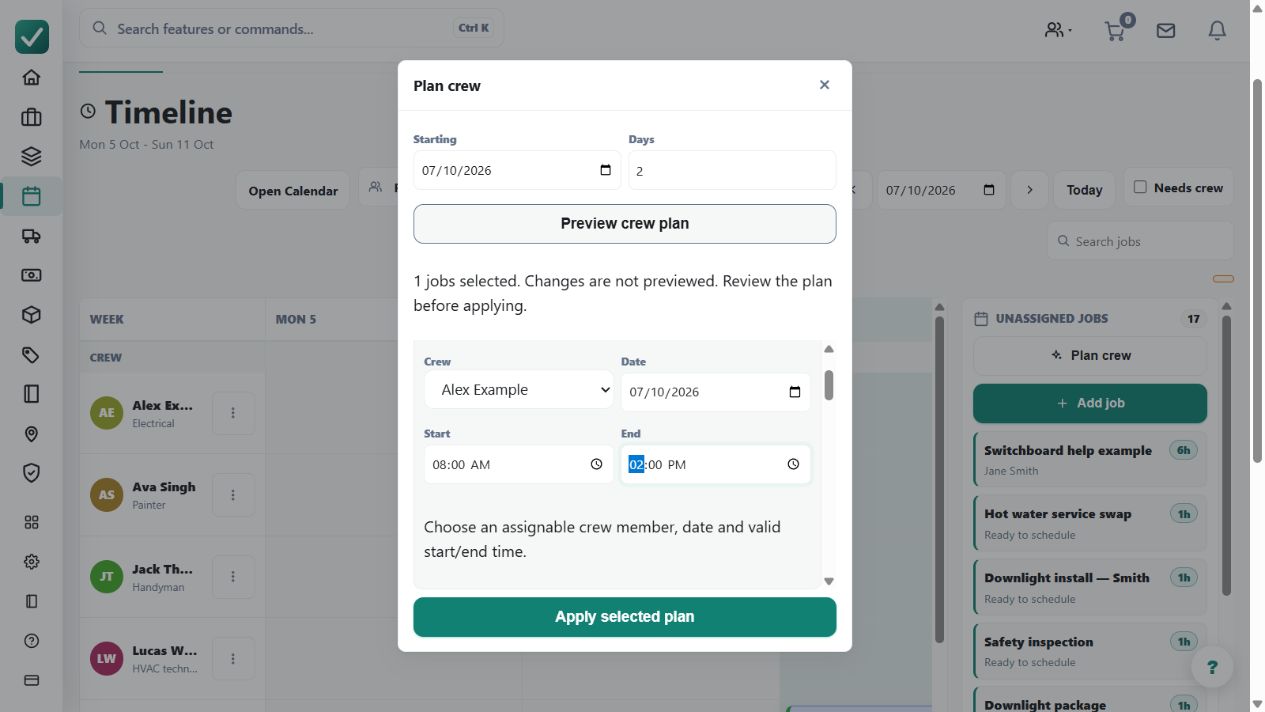
Demo screenshot. The crew-plan preview contains an example placement for review before Apply selected plan. The screenshot does not establish an optimised multi-stop route or any fuel-saving benchmark; available actions depend on the enabled routing features. Select the image to enlarge.
What
Assigns unallocated visits by trade match and route proximity, then re-optimises a crew member's day. Crew certifications are tracked separately.
Roles
owneroffice
How
Open Business settings > Team and keep each worker's trades and availability current.
Open Business Planner at /dispatch and choose the planning date.
Use the dispatch auto-assign or optimise route action where available on the planner.
Review the proposed worker, distance, and day order before leaving the assignments in place.
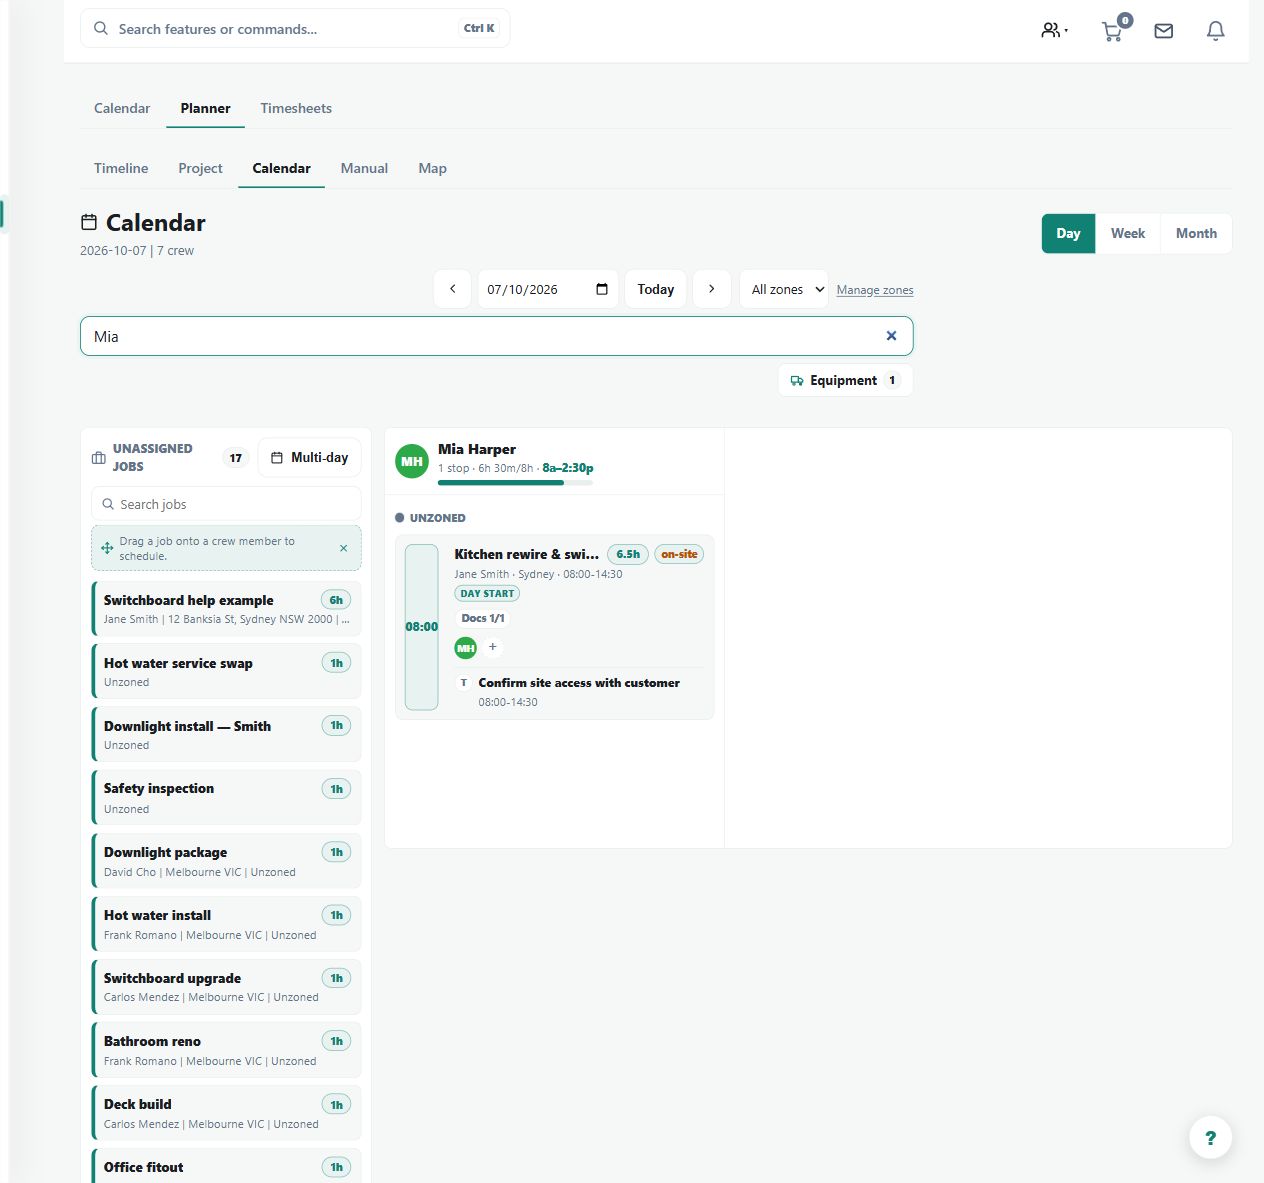
Demo screenshot. The calendar is filtered to Mia Harper and shows her booked visit against the day's available hours. Review the worker's availability and capacity before assigning more work. Select the image to enlarge.
What
Stores bookable minutes per crew member so dispatch can reason about how much work fits in a day.
Roles
owneroffice
How
Open Business Planner at /dispatch.
Open the capacity controls for the crew member or day being planned.
Set the available/bookable minutes for that person.
Schedule jobs against the day's available capacity and rebalance when the planner shows the day is overloaded.
Demo screenshot. The crew map distinguishes last-known updates from a worker whose sharing is off. These are fictional locations; a stale update must not be treated as a live position. Select the image to enlarge.
What
Shows who is live, last seen, at a current spot, assigned, available, stale, or near a job site.
Roles
owneroffice
How
Open Crew locations at /team/locations.
Review the map pins and status details for live, stale, available, and assigned workers.
Open a crew pin to see last seen time, accuracy, distance, and current spot details.
Use nearest-worker search when deciding who should take a new job or urgent visit.
Demo screenshot. The planner's day calendar shows an assigned visit and the unassigned-work list. Use the date and crew filters to inspect that day's allocation. Select the image to enlarge.
What
A crew-by-time board inside Business Planner showing fixed and Anytime visits for one day, so the day's load per crew member is visible at a glance.
Roles
owneroffice
How
Open Business Planner at /dispatch and switch to the Day Board.
Pick the date being planned.
Review each crew member's fixed appointments and Anytime visits across the day.
Adjust assignments on the board as the day changes; per-person route optimisation is available where auto-routing is on.
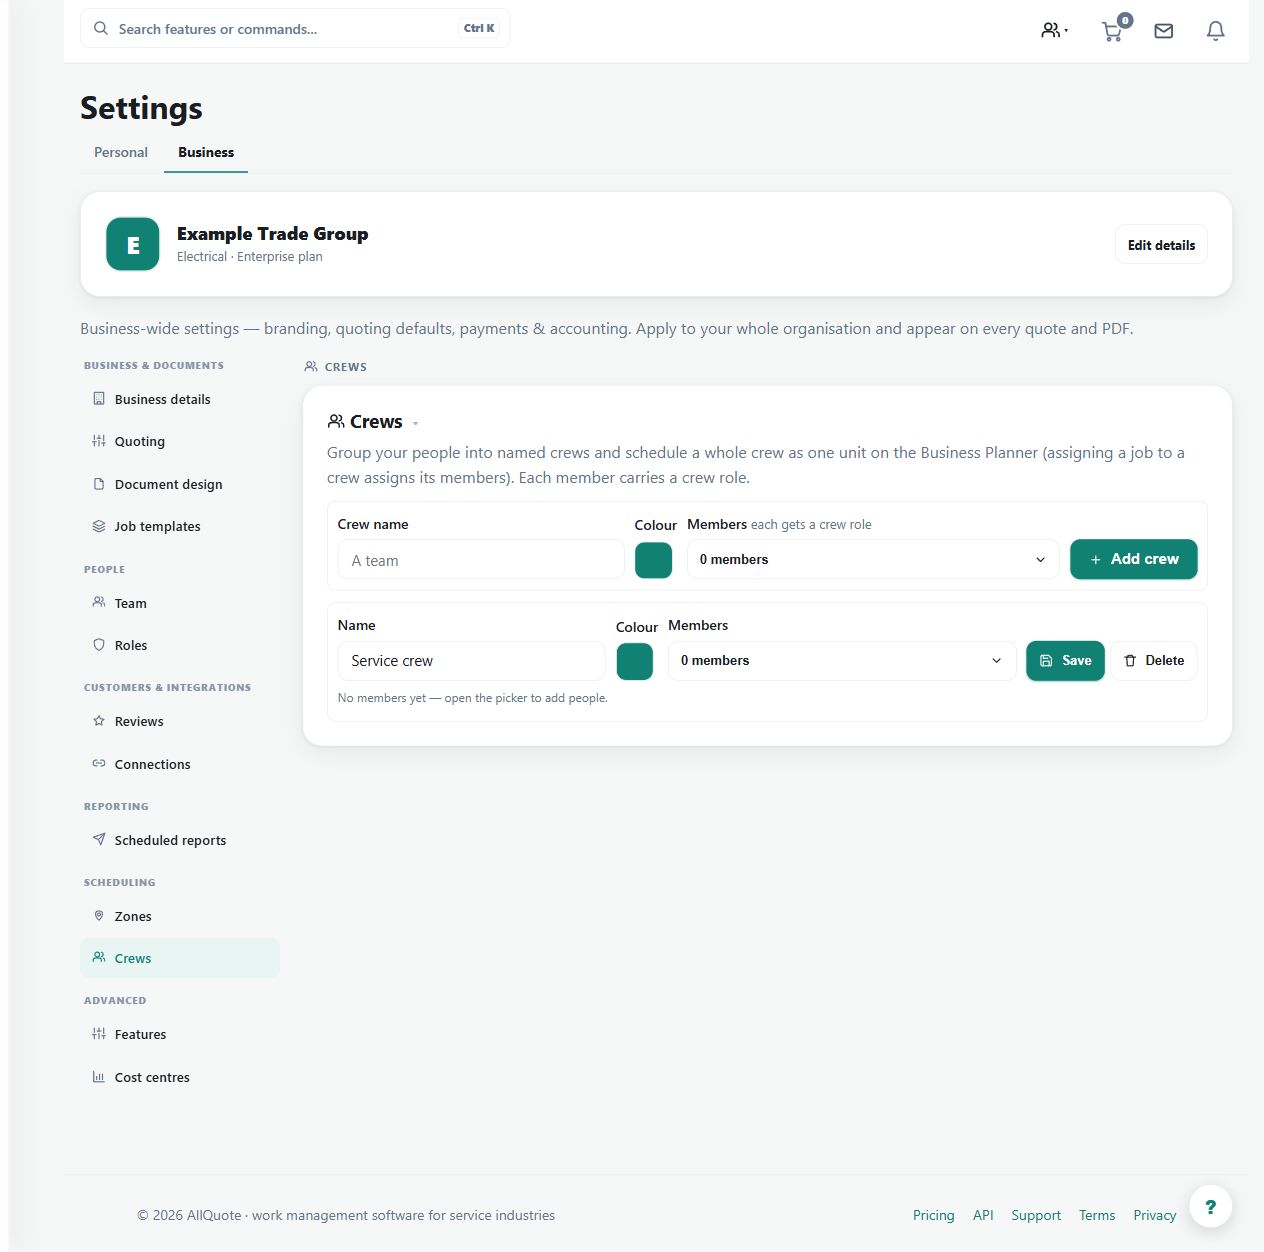
Demo screenshot. The Service crew scheduling group is configured in business settings. A crew group does not grant permissions or replace each member's availability and qualifications. Select the image to enlarge.
What
Groups team members into named crews, each member with a role, so a crew can be scheduled as one unit on the Business Planner.
How
Open Business settings > Crews at /group-settings?tab=crews.
Create the crew and add its members with their roles.
Schedule the crew as one unit on the Business Planner.
Edit membership as teams change; scheduling follows the current crew.
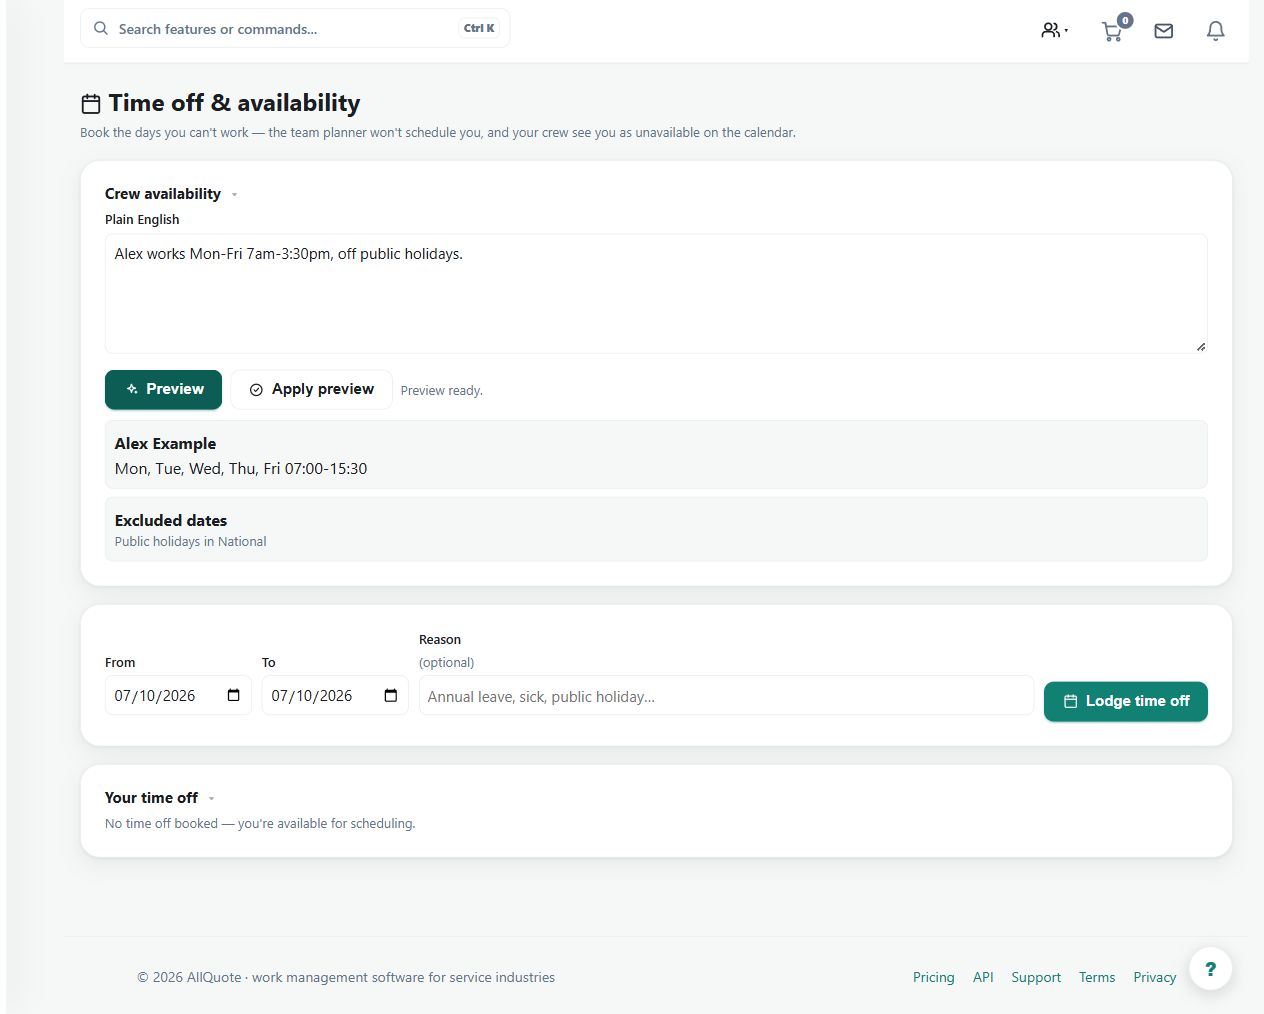
Demo screenshot. Plain-English hours produce a preview of Monday to Friday, 07:00–15:30, excluding public holidays. Inspect the preview and holiday region before applying it. Select the image to enlarge.
What
Lets an owner preview and confirm plain-English crew availability into the scheduling roster, instead of building each entry by hand.
Roles
owner
How
Open Availability at /availability.
Type the availability in plain English, such as the days a crew member is off.
Preview what will be recorded before anything is applied.
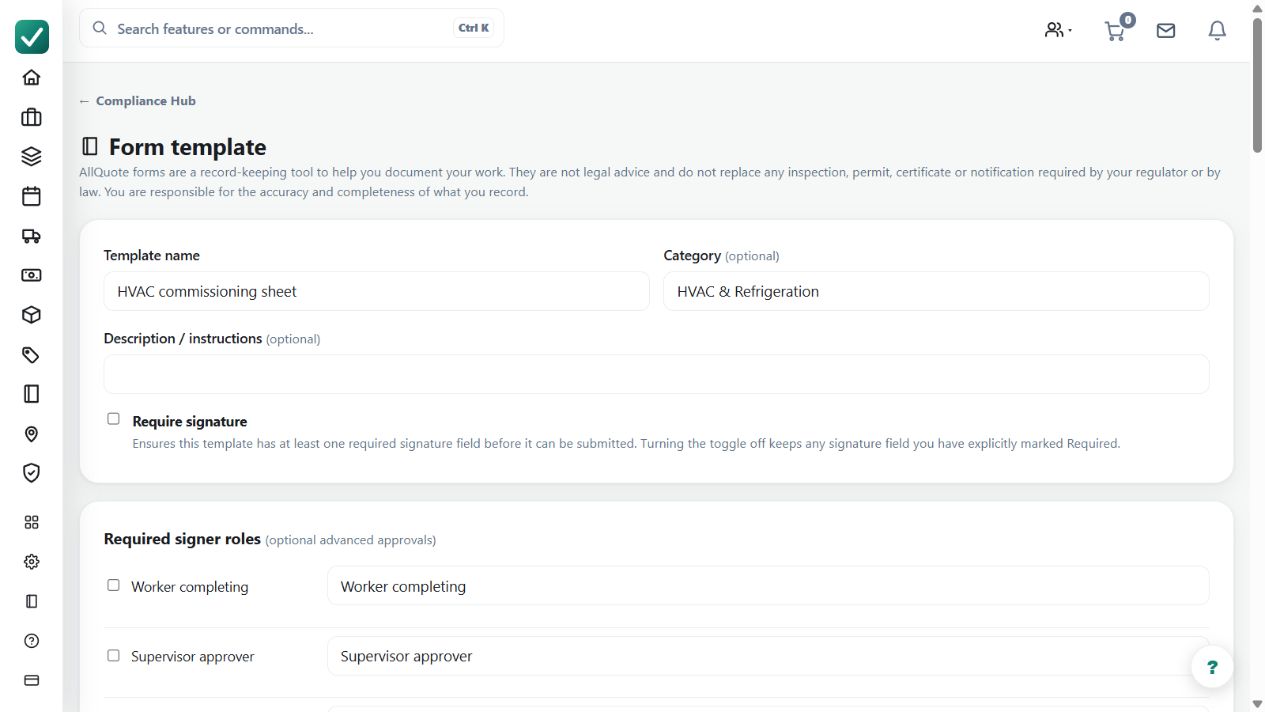
Demo screenshot. The editable HVAC commissioning template includes signer roles and configurable fields. It is a starting point to adapt and review, not evidence of regulatory approval or a completed inspection. Select the image to enlarge.
What
Creates reusable forms, compliance certificates, SWMS/JSA templates, prestart checklists and incident records for jobs and sites.
Roles
ownerofficeteam
How
Open Compliance Hub and add a starter template or create the form, SWMS, JSA, prestart, certificate or incident record your business uses.
Attach the right template or requirement to the job, task, equipment or site before work begins.
Have crew complete the required fields and collect a signature only when that template or record requires one.
Review the completed record from the job, equipment or Compliance Hub and export it when you need a filed copy.
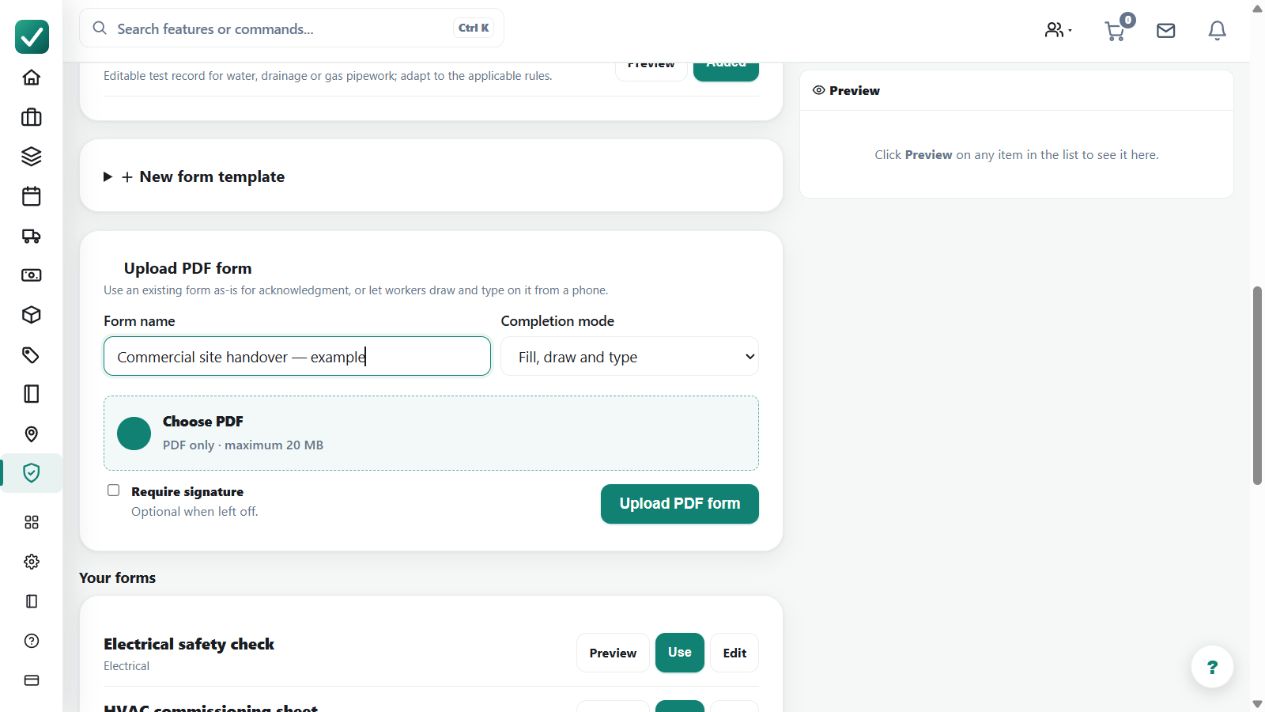
Demo screenshot. The existing-PDF upload panel is set to Fill, draw and type for an example commercial handover form. No PDF has been completed here; upload an approved source and verify every page before locking a completed record. Select the image to enlarge.
What
Turns an existing PDF into a Team-and-above form, checklist or equipment prestart that workers can acknowledge or complete in a phone browser, with a tamper-evident archived record copy for each completion.
Roles
ownerofficeteam
How
Open Compliance Hub at /safety. Under Checklists, choose Upload PDF prestart/checklist; for another form, open Custom forms and choose Upload PDF form. Name the template and choose Acknowledge only or Fill, draw and type.
Let the template creator decide whether Require signature is checked. For equipment, open the equipment item > Prestarts, attach the PDF template, and use Edit PDF template when its name, future completion mode or signature setting needs to change.
Open the PDF from the job or equipment prestart in a phone browser. Acknowledge only requires every page to be reviewed before acknowledgment; Fill, draw and type provides Ink, Text and Check tools for freehand marks, typed notes and checkmarks.
Save a draft as needed, then choose Complete & lock. AllQuote preserves the original PDF and creates a separate tamper-evident archived PDF record copy for that completion, including its completion details and any supplied signature.
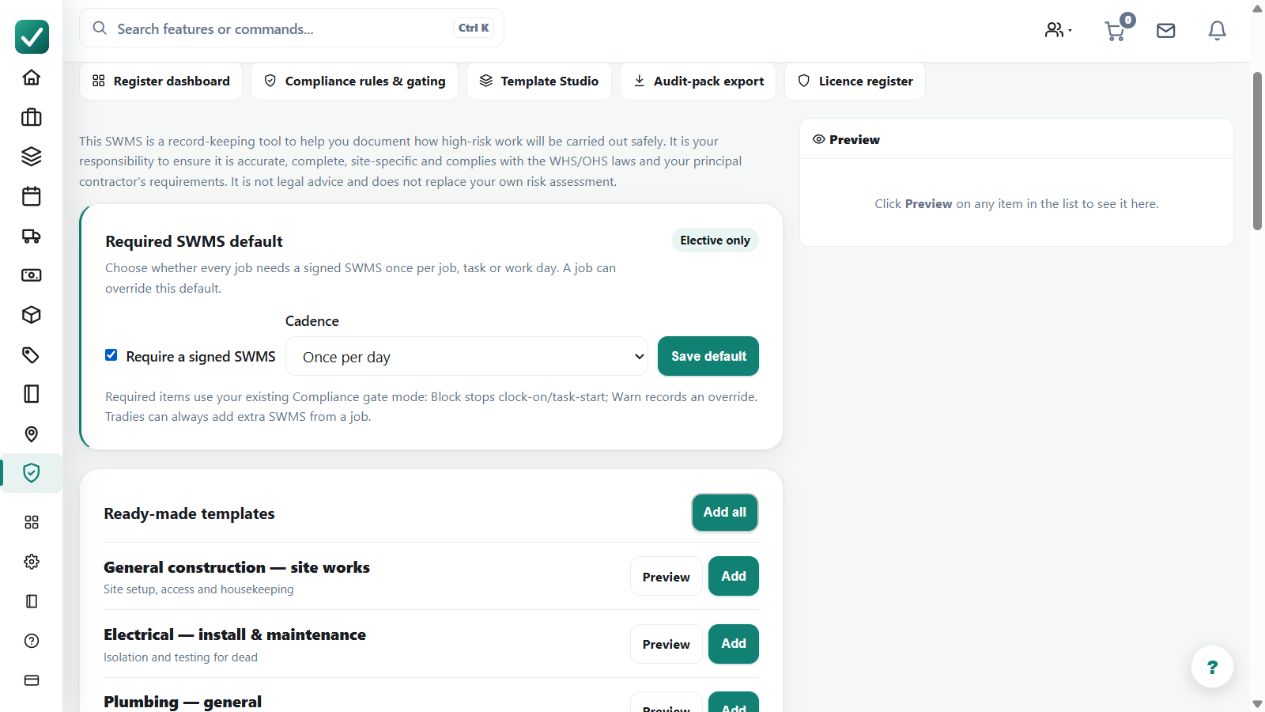
Demo screenshot. The SWMS requirement control is selected with Once per day as the example cadence. Review and save the intended rule; the template still needs a site-specific risk assessment and required sign-off. Select the image to enlarge.
What
Uses a required checkbox plus a three-option cadence to make a SWMS due once per job, once per task or once per work day on Team plans; leaving the checkbox clear keeps it elective.
Roles
ownerofficeteam
How
Open Compliance Hub > SWMS. Check Require a signed SWMS to make it required, then choose one of the three Cadence options: Once per job, Once per task or Once per day. Leave the checkbox clear for Elective only.
Open a job's Compliance area when that job needs a different cadence and save its override.
Create the due SWMS from the right template, link it to the job or task, complete the work details, then collect the required sign-off.
Team shows what is due; Enterprise compliance gating can warn or block clock-on or task start until the required SWMS is complete.
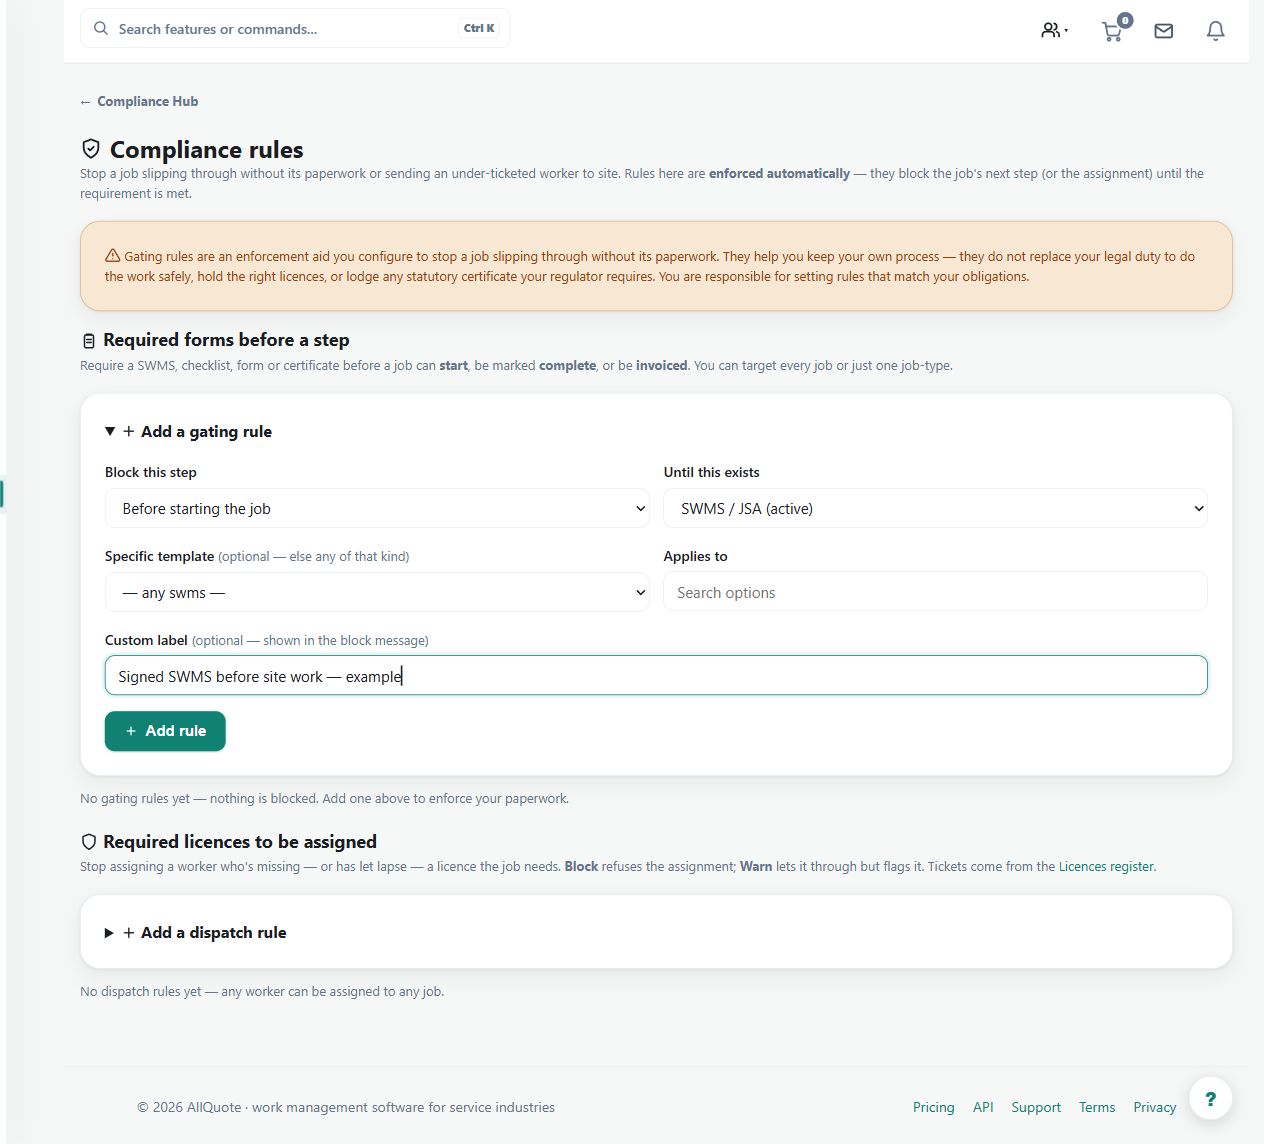
Demo screenshot. The expanded gating-rule form names an example signed-SWMS requirement before work starts. No rule is enforced until it is saved; configure only the requirements appropriate to the business and work. Select the image to enlarge.
What
Safety paperwork is not a hard block by default. Required fields and checks apply only when the business adds the form, checklist, certificate, or SWMS it wants to use.
Roles
owneroffice
How
Open Business settings > Features and turn on the safety area if it is hidden.
Open Compliance Hub at /safety.
Create the templates and required checks the business actually wants to enforce.
Attach those templates/rules to jobs; if no rule or template is added, the job flow is not blocked by safety paperwork.
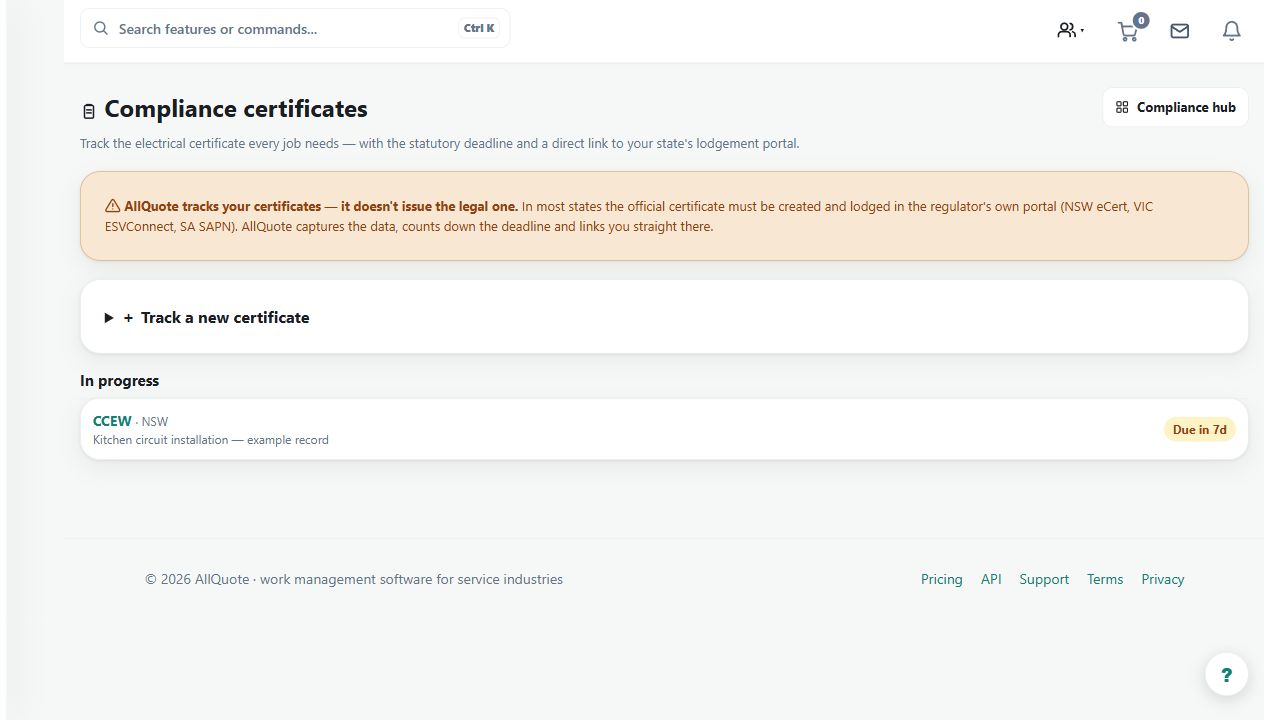
Demo screenshot. The register contains a fictional CCEW-related work record. Tracking a record does not lodge a statutory certificate or establish legal compliance. Select the image to enlarge.
What
Tracks required, lodged, and issued compliance certificate status for supported statutory workflows.
Roles
owneroffice
How
Open Compliance from the sidebar or go to /compliance.
Create a certificate record for the relevant job or site.
Record the required, lodged, and issued status as the statutory process moves forward.
Open the certificate record later to check or update its status before closing the job.
Demo screenshot. The demo licence register contains explicitly labelled example credentials and expiry dates. Real assignment decisions require verified evidence and the relevant licence type. Select the image to enlarge.
What
Stores worker tickets, licences, expiry dates, status, documents, and reminders for crew compliance review.
Roles
owneroffice
How
Open Licences at /licences.
Choose the worker and add each licence, ticket, certificate, expiry date, and status.
Upload evidence documents where the screen asks for proof.
Review the register regularly so expired or soon-expiring certifications are corrected before dispatch depends on them.
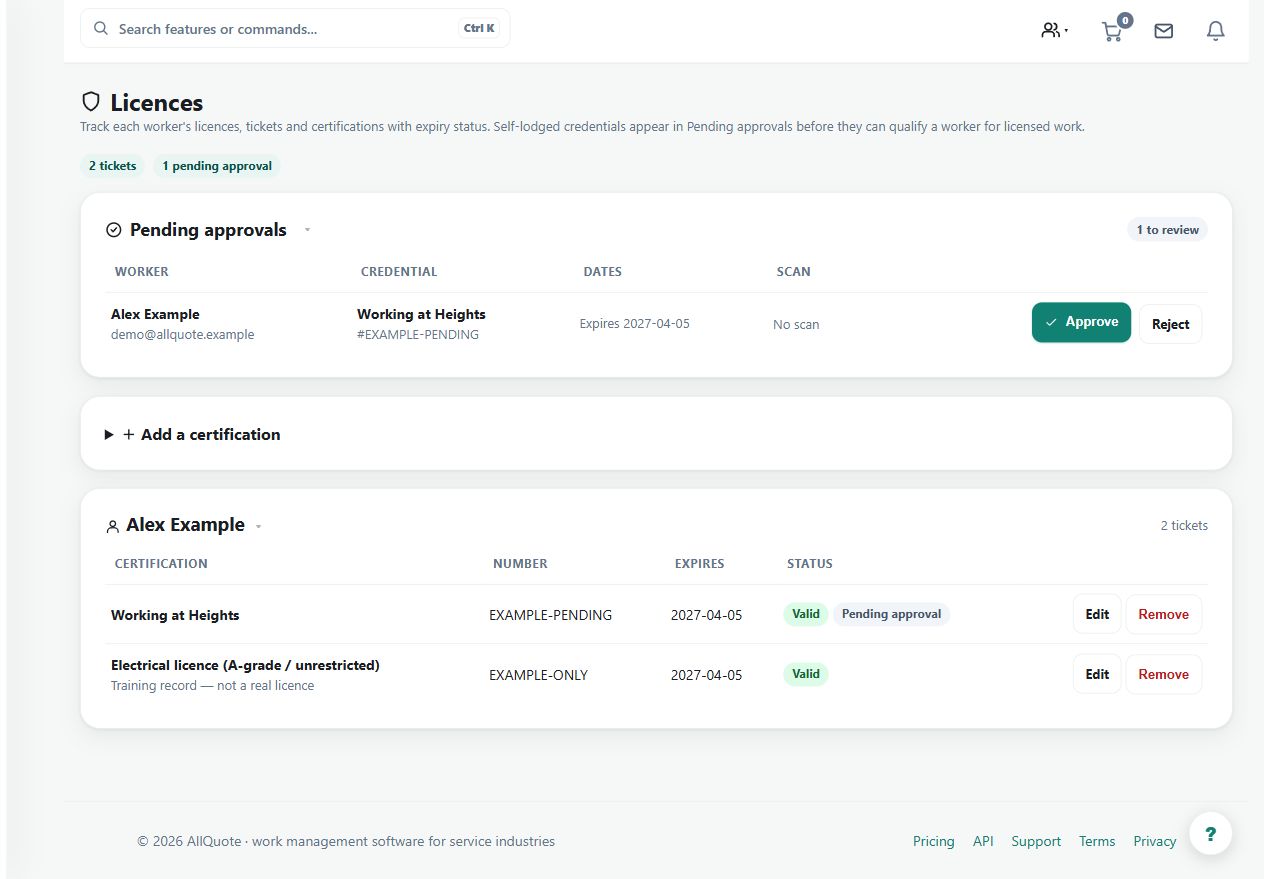
Demo screenshot. The licence register includes an example pending credential alongside an approved training record. Review the original evidence before approving a real worker's licence. Select the image to enlarge.
What
Lets approved managers review self-lodged worker licences and credentials before they count for compliance checks.
Roles
owneroffice
How
Open Compliance hub > Licence approvals.
Review pending worker credentials and open the uploaded scan when evidence needs checking.
Approve credentials that are valid for the business, or reject them with a reason the worker can fix.
Approved credentials then count in licence-holder lists and task assignment checks.
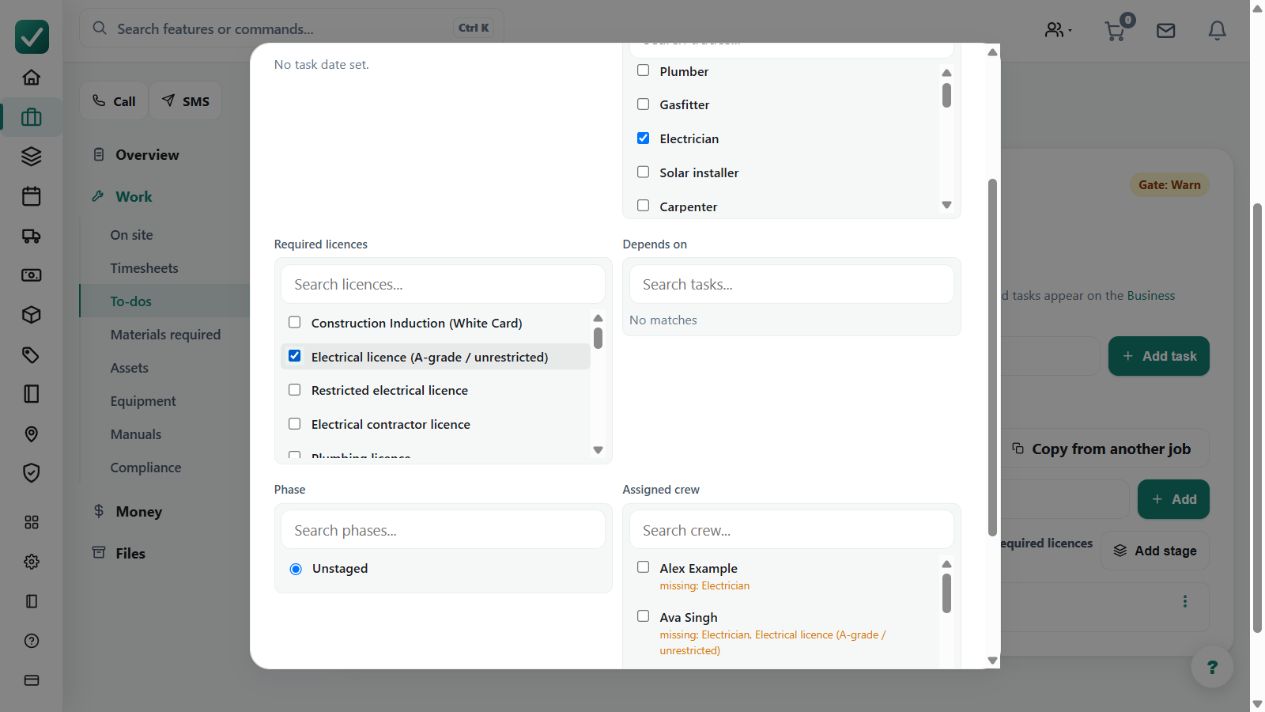
Demo screenshot. The task editor selects Electrician and Electrical licence as requirements. Assignment must be checked against approved worker credentials and the business's Warn or Block mode. Select the image to enlarge.
What
Checks each job task's required trades and licences before crew are assigned, with soft warnings or hard blocks depending on the feature mode.
Roles
owneroffice
How
Open a job, add tasks under Schedule & crew, and set each task's required trades and licences while creating or editing it.
Assign crew to the task from the job screen or the Business Planner.
When a selected worker is missing a required trade or approved licence, follow the soft warning or hard block shown.
Review the job's notes trail when a soft-mode override is recorded.
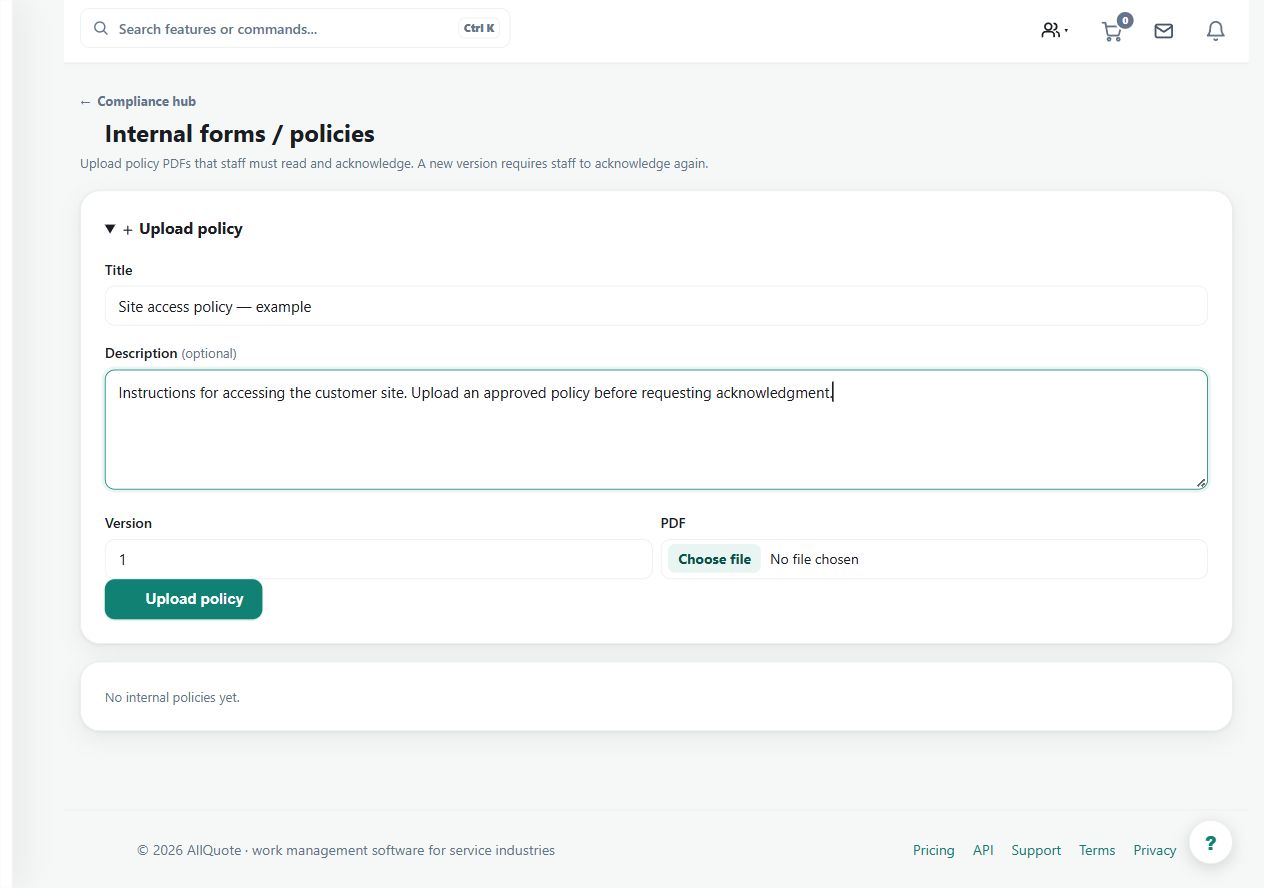
Demo screenshot. The policy-upload form has an example title, description and version. Add the approved PDF and verify acknowledgments; this screenshot does not show an acknowledged policy. Select the image to enlarge.
What
Uploads policy PDFs that staff must read and acknowledge, and lets managers track who has acknowledged the current version of each policy.
Roles
owneroffice
How
Open Compliance > Policies at /compliance/policies.
Upload the policy PDF staff must read.
Staff open and acknowledge the policy from their own account.
Track acknowledgements per policy and re-collect them when a new version is uploaded.
Demo screenshot. The example timesheet contains recorded job hours and office review controls. Check worker, job, breaks and period before approving hours for payroll or billing. Select the image to enlarge.
What
Lets authorised office users review submitted time, job allocation, breaks, discrepancies, and approval state before billing or payroll preparation.
Roles
owneroffice
How
Open Timesheets and choose the day, week, worker, or job that needs review.
Check clocked time, job allocation, breaks, submitted notes, and any suggestion or discrepancy details.
Leave incomplete entries unapproved while obtaining clarification, or amend the reviewed hours before approval. Decline removes an entry; it does not return it to the worker.
Use approved time for job costing, billing, or the separate pay-run workflow where available.
Demo screenshot. The map shows opted-in example crew and identifies Alex Example as sharing off. Availability, sharing hours, leave and organisation pause can also determine whether a location appears. Select the image to enlarge.
What
Shows crew location only when the worker has opted in, is available, within sharing hours, not on leave, and not paused for the org.
Roles
ownerofficeteam
How
Crew enable location sharing in their worker app and keep availability current.
The business only sees a live pin while the worker is opted in, available, inside sharing hours, not on leave, and sharing is not paused.
Managers open Crew locations at /team/locations to view fresh pins, stale pins, distance, accuracy, and time at the current spot.
If a pin is missing, check opt-in, availability, leave, sharing hours, and org pause before treating it as a dispatch issue.
Demo screenshot. The job overview includes the explicit Notify customer I'm on the way action. It was not pressed for this example; SMS consent, a valid customer mobile and applicable service requirements still apply. Select the image to enlarge.
What
Creates a customer tracking link after a worker marks that they are on the way, showing ETA until arrival or expiry.
Roles
ownerofficeteam
How
Open the relevant job from /jobs.
Use the job's on-my-way/customer tracking action before travelling to the site.
Share or rely on the generated customer tracking link while the trip is active.
The ETA updates until arrival or expiry, then the job returns to normal job tracking.
Demo screenshot. The timesheet review screen is the starting point for inspecting time and discrepancies. These are seeded job hours, not proof that a geofence generated or approved a GPS suggestion. Select the image to enlarge.
What
Turns geofence arrival and leave events into pending timesheet suggestions, preserving recorded GPS minutes for review.
Roles
owneroffice
How
Open Timesheets at /timesheets.
Review the suggested GPS segments created from arrival and leave events.
Open the calculation/discrepancy details when the suggested time does not match the expected job time.
Accept, amend, or dismiss the suggestion before it becomes payroll or billable job time.
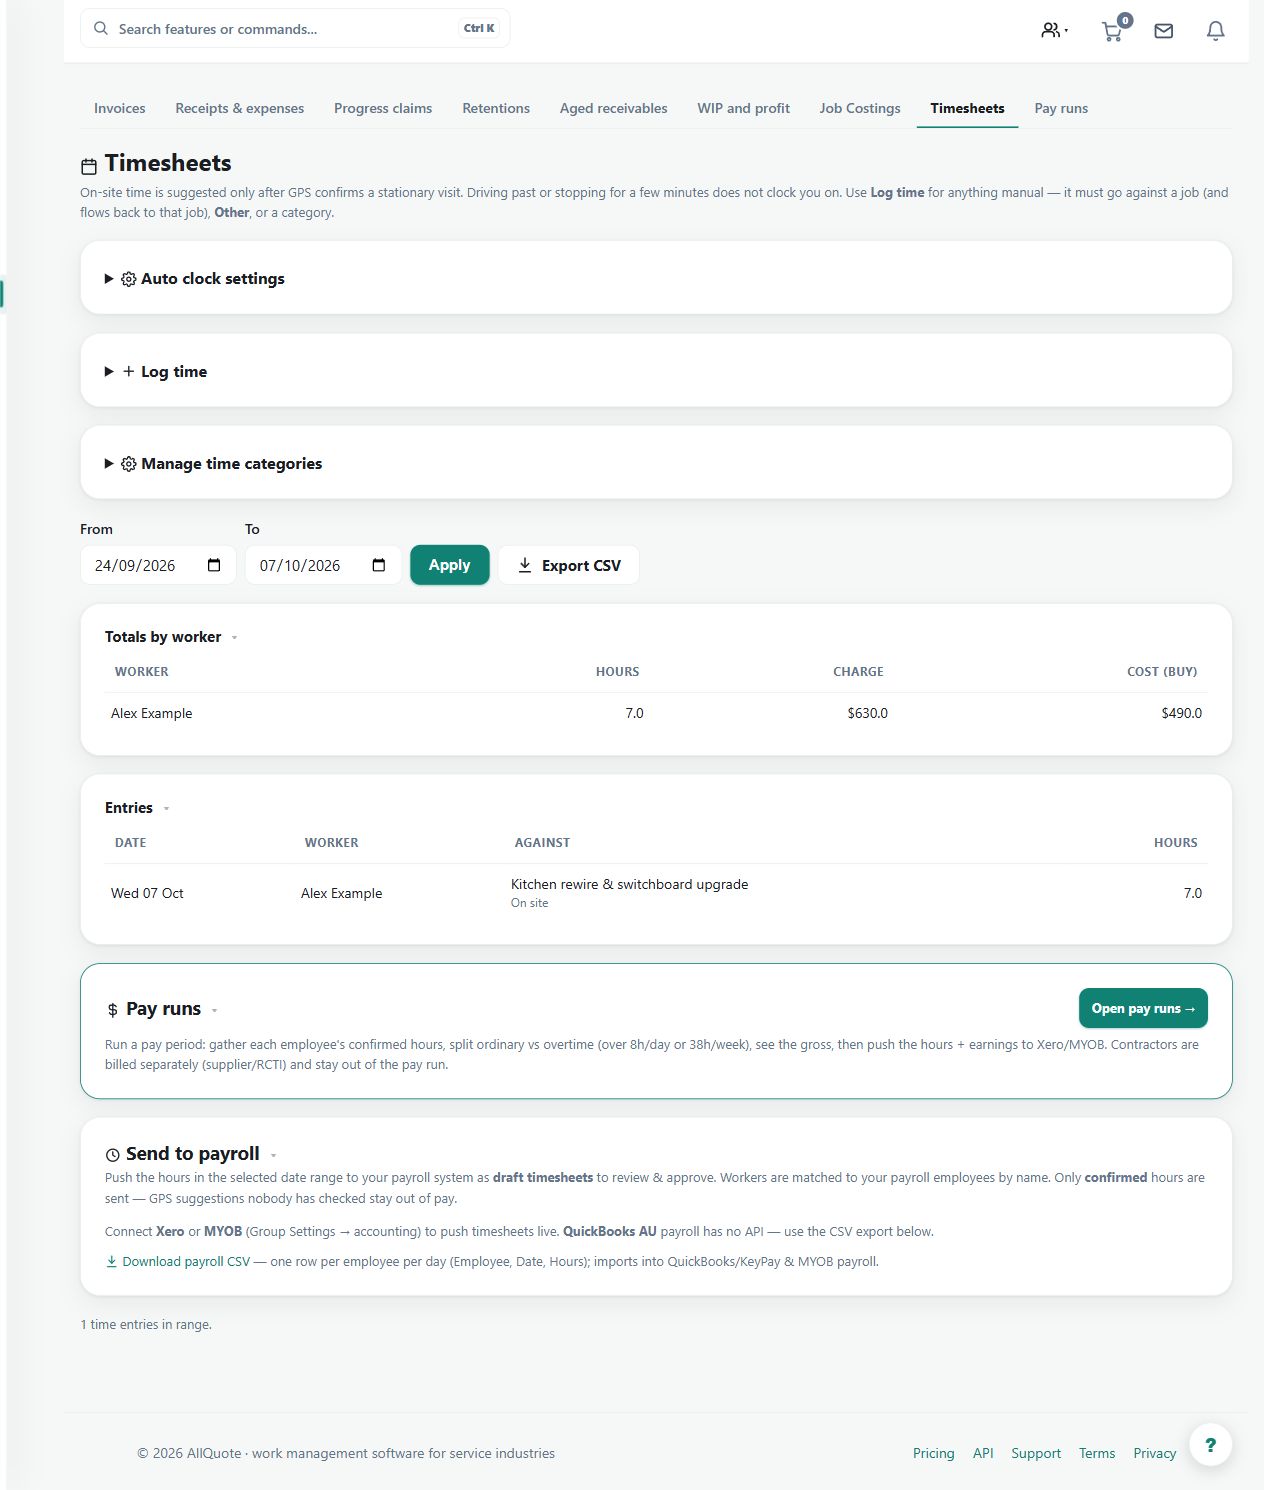
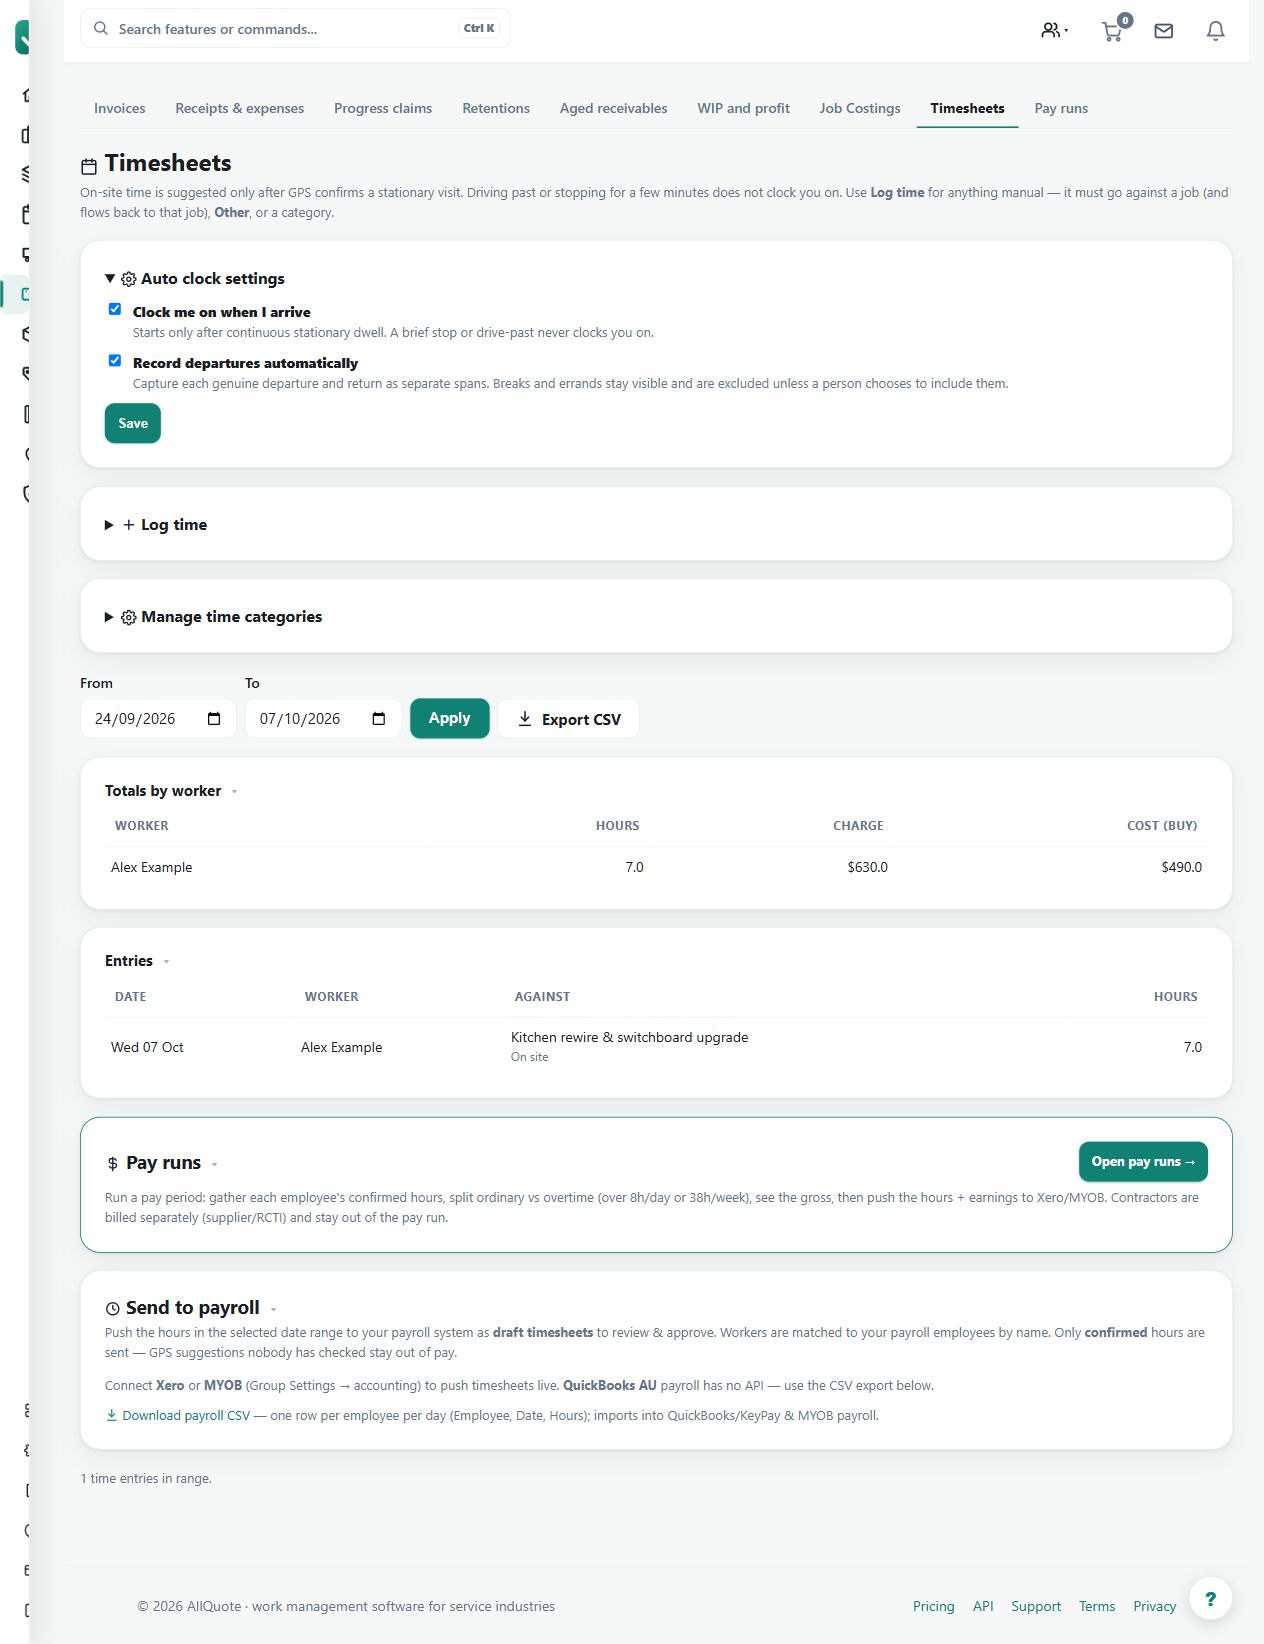
Demo screenshot. Expanded automatic clock settings sit above the example timesheet. Review consent, location and working-time rules; enabling a setting does not prove a device supplied an arrival event. Select the image to enlarge.
What
Can automatically start and stop a job timer when a worker arrives at or leaves an assigned job site.
Roles
owneroffice
How
Open Timesheets at /timesheets.
Review the auto-clock settings for GPS arrival and leave events.
Make sure jobs have a usable site address/geofence before relying on automatic clock-on or clock-off.
Confirm or fix any generated timesheet entries before approving time for payroll or job billing.
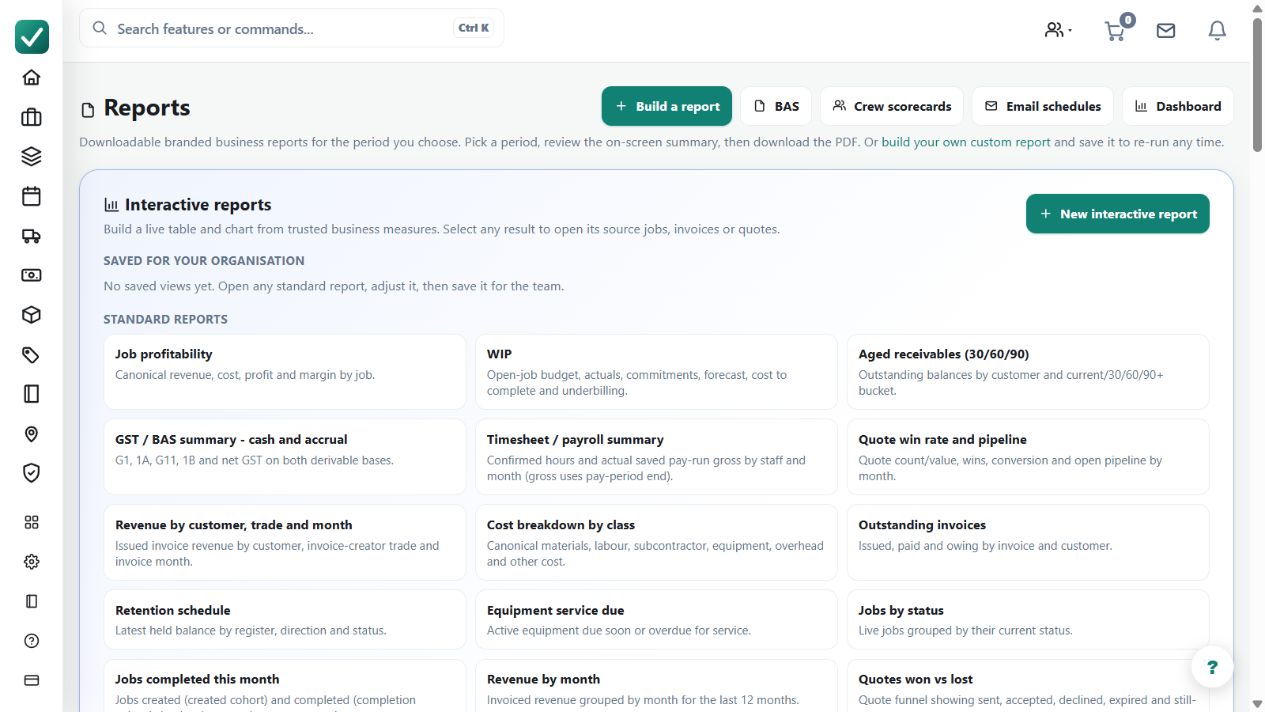
Demo screenshot. The report catalogue exposes financial, job, labour and customer reporting. Pick the correct period and inspect the source transactions before relying on a total. Select the image to enlarge.
What
Produces operational and profitability reports from jobs, quotes, invoices, labour, and stock data.
Roles
owneroffice
How
Open Reports from the sidebar or go to /reports.
Choose the report type needed for revenue, cash, job profitability, aged receivables, crew hours, or sales pipeline.
Set the date range and filters shown on the report page.
Generate, view, print, or export the report for the period being reviewed.
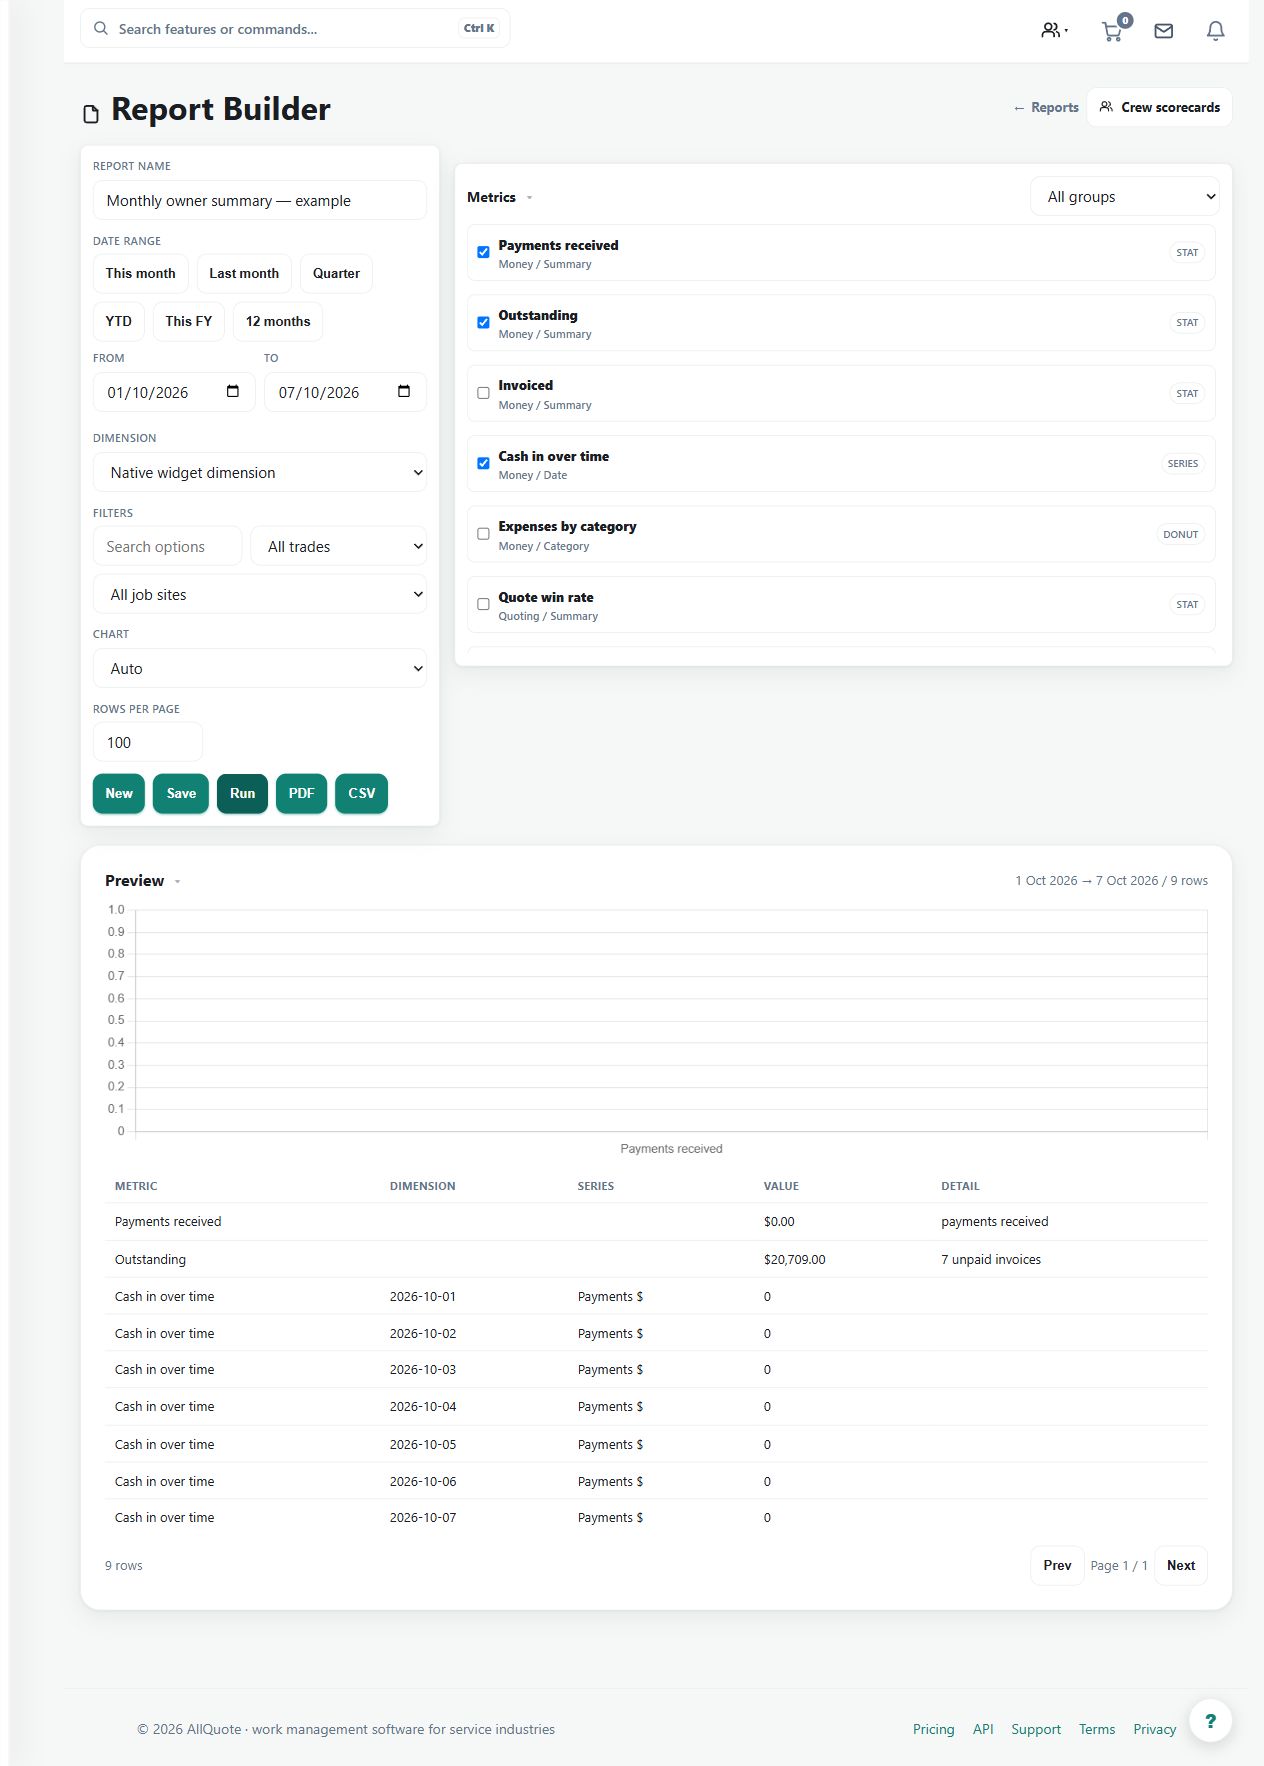
Demo screenshot. The custom report example selects payments received, outstanding and cash-in metrics for an owner summary. Report output reflects the chosen dates, filters and available records. Select the image to enlarge.
What
Builds saved reports from selected metrics, filters, date ranges, and output formats.
Roles
owneroffice
How
Open Report Builder at /reports/builder.
Choose the dataset, fields, metrics, filters, and date range.
Preview the output and adjust the columns until it answers the business question.
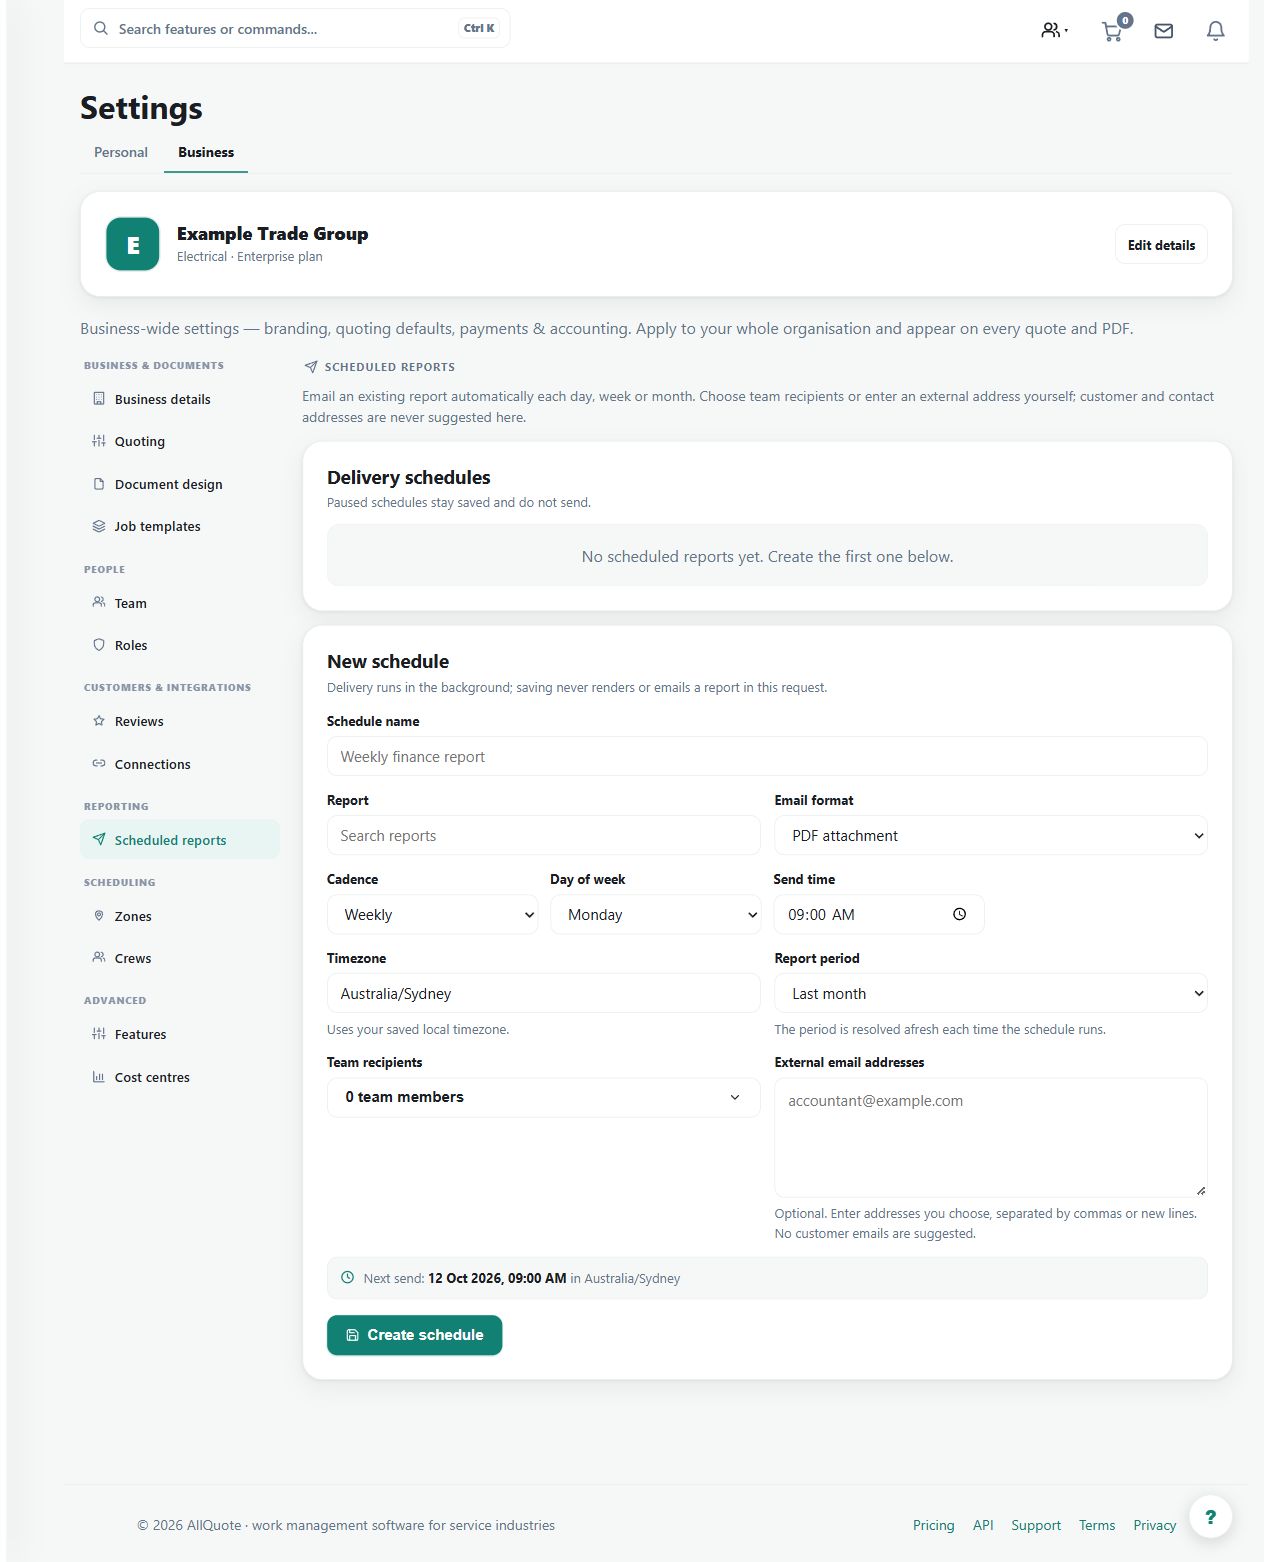
Demo screenshot. Scheduled-report settings show the recipient, report and cadence controls. The screenshot demonstrates configuration only; no report email was sent. Select the image to enlarge.
What
Emails selected reports, saved builder reports, scorecards, or dashboards on a daily, weekly, or monthly cadence.
Roles
owneroffice
How
Open Reports > Email schedules at /reports/schedules.
Choose the report or dashboard to send.
Set the cadence, delivery time, output format, recipients, and reporting range.
Save the schedule, then use Send now when the delivery setup needs a test.
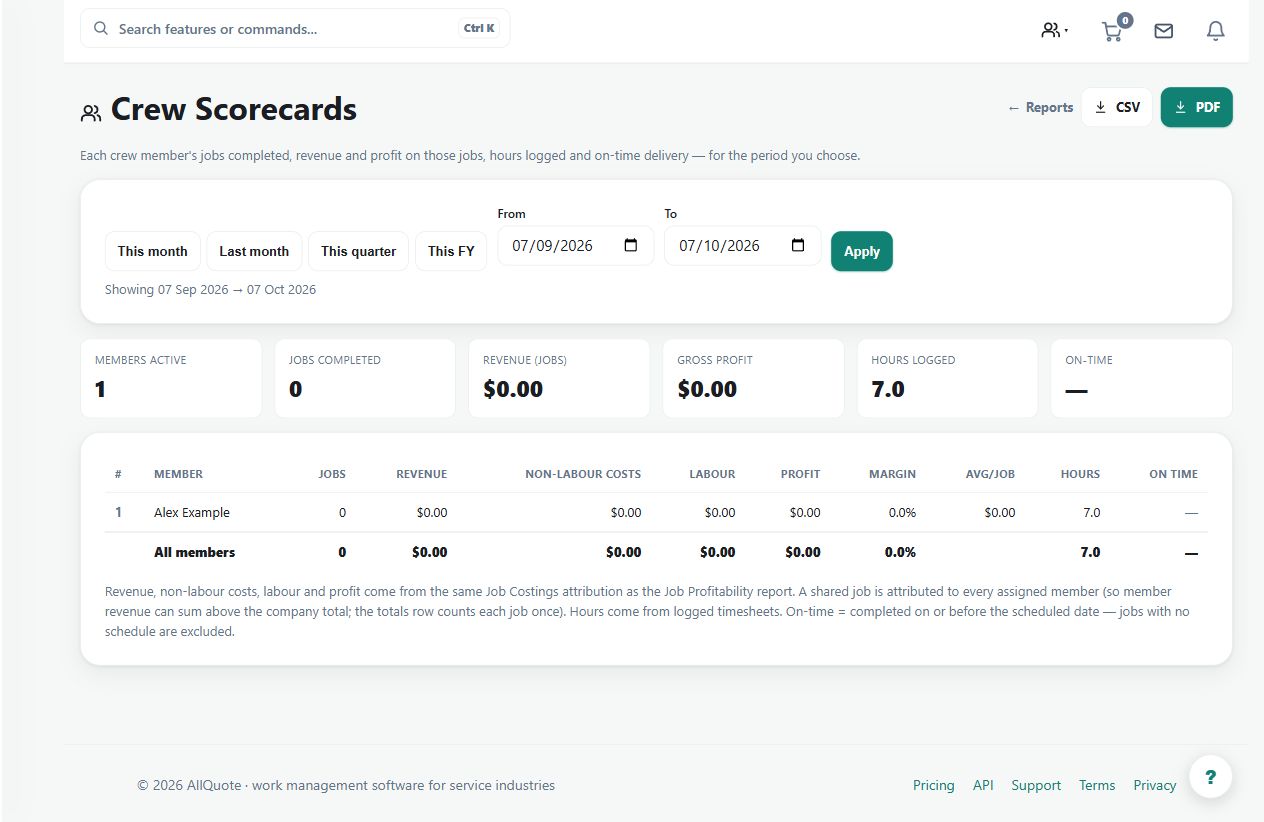
Demo screenshot. The crew scorecard shows the example worker's logged hours and operational measures. Use complete, comparable records before drawing performance conclusions. Select the image to enlarge.
What
Summarises per-technician jobs, revenue, hours, completion, and on-time performance.
Roles
owneroffice
How
Open Crew Scorecards at /reports/scorecards.
Choose the reporting period.
Review each technician's jobs, revenue, hours, completion, and on-time performance.
Export or print the scorecard when it needs to be shared with management or payroll.
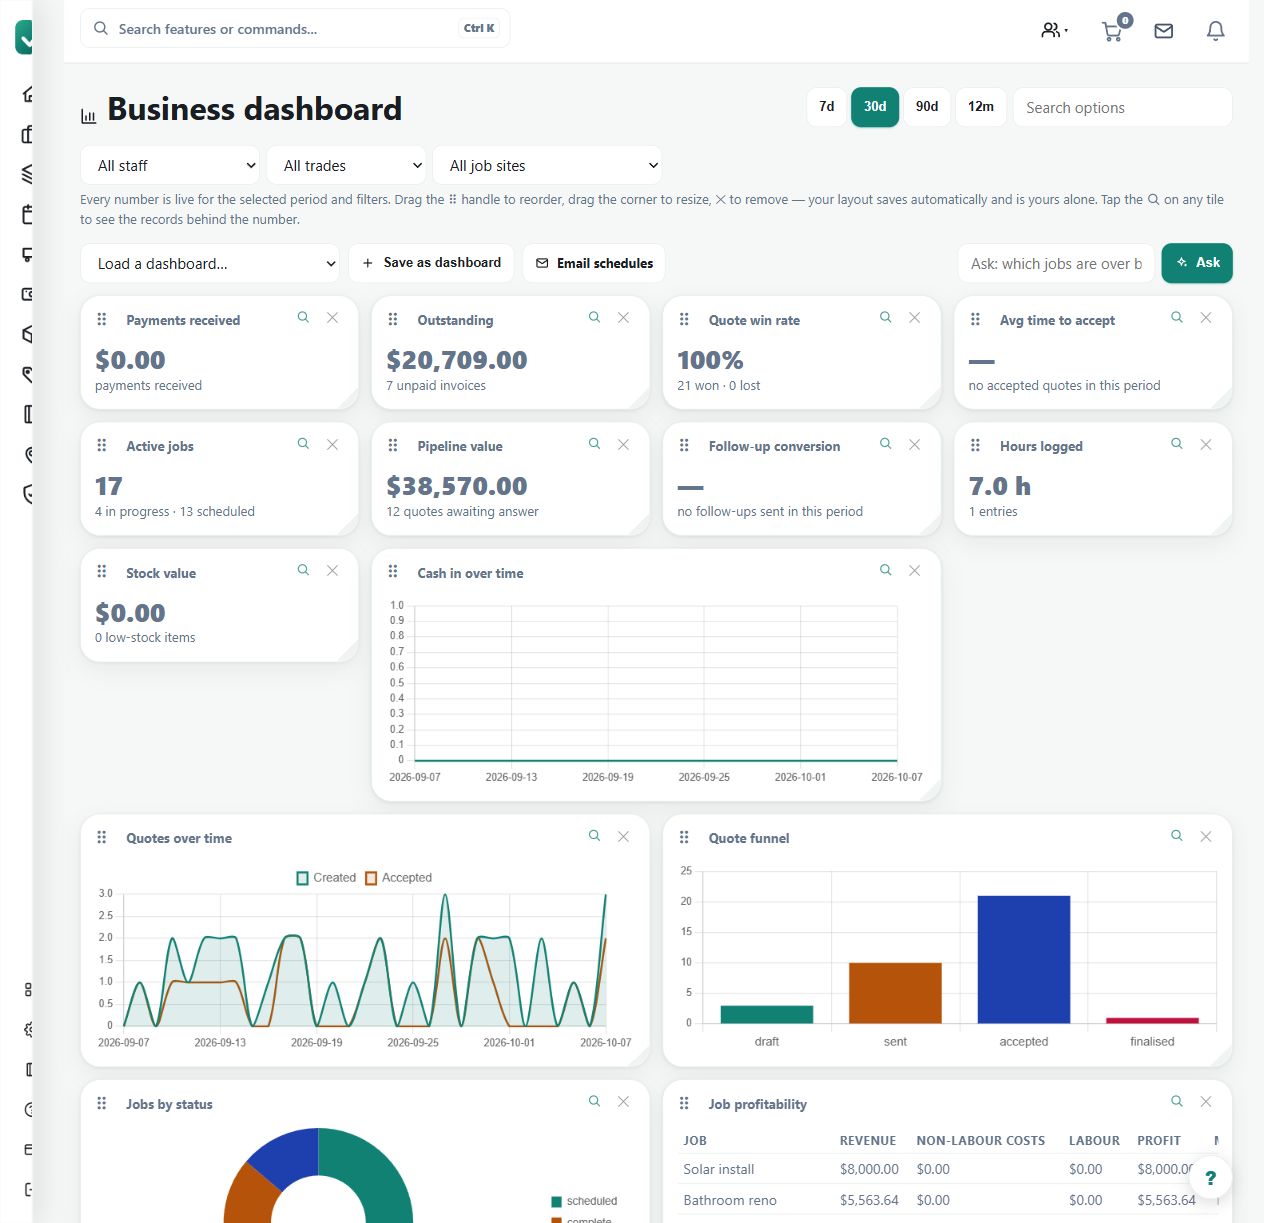
Demo screenshot. The business dashboard displays metrics from fictional invoices and jobs. These figures illustrate the interface and are not AllQuote's own commercial results. Select the image to enlarge.
What
Provides configurable BI dashboards for money, jobs, labour, reports, and stock signals.
Roles
owneroffice
How
Open Business Dashboard at /bi.
Review the dashboard widgets for money, jobs, labour, reports, and stock signals.
Use widget links or drill-downs to inspect the underlying records.
Save dashboard layout changes where the dashboard allows editing.
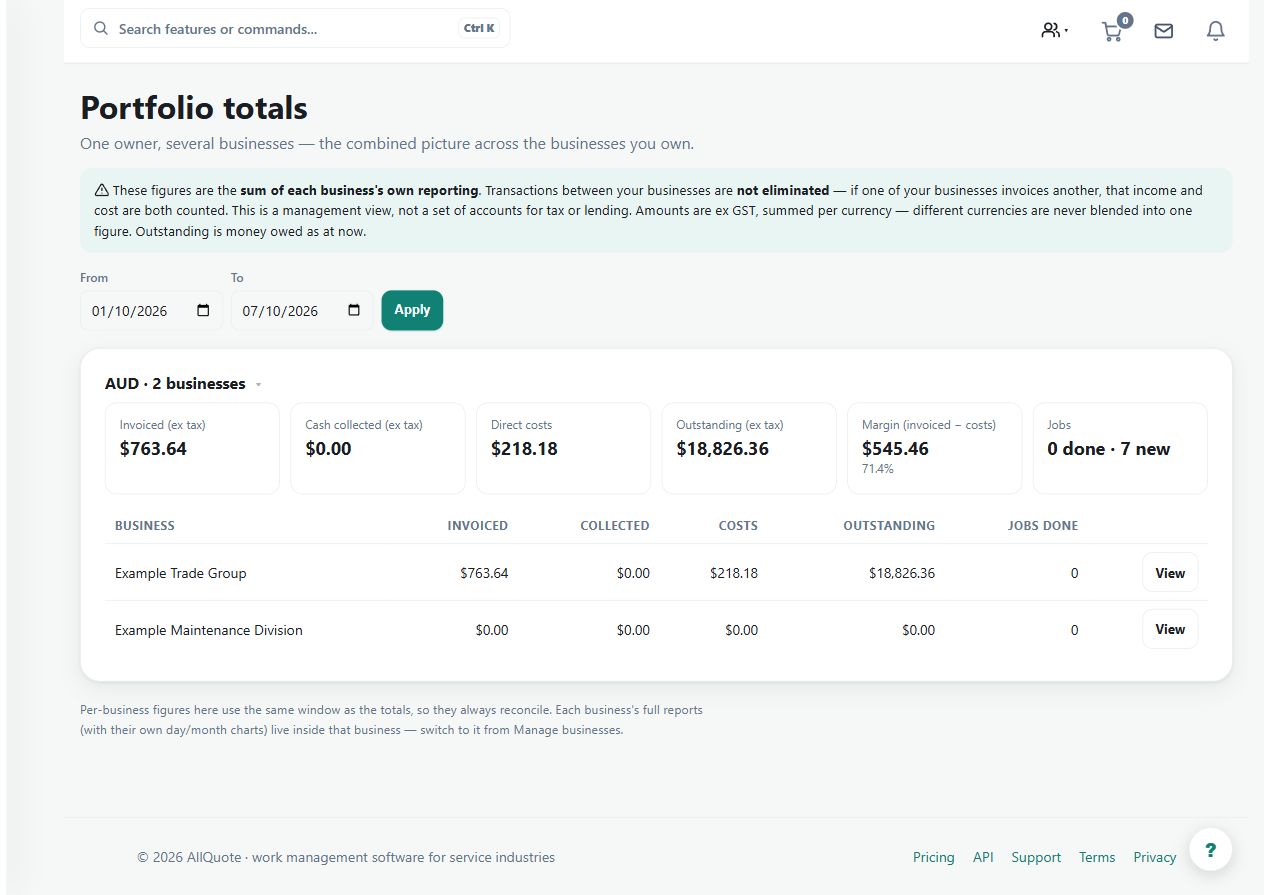
Demo screenshot. The portfolio view lists Example Trade Group and Example Maintenance Division. Totals are limited to businesses the signed-in owner is authorised to view. Select the image to enlarge.
What
Sums the additive money facts across every reporting-entitled business the owner owns, per currency. It is not a statutory consolidation - the page says so in plain words.
Roles
owner
How
Open Portfolio at /portfolio. The page only exists for an owner of at least one reporting-entitled business.
Check the window (month to date by default) and adjust the from/to dates when a different period is needed.
Review the summed totals per currency across the owned businesses.
Open a business from the list for its per-organisation drill-down; ownership and entitlement are re-verified on every request.
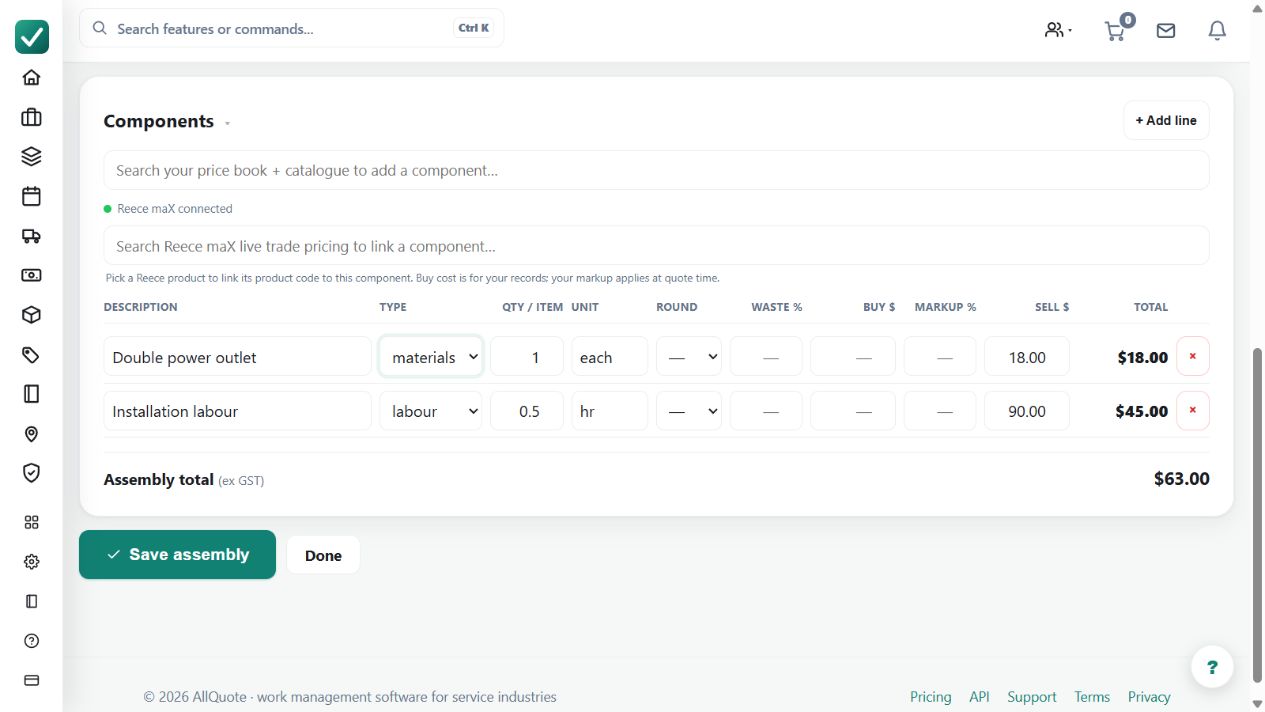
Demo screenshot. The Power outlet installation assembly contains a material component and installation labour, with illustrative rates. Review quantities, units, waste and supplier costs before reusing an assembly. Select the image to enlarge.
What
Stores reusable bundles of labour and materials that can be used to price repeated work from current cost assumptions.
Roles
owneroffice
How
Open Apps > Assemblies & Kits or go to /kits.
Use New assembly, enter the name, description, and optional required licence, then press Create & add components.
Add materials, labour, and other reusable component lines from the price book or free text.
Open a quote and use Add assembly/kit so the current component prices expand into quote line items.
To reuse work already priced on a quote, tick quote line items and press Create assembly/kit.
Use Business settings > Documents to choose whether customer documents show the kit breakdown or one collapsed line.
Demo screenshot. The document theme controls whether an assembly appears as a single customer-facing line or a breakdown. The underlying assembly remains available for costing and review. Select the image to enlarge.
What
Lets the quote editor keep kit components while the customer document can show a single kit line.
Roles
owneroffice
How
Open Assemblies & Kits at /kits.
Use New assembly, enter Name and Description, then press Create & add components.
On Edit assembly, use Components, + Add line, and Save assembly to build the reusable kit from pricebook/catalogue components.
Open a quote and use the line item search Add an assembly / kit... so the tradie's editor keeps the component build-up.
Open Business settings > Documents and turn Show assembly breakdown (off = each kit as one line) off when the customer should see one collapsed kit line; leave it on when the customer should see components.
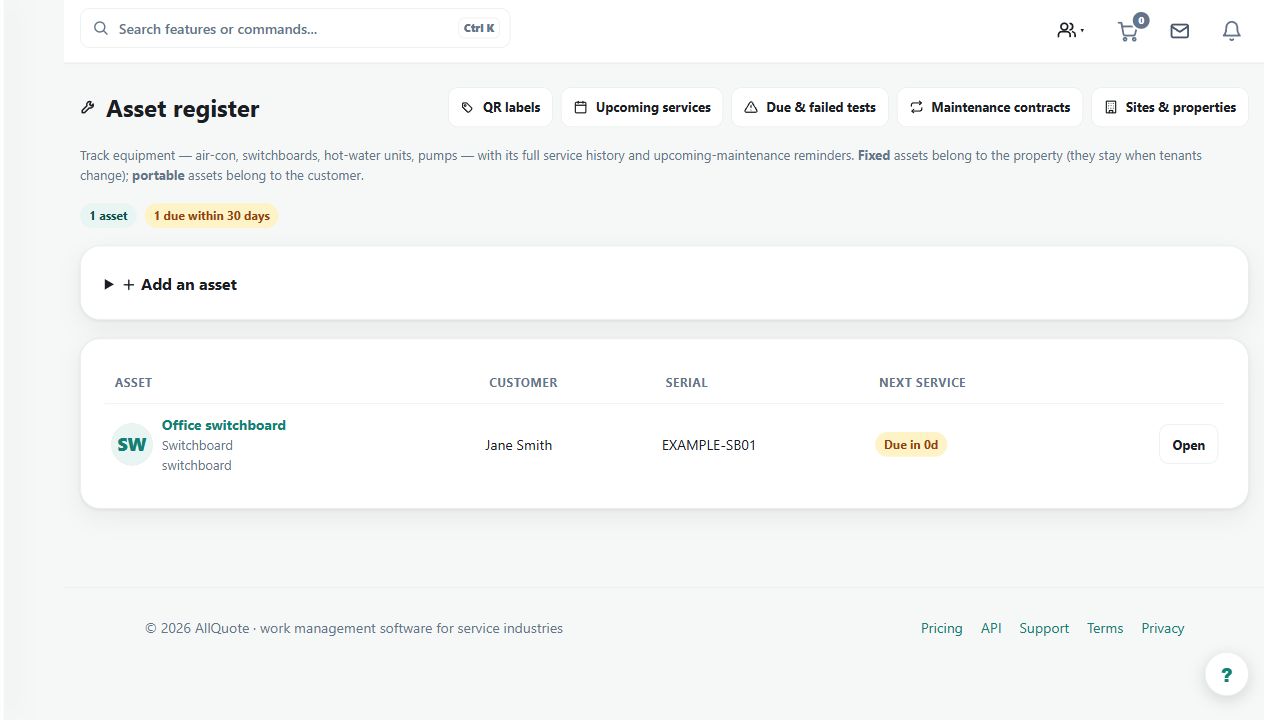
Demo screenshot. The asset register shows Office switchboard, serial EXAMPLE-SB01 and a service-due indicator. Fixed property assets and portable customer-owned assets have different ownership semantics. Select the image to enlarge.
What
Tracks customer equipment, photos, site placement, and linked jobs in an asset register.
Roles
owneroffice
How
Open sidebar Work > Assets or go to /assets.
Use Add an asset and enter Name, Asset type, Model number, Serial #, Customer, Site address, Install date, and Notes.
Use Site address for where the asset is fitted; jobs created for the asset auto-populate that site address.
Open the asset and use Details to edit fields, or press Create a job for this asset to start linked work.
Use Photos & documents > Upload for files that belong with the asset.
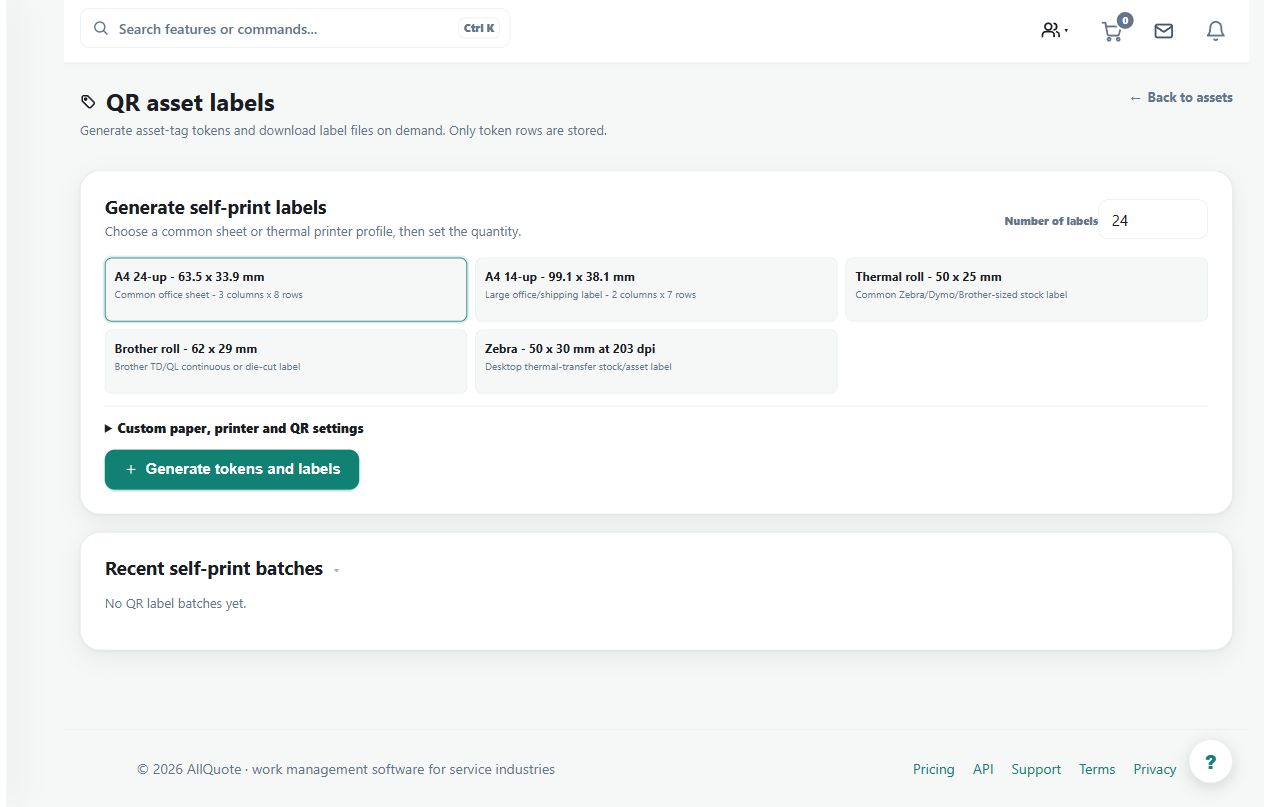
Demo screenshot. The asset-label screen offers print-profile controls for QR tags. Test a printed label, allocate it to the correct asset and verify signed-in access before applying more labels. Select the image to enlarge.
What
Generates QR asset-tag tokens, prints durable labels, and opens the linked asset when a tag is scanned.
Roles
owneroffice
How
Open Assets, then QR labels.
Generate the number of labels needed and choose the label and page dimensions for the PDF grid.
Download the PDF grid or a Brother, Dymo, or Zebra thermal template; files are rendered when downloaded.
Attach the printed label to the asset, scan it, and choose the asset record to allocate the tag.
After allocation, scans open the linked asset for signed-in team members.
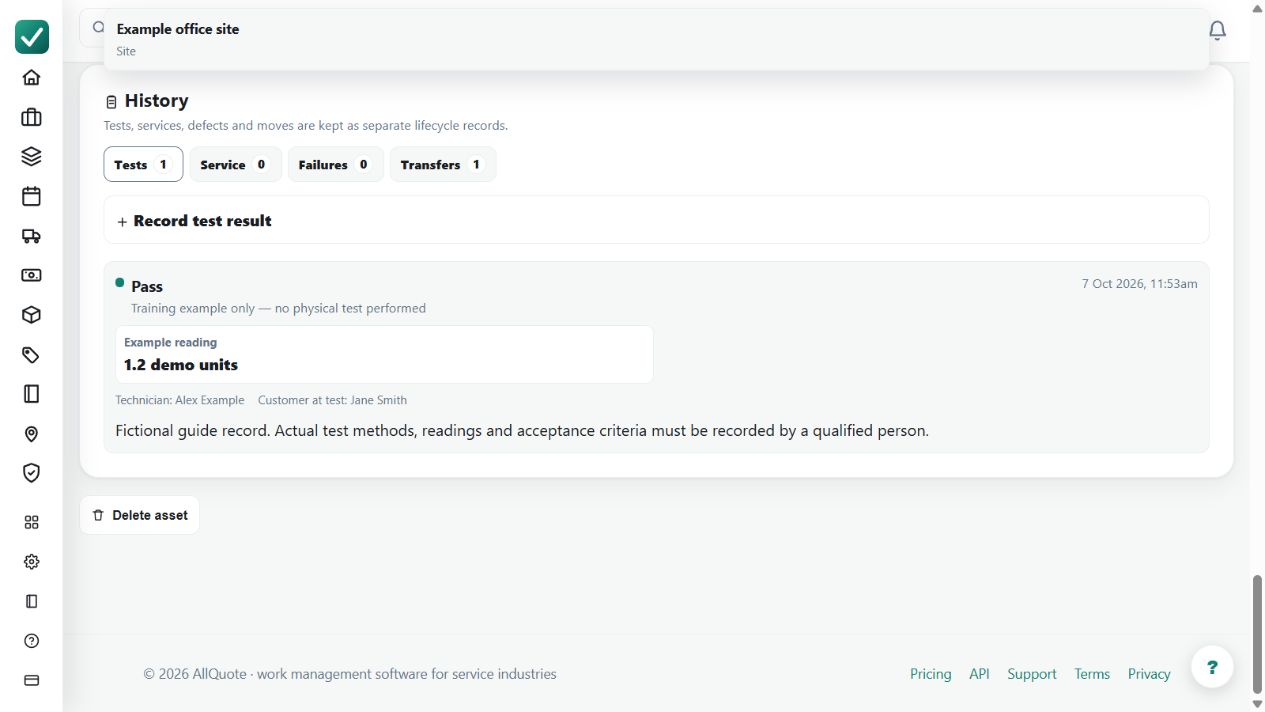
Demo screenshot. The asset's history separates tests, services, failures and transfers. The visible test is explicitly fictional and no physical test was performed; record real methods, readings and evidence against the correct asset. Select the image to enlarge.
What
Tracks scheduled maintenance, service reminders, completed-service history, and lifecycle records for registered assets.
Roles
owneroffice
How
Open an asset from /assets.
Set the service interval and install date when the asset needs planned maintenance.
Use Upcoming services to review overdue and due-soon work.
Log completed services with notes and an optional linked job so the lifecycle history stays attached to the asset.
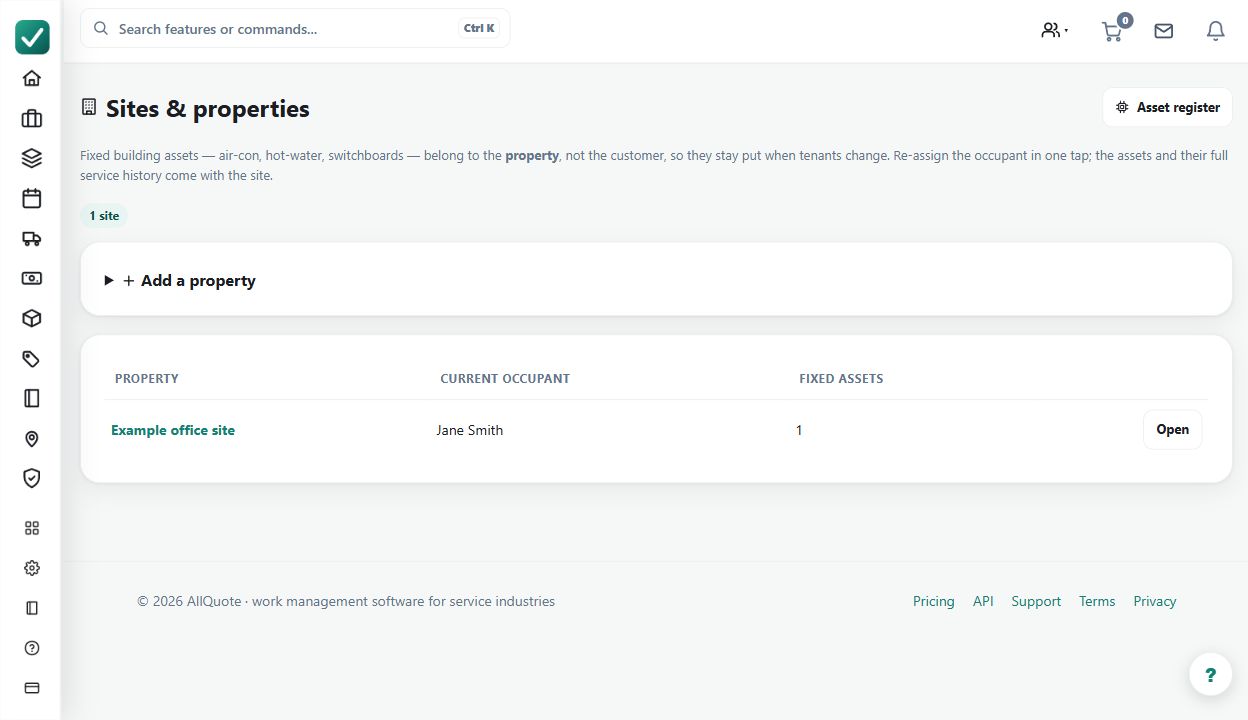
Demo screenshot. The example site register links a property to its customer and fixed assets. Verify the site address and ownership before changing occupants or moving an asset. Select the image to enlarge.
What
Tracks fixed property assets and occupant changes while preserving site and service history.
Roles
owneroffice
How
Open Sites & Properties at /sites.
Create the property/site with the service address and customer/occupant details.
Attach fixed assets or open linked assets from the site record.
When the occupant changes, update the occupant/customer details without deleting the site history.
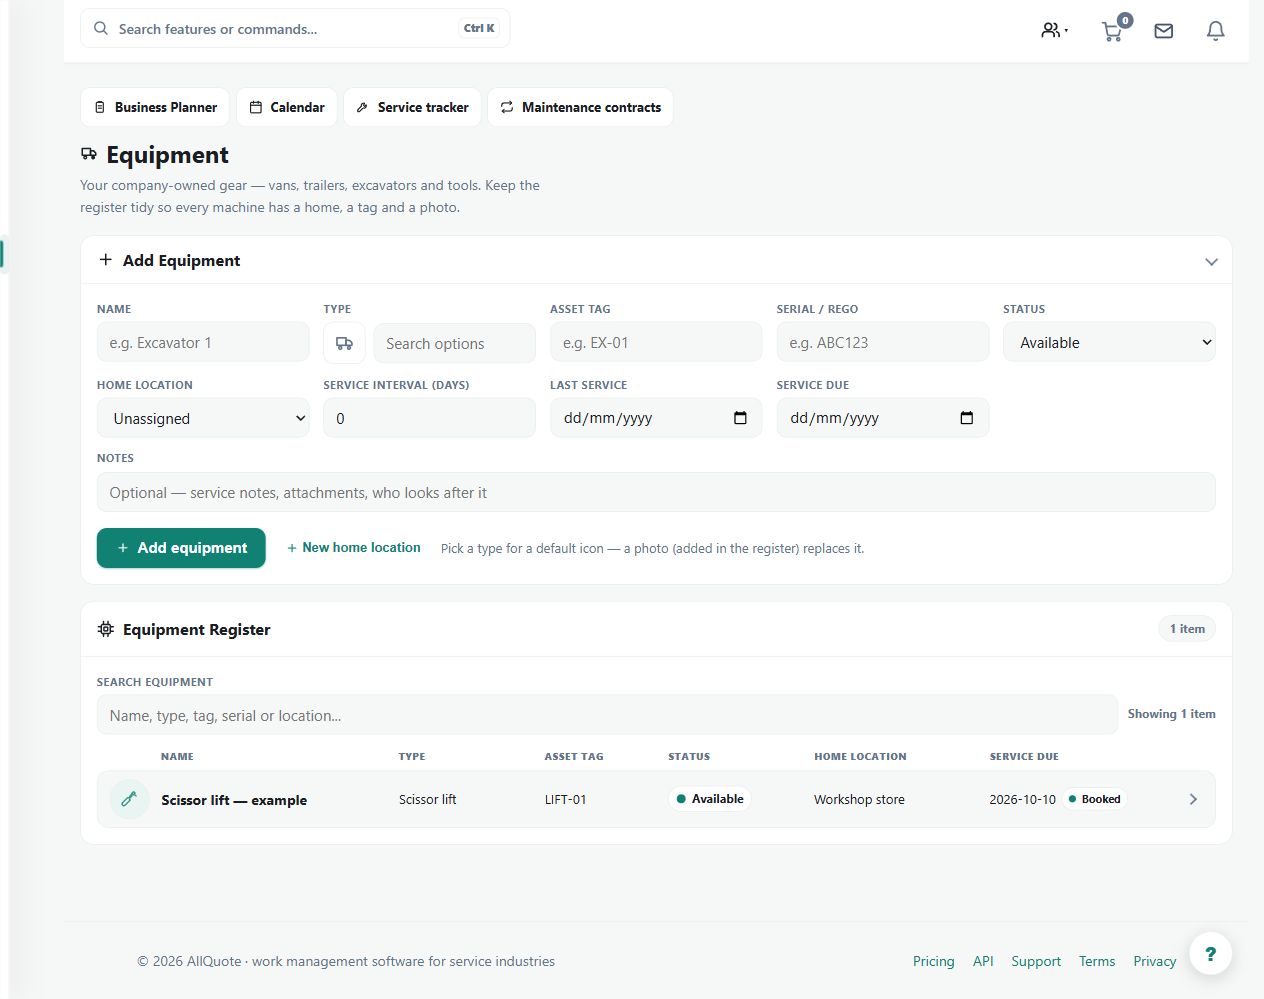
Demo screenshot. The equipment register lists a tagged scissor lift with serial and allocation information. Check booking dates and conflicts before committing the equipment to work. Select the image to enlarge.
What
Tracks company-owned gear such as vans, trailers, machines, and tools so they can be allocated to jobs.
Roles
owneroffice
How
Open Equipment at /equipment.
Add each company-owned asset such as vans, trailers, machines, tools, or hire gear.
Set the equipment's home location and availability details.
Open Business Planner at /dispatch and allocate available equipment to the jobs that need it.
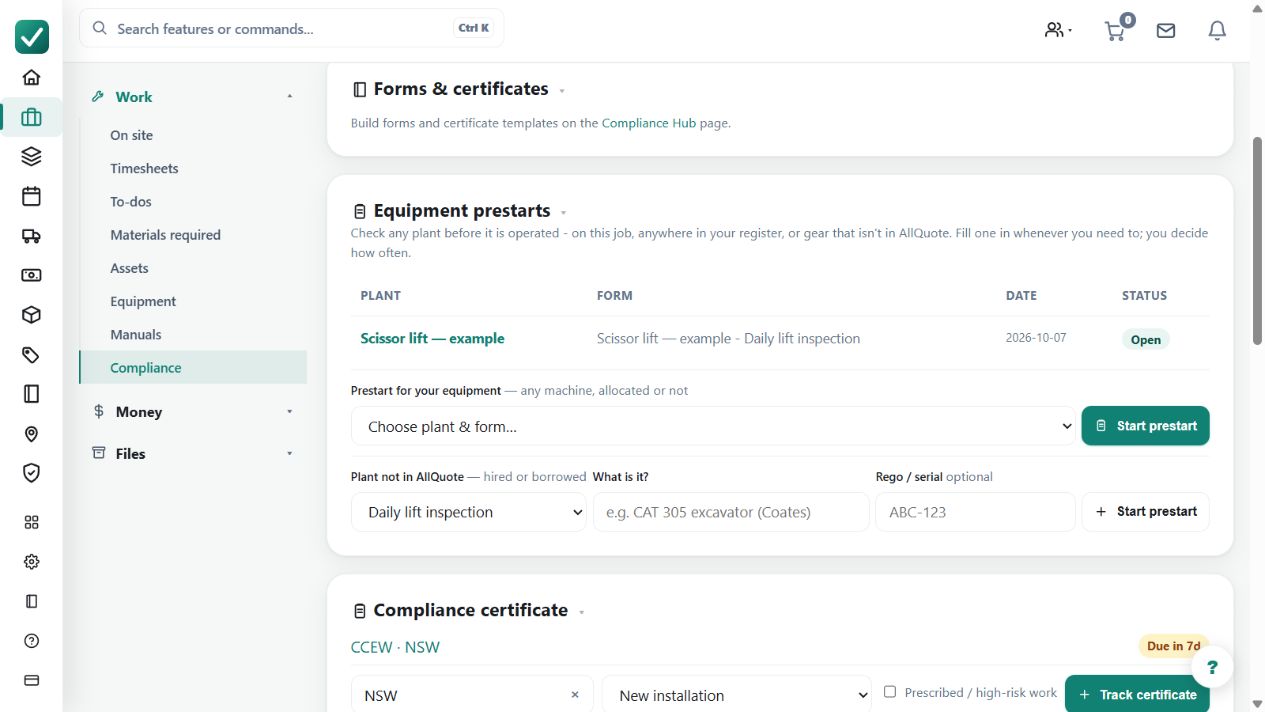
Demo screenshot. The job's equipment prestart area provides the required inspection entry point. A listed template is not a completed or passed safety check. Select the image to enlarge.
What
Keeps equipment prestart templates, job checklists and completed records together when the Team plan's Equipment and Safety areas are enabled.
Roles
ownerofficeteam
How
Open the equipment record > Prestarts and create or attach each checklist that applies to that item of equipment.
When building a template, choose whether a signature is required; an unsigned completion is allowed when the creator leaves it optional.
Allocate the equipment to the job. Each attached template stays as its own checklist, so one equipment item can have several prestarts on the same job.
Open the equipment prestart in the field app, answer every item and complete it. AllQuote stamps the actual date, time and completer, and the same record appears in Compliance.
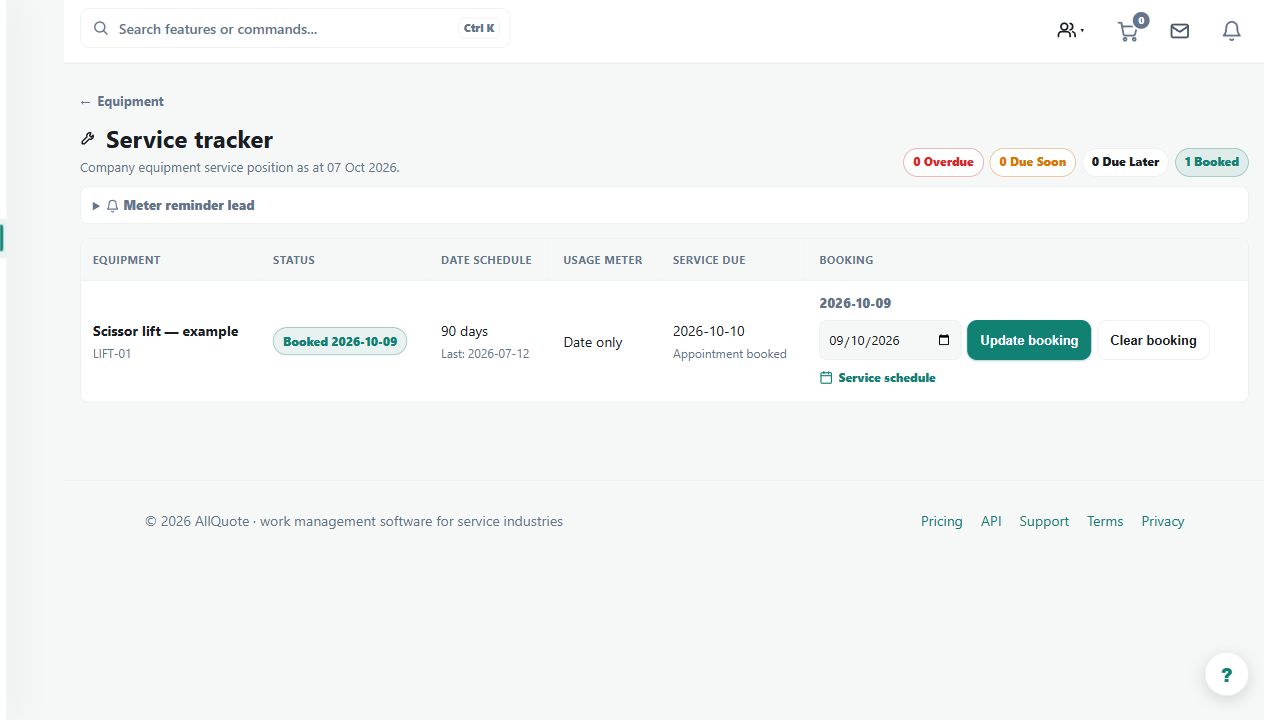
Demo screenshot. The lift's service tracker separates the due date from a booked service. A booking alone does not record that maintenance was completed. Select the image to enlarge.
What
Shows when equipment service is due separately from the date a service visit has been booked.
Roles
owneroffice
How
Open Equipment > Service tracker and review overdue, due-soon and current equipment.
Open an equipment record and set its service interval, last service date or next due date.
Add a booked date when the service is arranged. Booking it does not move the due date or make an overdue service complete.
After the work is done, log the completed service so its history and next due date update from the actual service record.
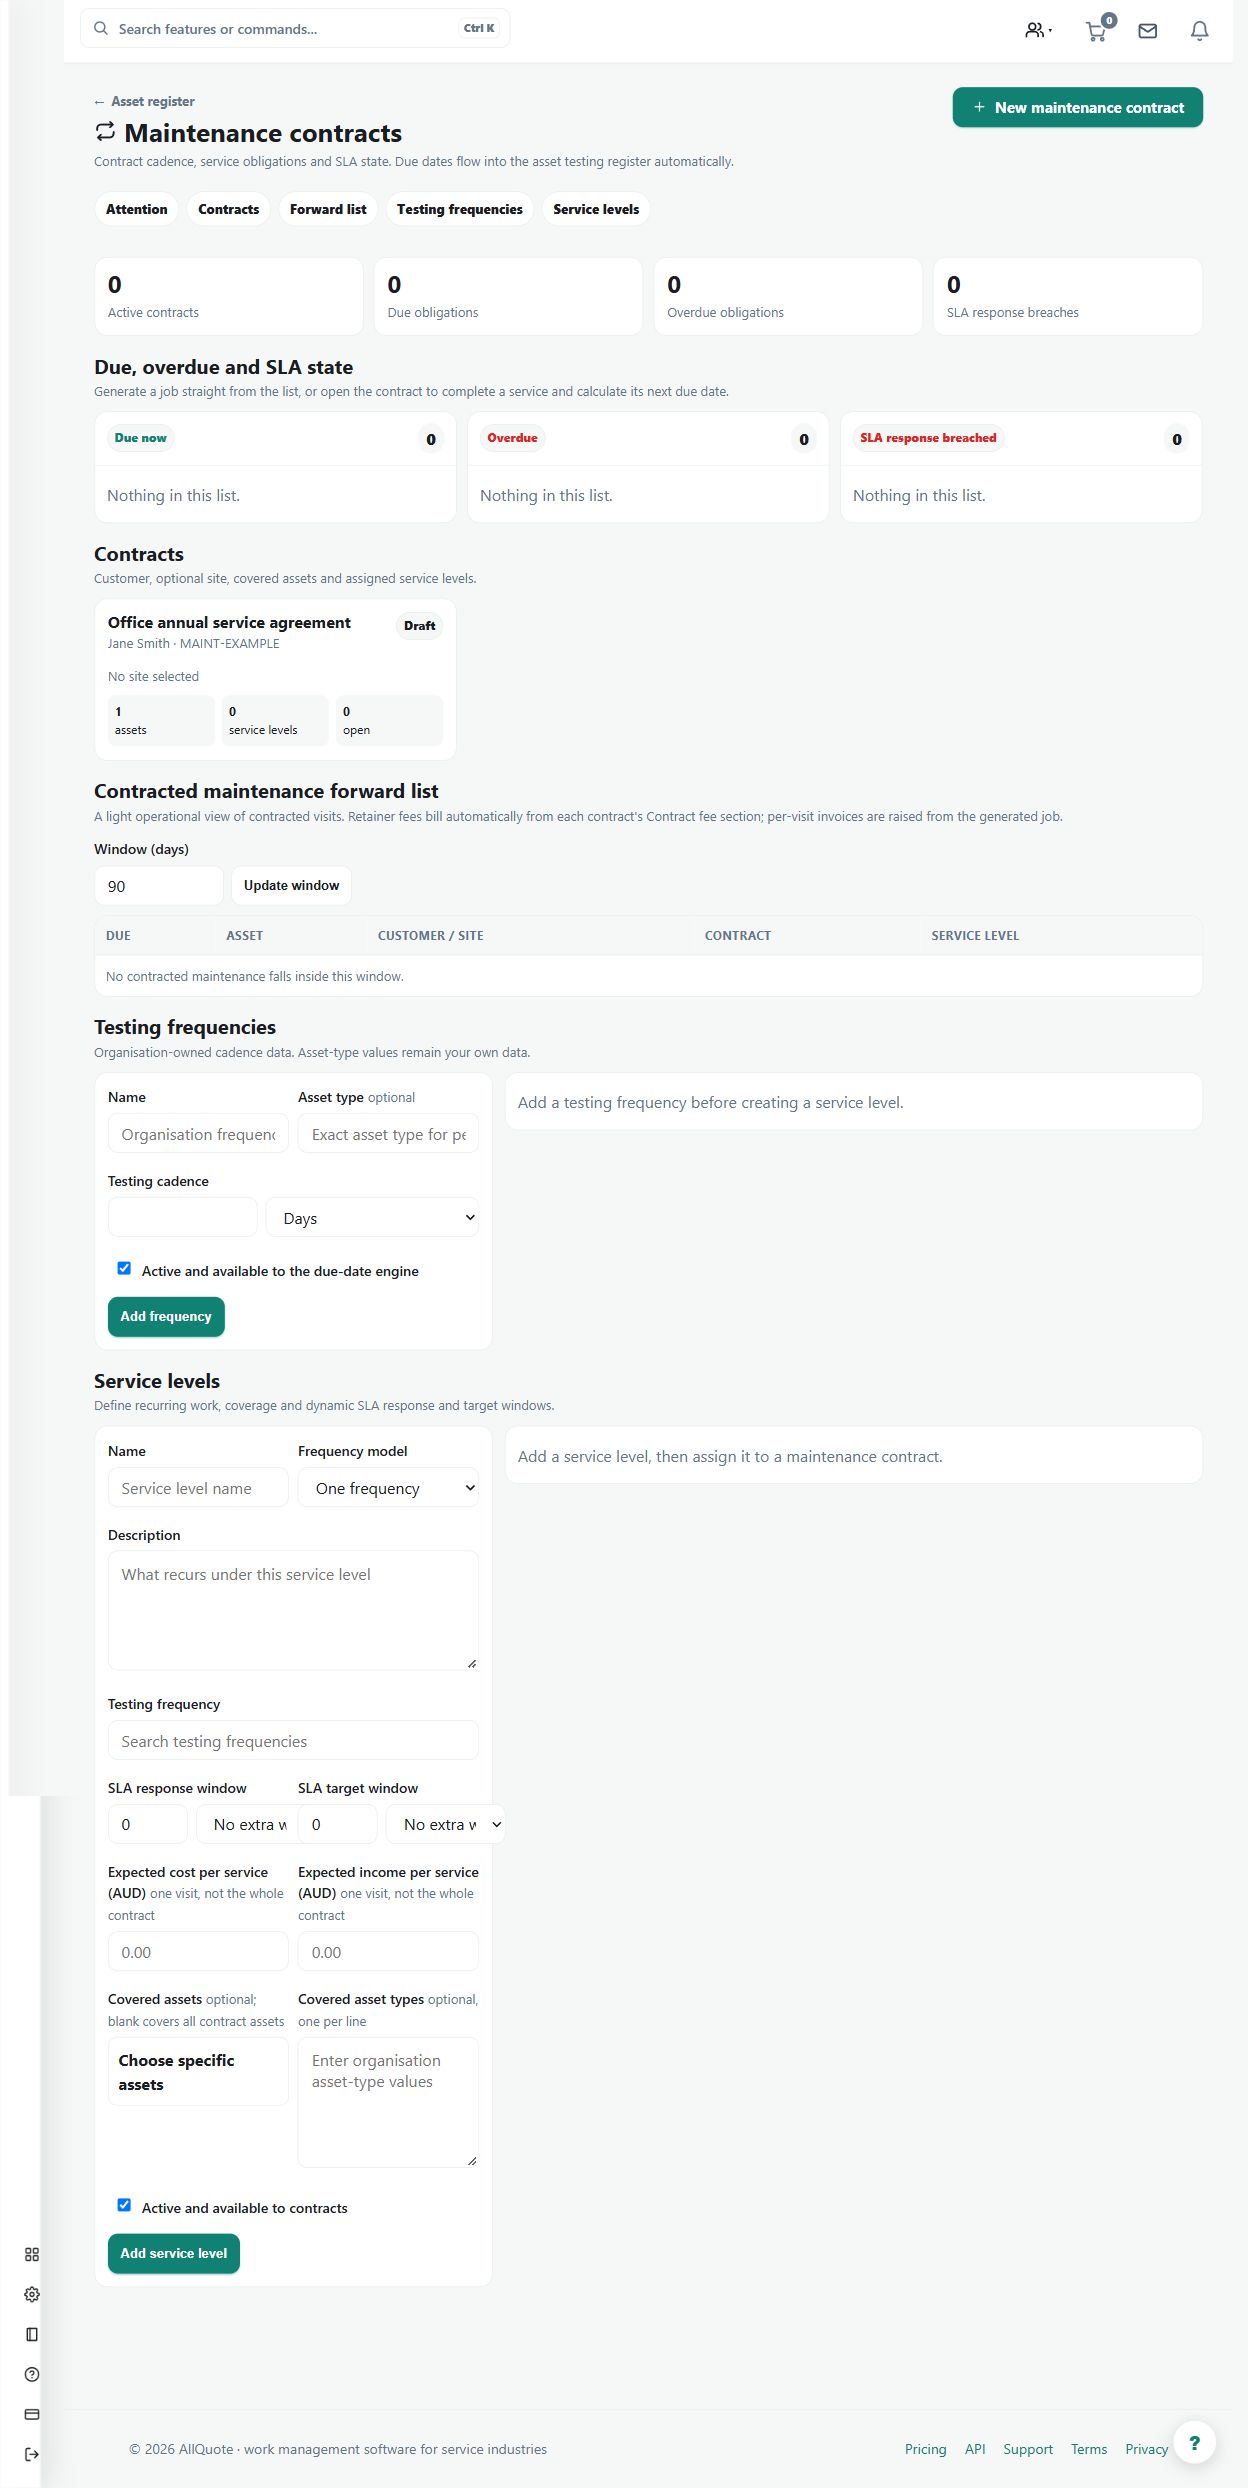
Demo screenshot. The office service agreement is a draft in the maintenance-contract register. Configure the service level, scope and any agreed retainer before activation; this example has not been billed. Select the image to enlarge.
What
Sets a recurring fee on a maintenance contract - amount, period and description - that the nightly run bills as a draft invoice each period.
Roles
owneroffice
How
Open Maintenance, choose the contract, and go to its billing section.
Set the fee amount, the billing period, and the description the customer should see.
Save the fee; the nightly run raises a draft invoice each period for review before sending.
Set the fee to 0 to clear it when the retainer ends; the contract and its history stay intact.
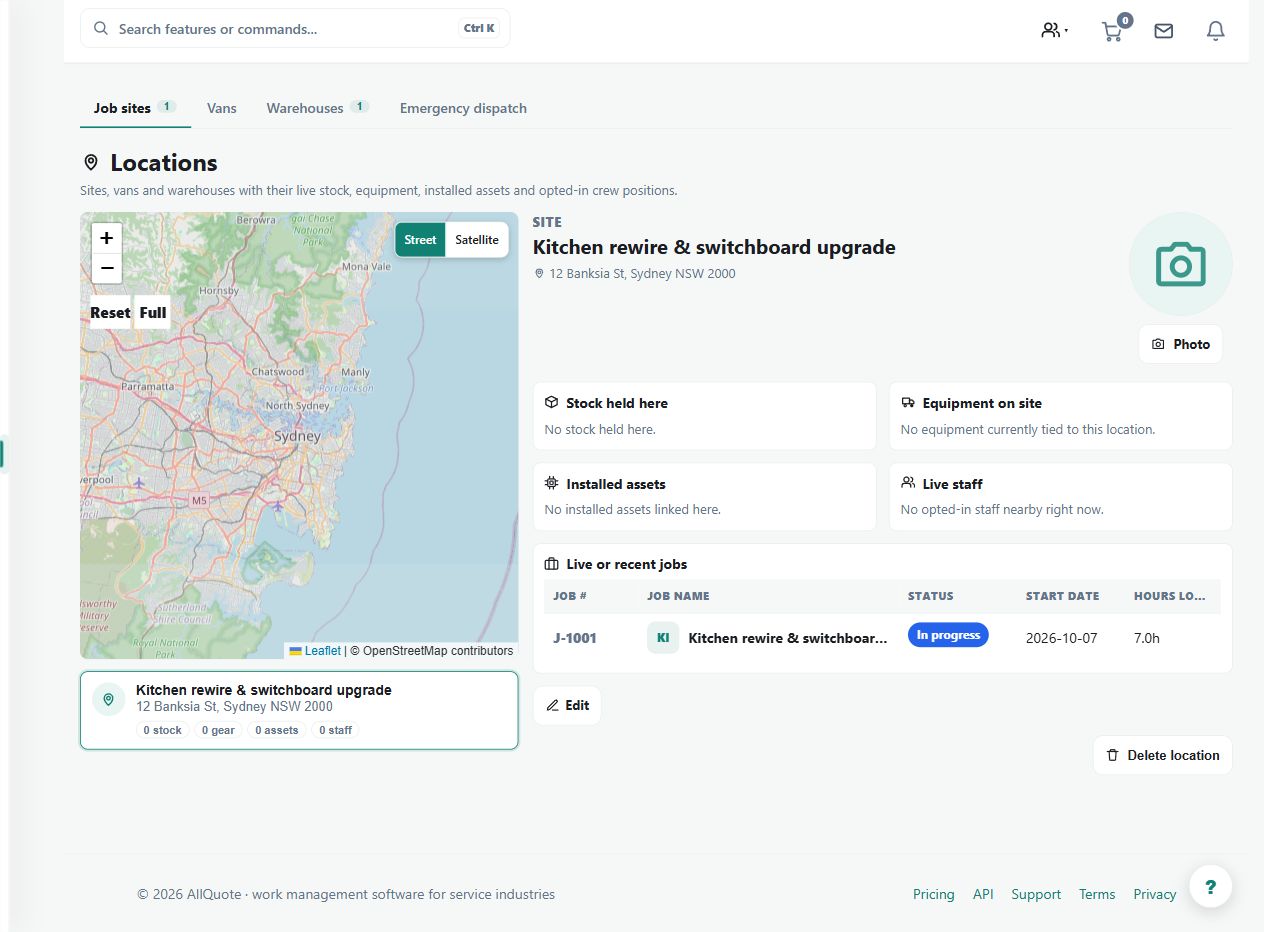
Demo screenshot. The locations hub groups job sites, vans and warehouses. Choose the correct location type before allocating stock, equipment or work. Select the image to enlarge.
What
Unifies live job sites, vans, warehouses, stock, equipment, installed assets, and opted-in crew positions into one location view.
How
Open Locations at /locations.
See sites, vans, warehouses and opted-in crew positions on one view.
Open a location for the stock, equipment or assets held there.
Use it before dispatching or restocking so the nearest resource is used.
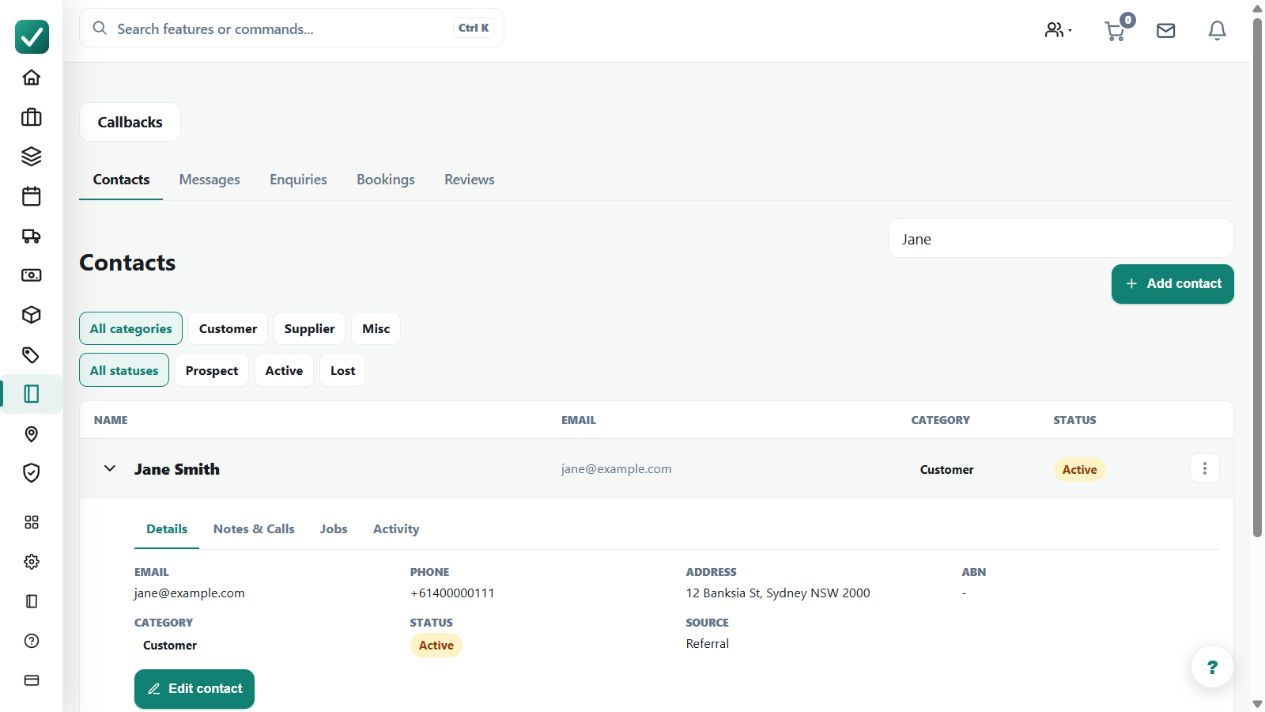
Demo screenshot. Jane Smith is a fictional customer with contact details, source and lifetime-invoiced information in the expanded record. Keep the customer record distinct from individual jobs and properties. Select the image to enlarge.
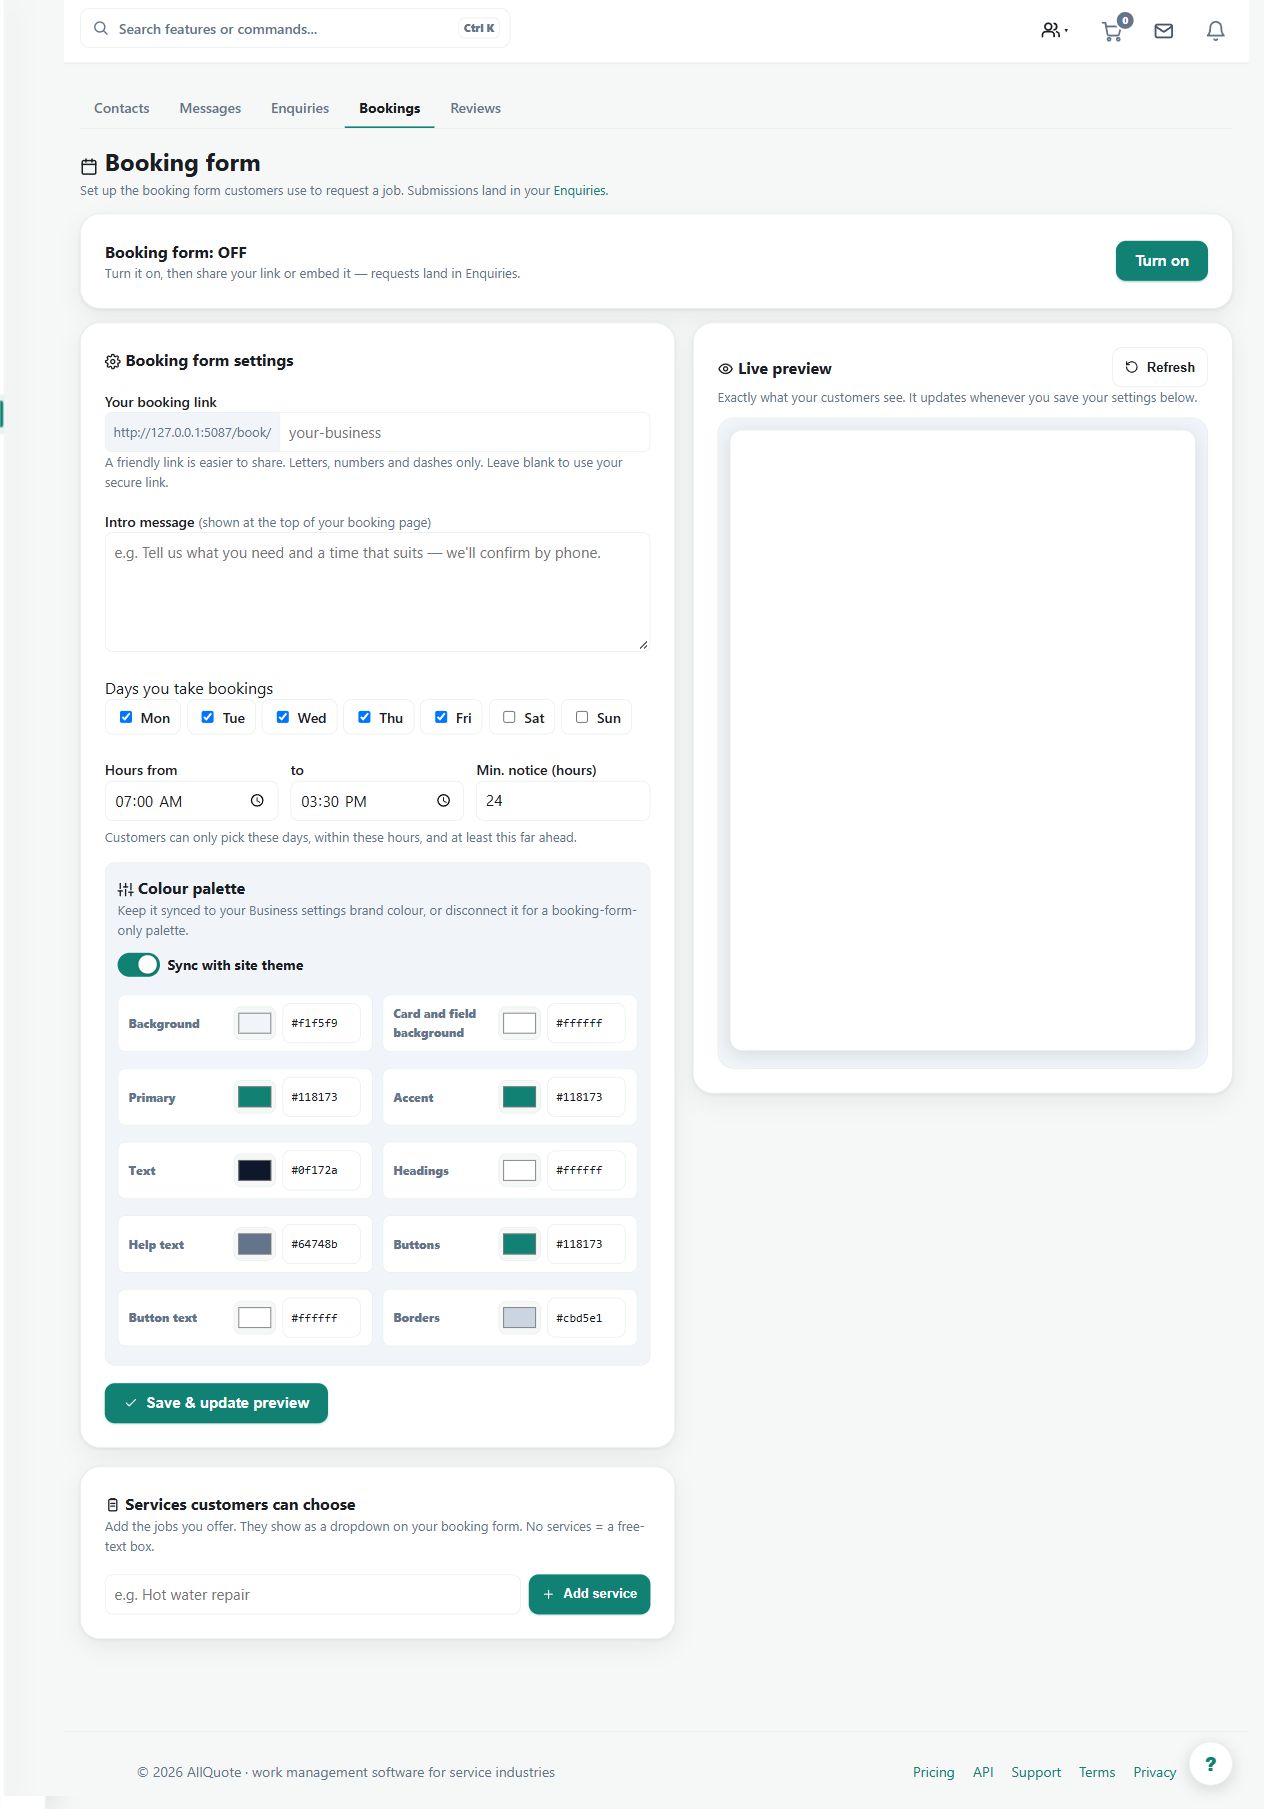
Demo screenshot. The online-booking configuration shows service and availability controls. This is a setup example; the screenshot does not imply that the form has been enabled or that a customer booking was received. Select the image to enlarge.
What
Publishes a booking form, accepts requests, manages services, and turns accepted bookings into jobs.
Roles
owneroffice
How
Open Bookings at /bookings.
Configure the service list and public booking link the customer will use.
Review incoming booking requests in the bookings list.
Accept a booking to turn it into work, or dismiss it when it is not going ahead.
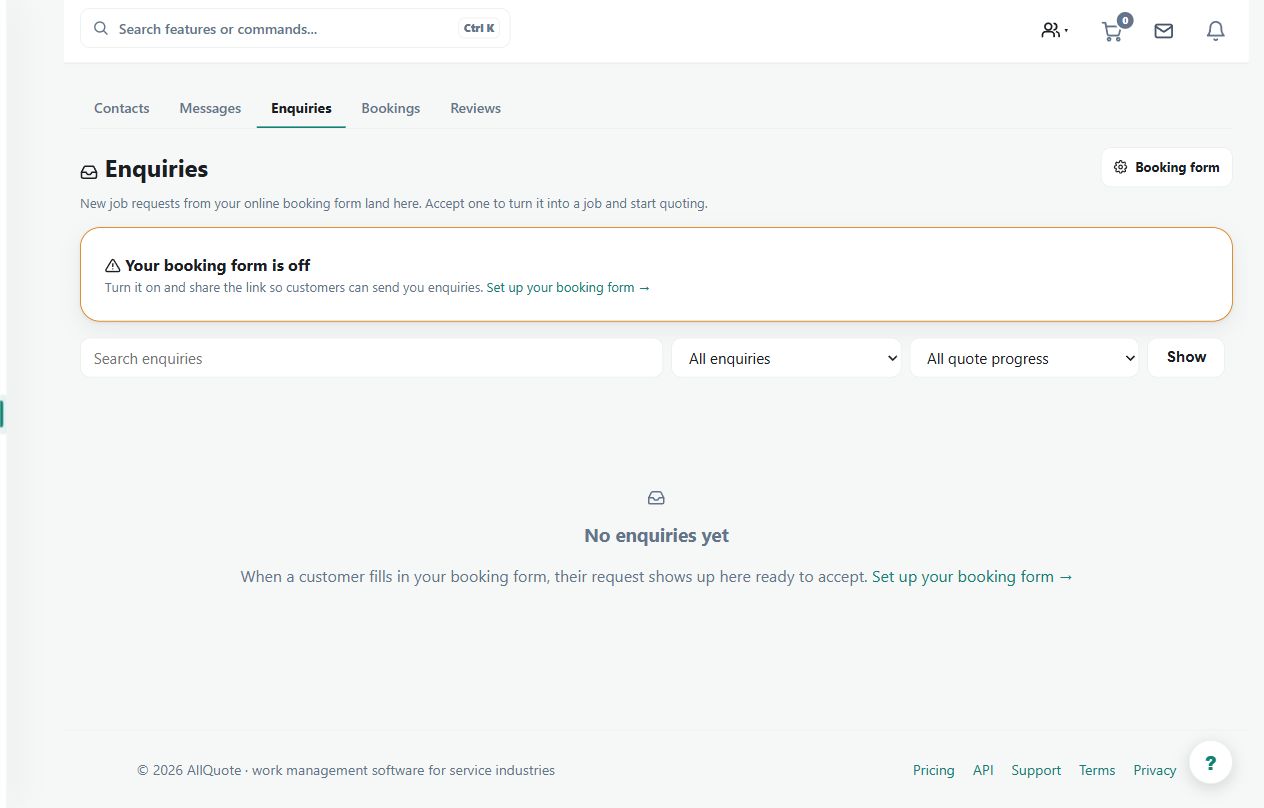
Demo screenshot. The enquiry inbox and filters are ready to review incoming requests. This example contains no received enquiries; create or convert a job only after checking the customer's scope. Select the image to enlarge.
What
Collects incoming customer enquiries separately from confirmed bookings and active jobs.
Roles
owneroffice
How
Open Enquiries at /enquiries.
Review each new request, including customer contact details and the message.
Convert the enquiry into the next operational record when it is real work.
Dismiss or close enquiries that are spam, duplicates, or not proceeding.
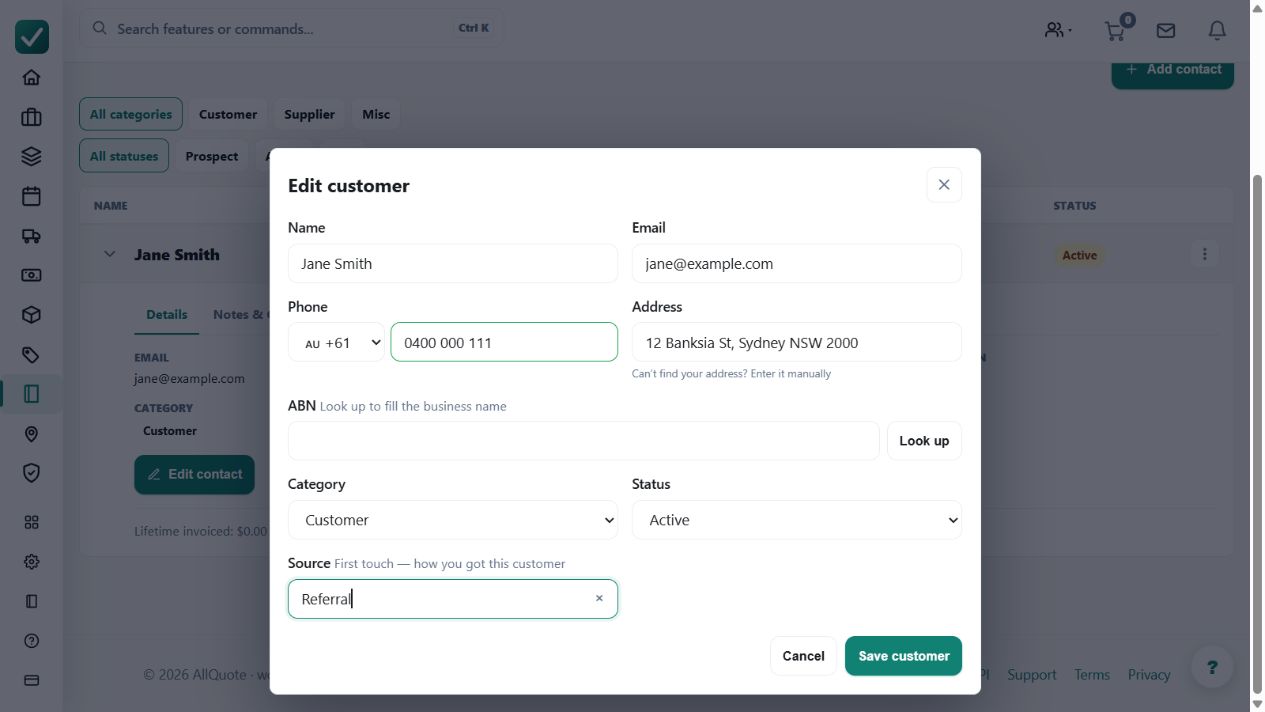
Demo screenshot. The customer editor selects Referral as the first-touch source. This is an example classification, not a verified advertising-attribution result. Select the image to enlarge.
What
Records where each customer came from on the contact card, so the business can see which channels actually send work.
Roles
owneroffice
How
Open Contacts and create or open the customer.
Choose the acquisition source when adding the customer.
Re-entry never overwrites an existing source - the first recorded source is kept, so the lead history stays honest.
Review sources across the contact list to see where new customers are coming from.
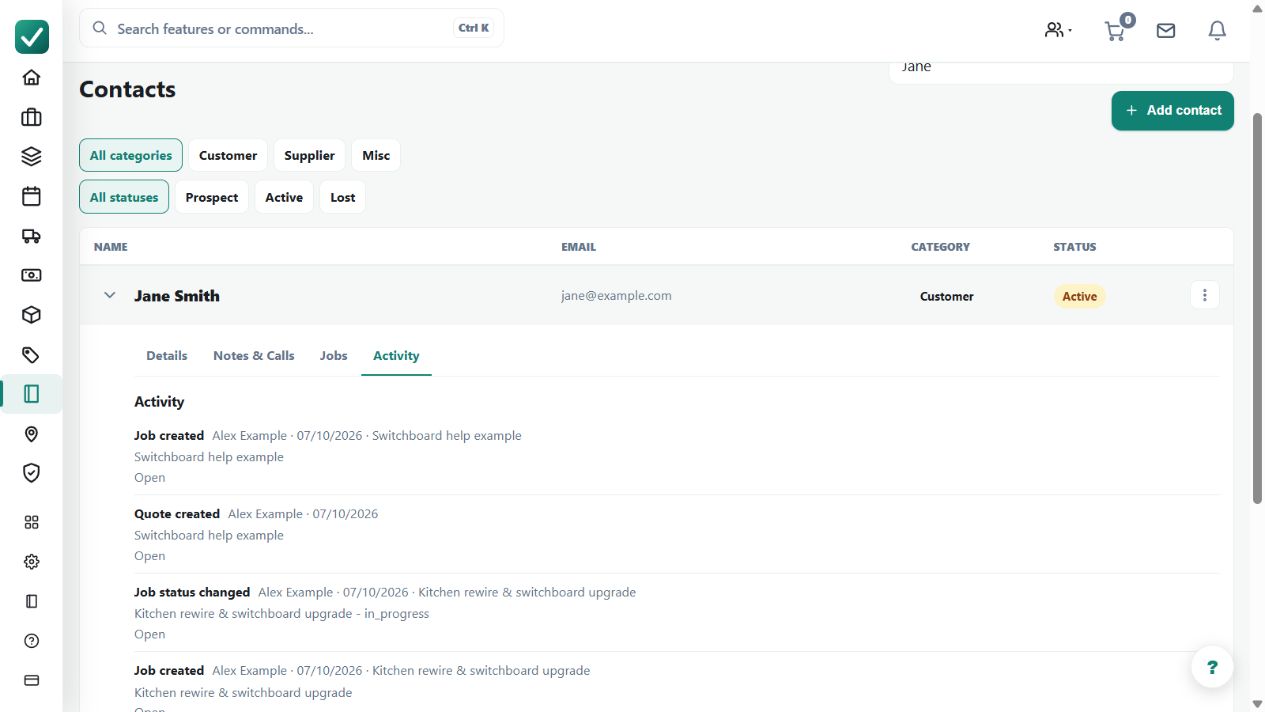
Demo screenshot. The expanded customer's Activity view brings related records into one place. The lifetime-invoiced amount depends on linked invoice records and is not a forecast of future value. Select the image to enlarge.
What
Shows a per-customer activity timeline and the customer's lifetime value on the contact card, so the whole relationship is visible in one place.
Roles
owneroffice
How
Open Contacts and expand the customer's row.
Read the lifetime value on the contact card for the customer's total billed worth.
Open the activity timeline for the per-customer history; it loads when the row expands, not before.
Use the timeline before quoting or following up so prior work and conversations are not missed.
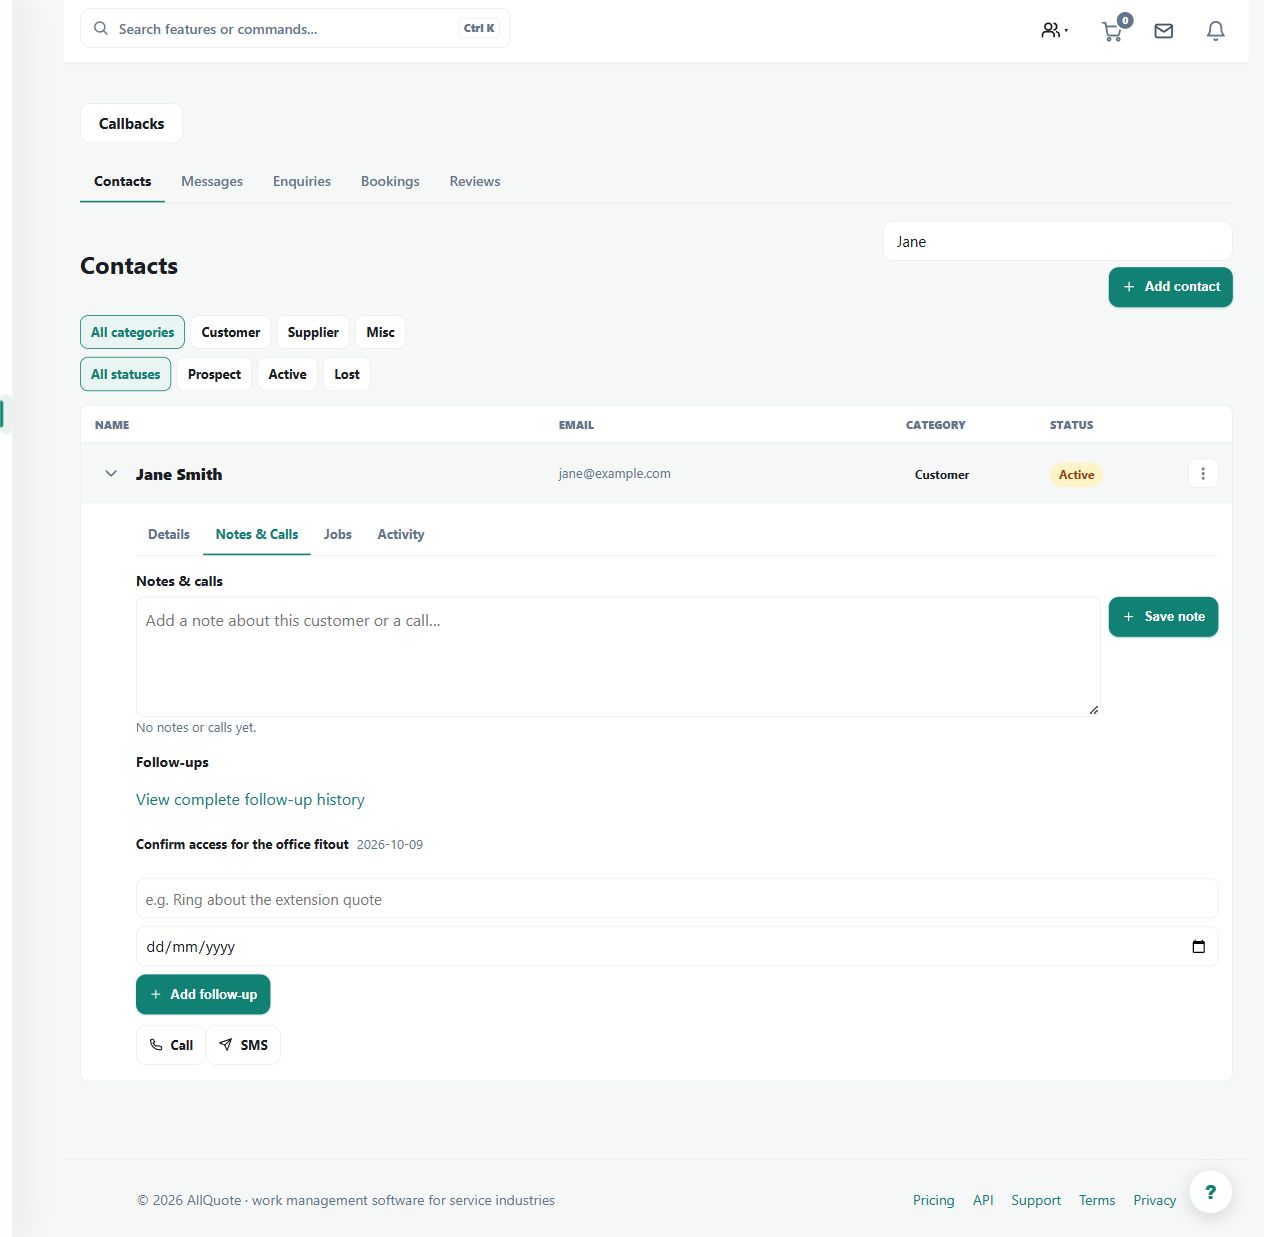
Demo screenshot. A saved example follow-up asks the office to confirm site access on 9 October. A follow-up reminder does not itself contact the customer. Select the image to enlarge.
What
Adds a follow-up task straight from the contact card, linked to that customer and visible from the contacts list.
Roles
owneroffice
How
Open Contacts and choose the customer.
Add a follow-up from the contact card with a title that says what must happen next.
See outstanding follow-ups per customer on the contacts list.
Complete the follow-up from the task when the call or visit is done.
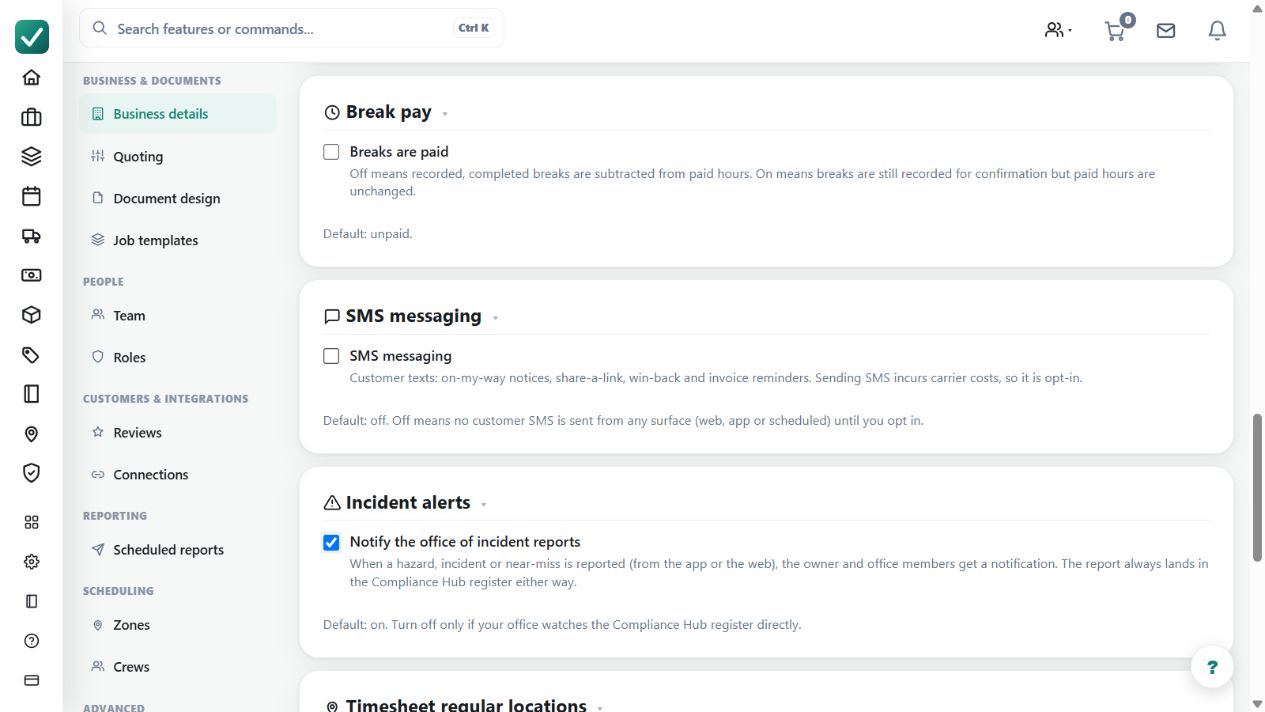
Demo screenshot. The business SMS control is opt-in and is off in this example. Sending is a separate deliberate action and can incur carrier charges; no text was sent for the guide. Select the image to enlarge.
What
Sends customer text messages such as on-my-way notices, share-a-link, win-back and invoice reminders. Opt-in, because sending SMS incurs carrier costs; usage packs can add credits.
How
Open Business settings > Business details and turn on SMS messaging.
Use the SMS action from a job or customer surface, such as the on-my-way notice.
Watch SMS usage; included monthly SMS resets with the plan and usage packs can add more.
Turn the toggle off at any time to stop all customer SMS from every surface.
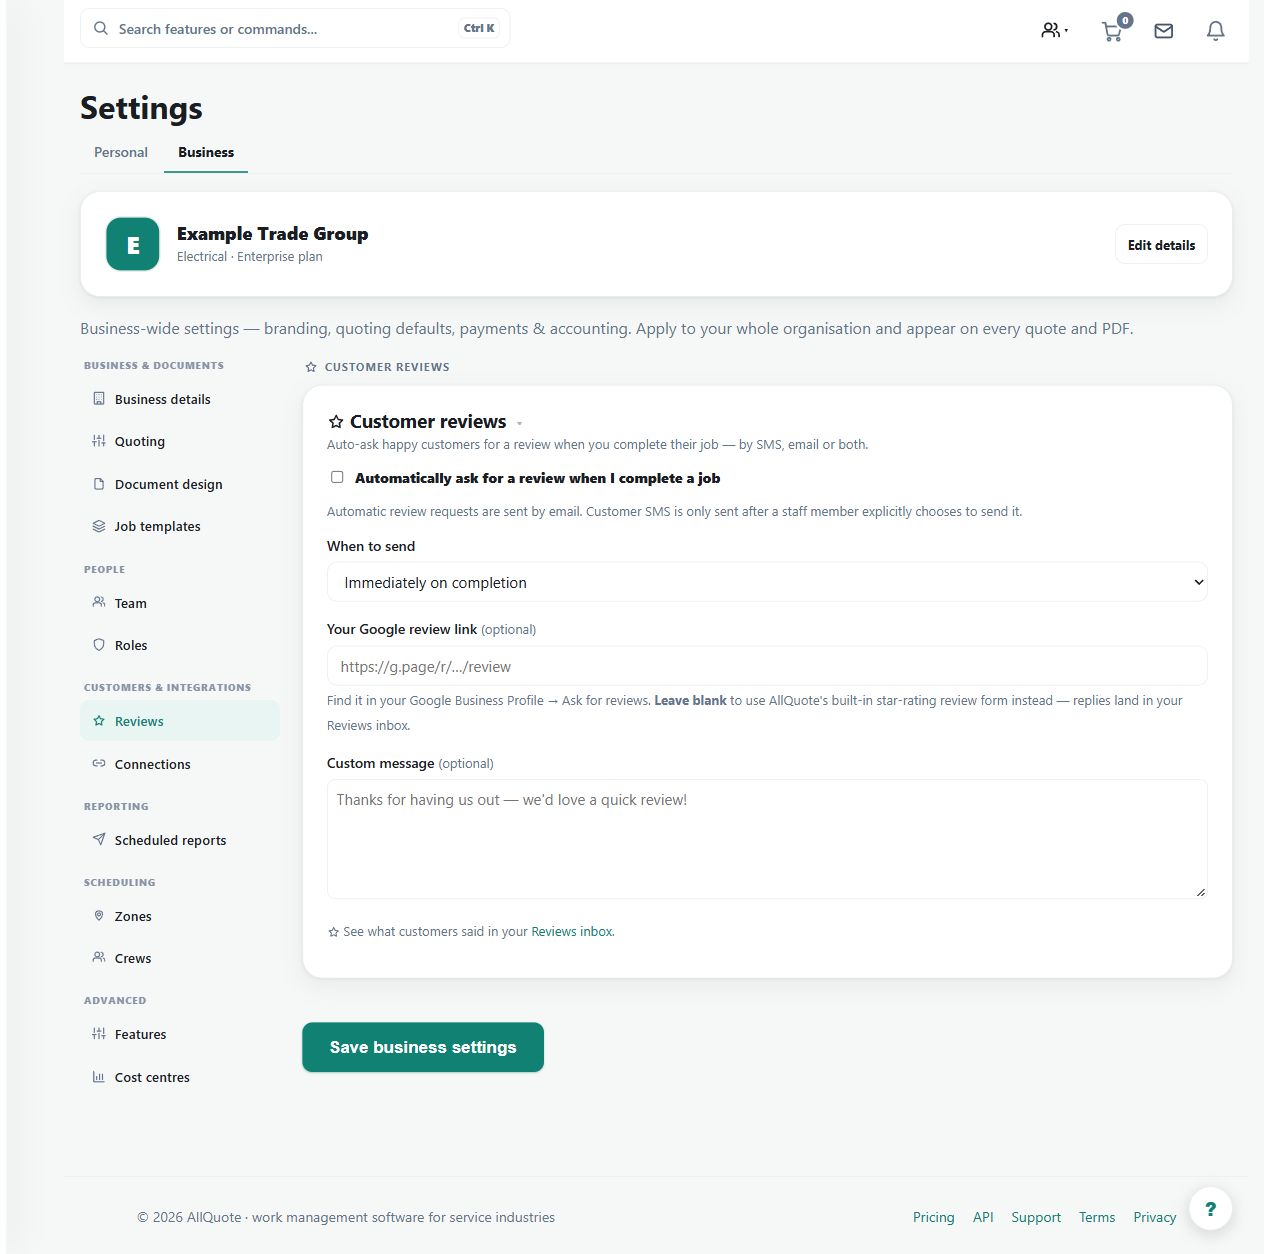
Demo screenshot. Review-request settings show how the business prepares its review workflow. There are no fabricated customer reviews or testimonials in this example. Select the image to enlarge.
What
Requests customer feedback by email after completed work when the business deliberately enables review requests. Automated review requests never send SMS.
How
Open Reviews at /reviews.
In Business Settings > Reviews, configure the destination, message and delay, then deliberately enable review requests.
Eligible completed jobs create an email request immediately or after the configured delay. Review the settings before enabling; there is no universal per-message approval step.
Track which customers were asked and what came back.
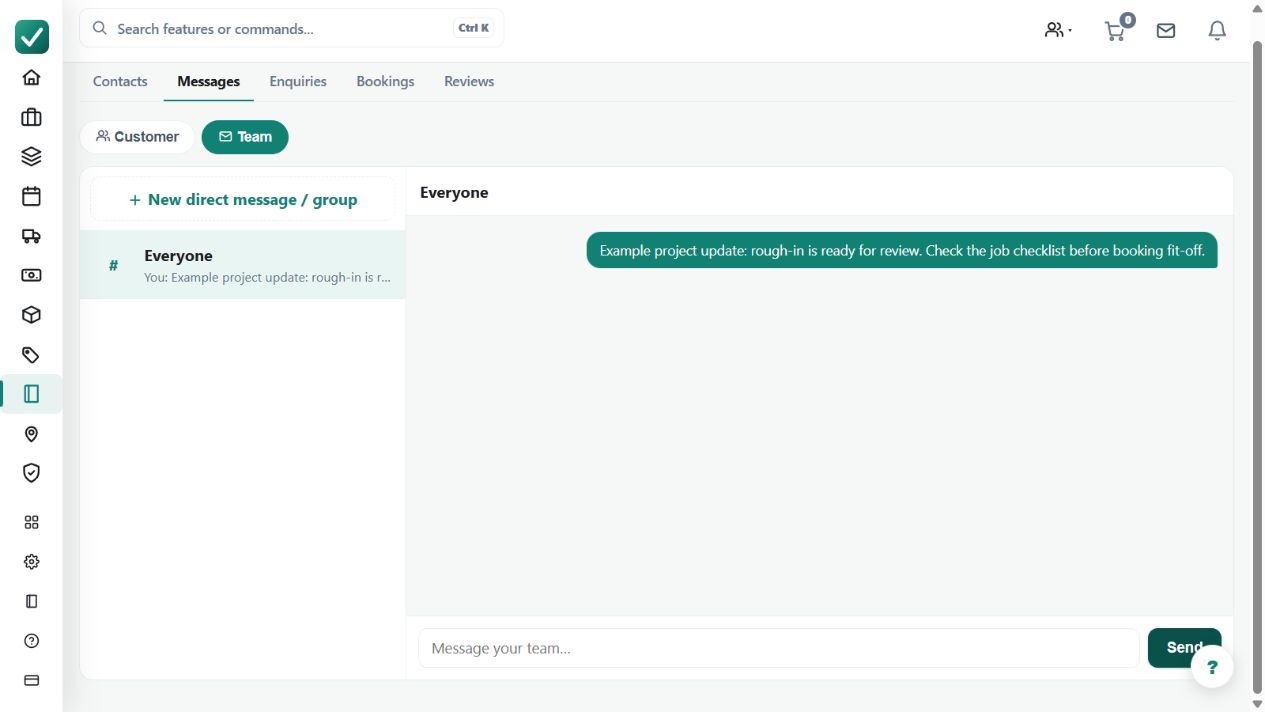
Demo screenshot. An internal demo message asks the team to review rough-in before booking fit-off. This local example was not delivered to any real customer or worker. Select the image to enlarge.
What
Keeps job-related messages with the work record so office staff and field users can discuss the job without losing context.
How
Open Chats at /chats.
Choose the job or customer conversation.
Message the team or the customer from the same thread the work lives on.
Return to the job for the full record - the conversation stays linked.
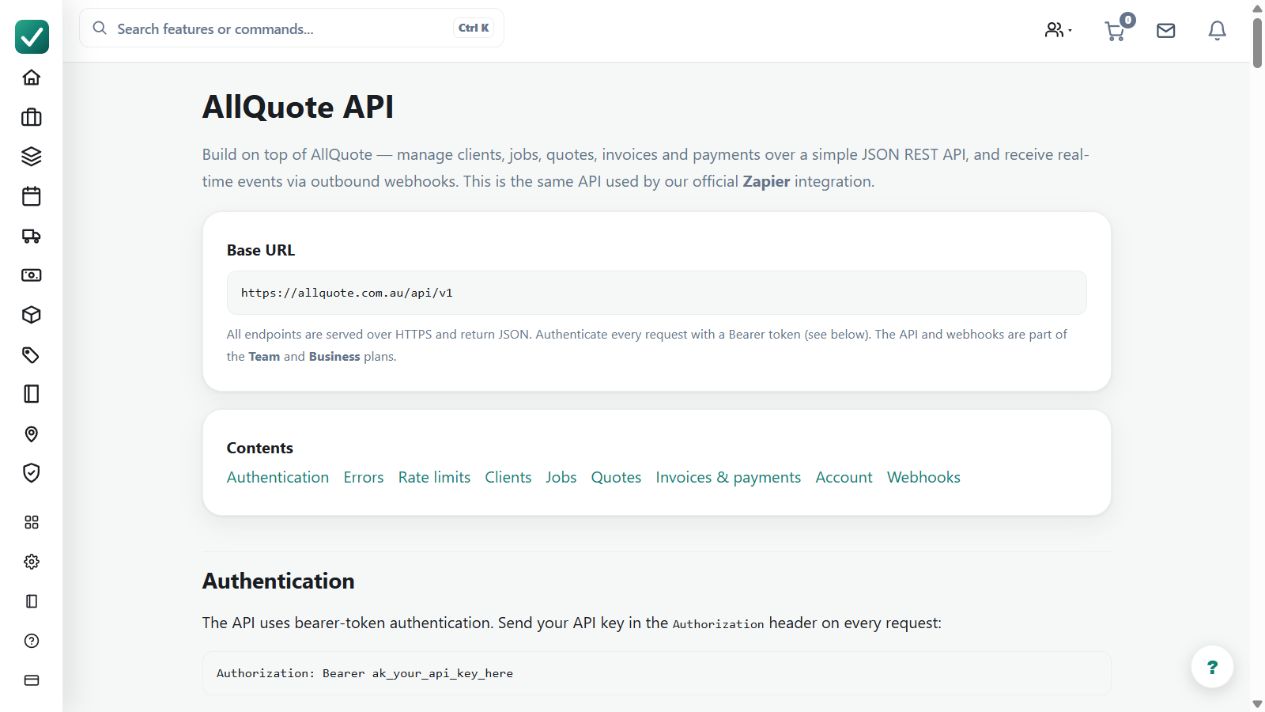
Demo screenshot. The API documentation describes authentication and integration entry points. Create scoped credentials only for the intended integration; this screenshot contains no live API key. Select the image to enlarge.
What
Provides API access and outbound webhooks for connecting AllQuote to external tools and automations.
Roles
owneroffice
How
Open Developers at /developers to review available API endpoints and webhook behaviour.
Create or use the integration credentials for the external system.
Connect the API client or webhook receiver to the AllQuote records it needs.
Test against a small workflow before depending on the integration in production.
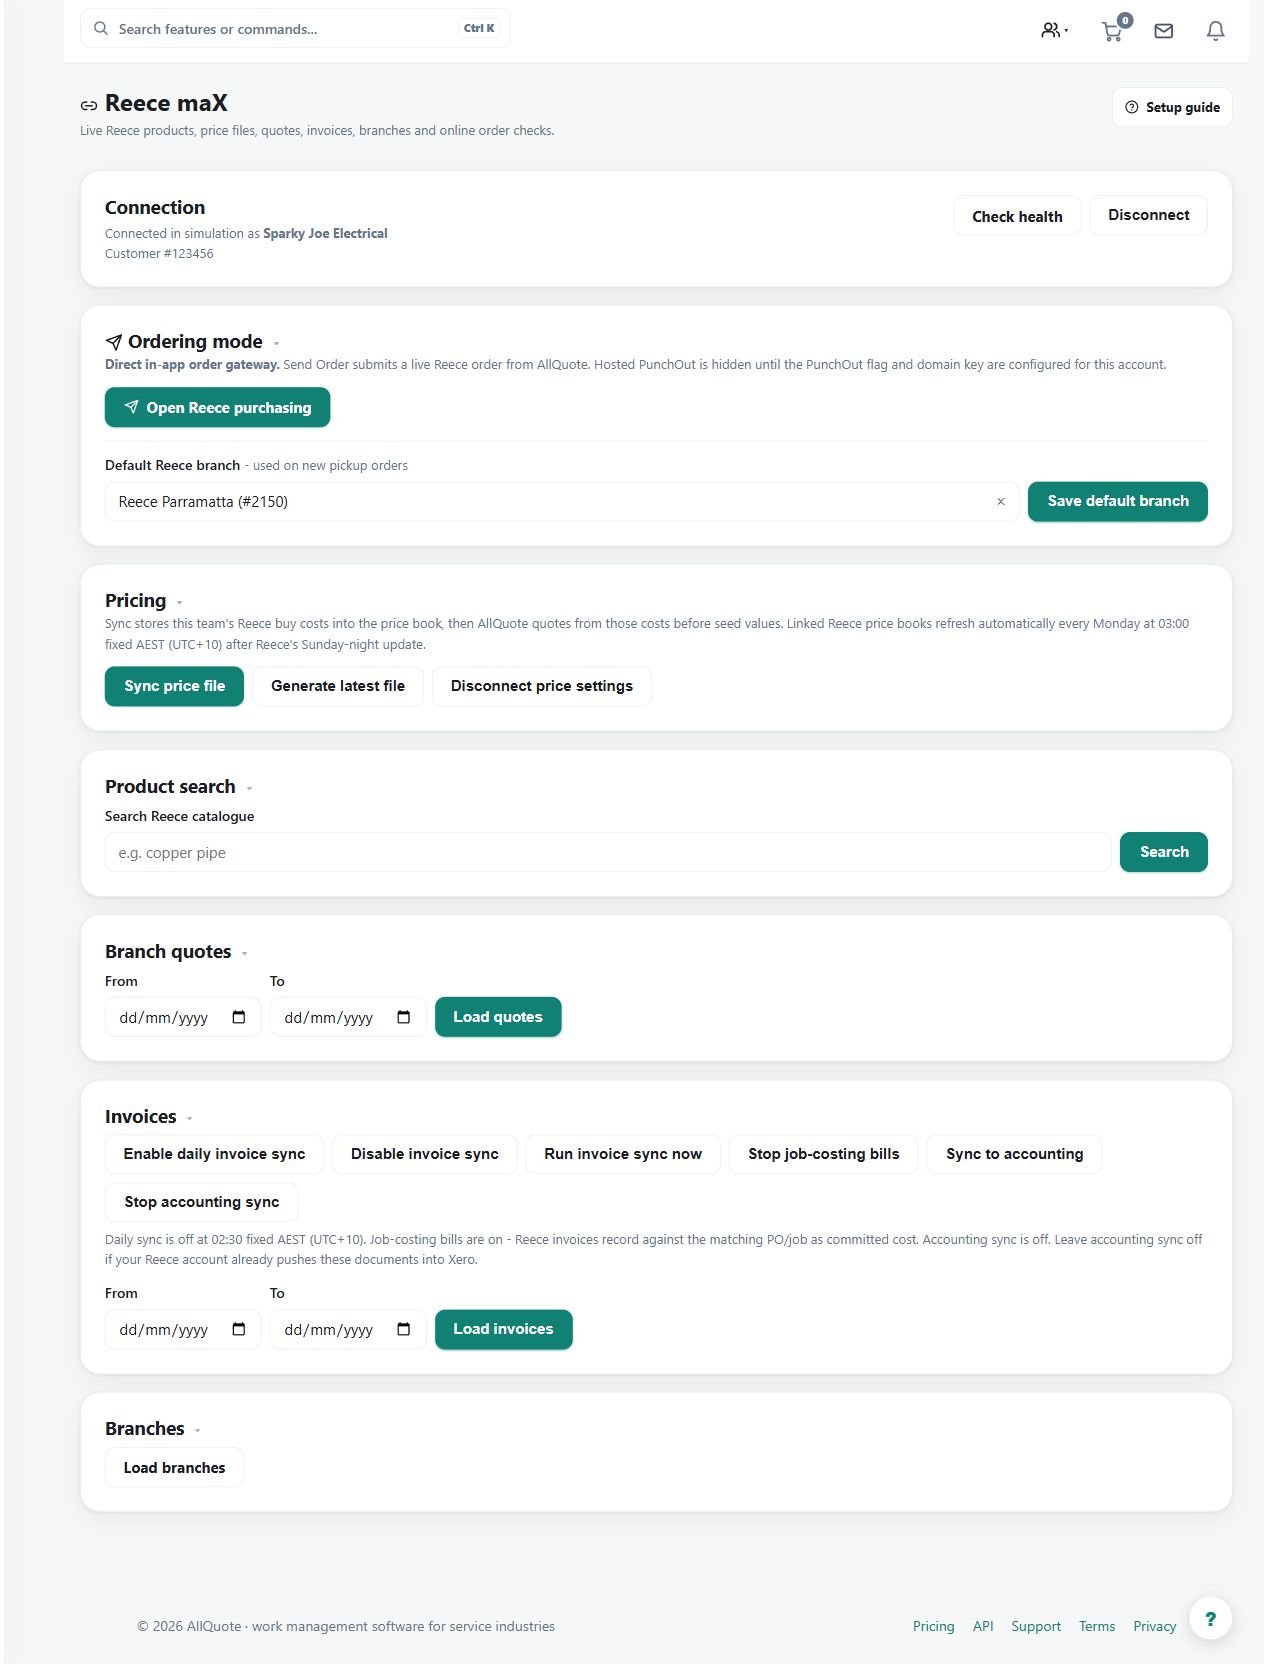
Demo screenshot. The Reece integration screen is explicitly in simulation. Real catalogue access requires the relevant account connection and supplier entitlement; example prices are not live trade prices. Select the image to enlarge.
What
Connects Reece account data, syncs products/pricing, and can add Reece products to the AllQuote price book.
Roles
owneroffice
How
Open Reece at /integrations/reece.
Connect the Reece integration for the business account.
Run or schedule a product/price sync.
Review synced products and add the needed Reece rows into the AllQuote pricebook before quoting or stocking from them.
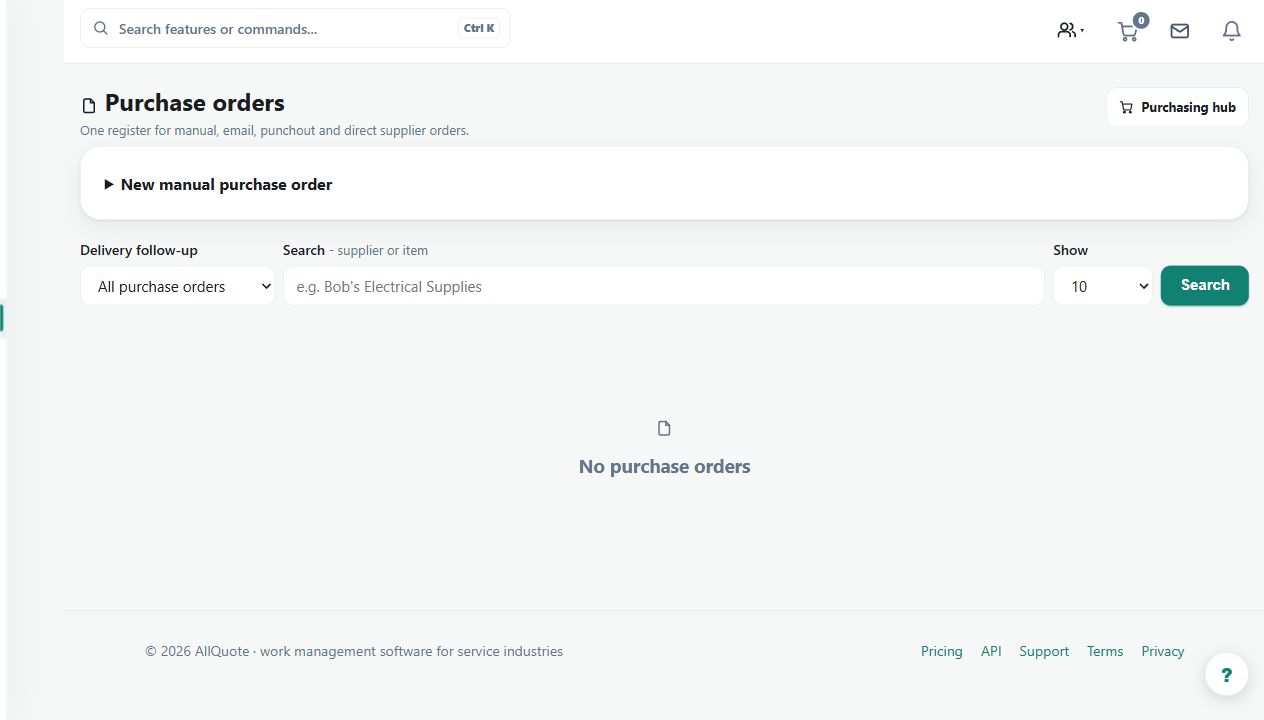
Demo screenshot. The purchase-order screen provides the ordering entry point. This screenshot shows preparation controls, not a submitted supplier order or confirmed delivery. Select the image to enlarge.
What
Supports Reece-backed purchase order preview, checks, submit flow, and quote-to-order workflows.
Roles
owneroffice
How
Open Purchase orders at /purchase-orders.
Create or open the purchase order for the job or stock order.
Use the Reece actions on the purchase order when the integration is connected.
After the order arrives, receive it back into stock so quantities and costs update.
Demo screenshot. The Reece integration's simulation screen exposes invoice-sync setup. A configured or simulated connection is not proof that a real supplier invoice was received. Select the image to enlarge.
What
Pulls Reece invoice documents into AllQuote for review and caching; Business can also turn those invoices into supplier-bill and accounting workflows.
Roles
owner
How
Open Reece at /integrations/reece.
Use the invoice sync controls after the Reece account is connected.
Run the sync or leave the daily sync enabled.
Review the cached invoice batch and any recorded supplier-bill results.
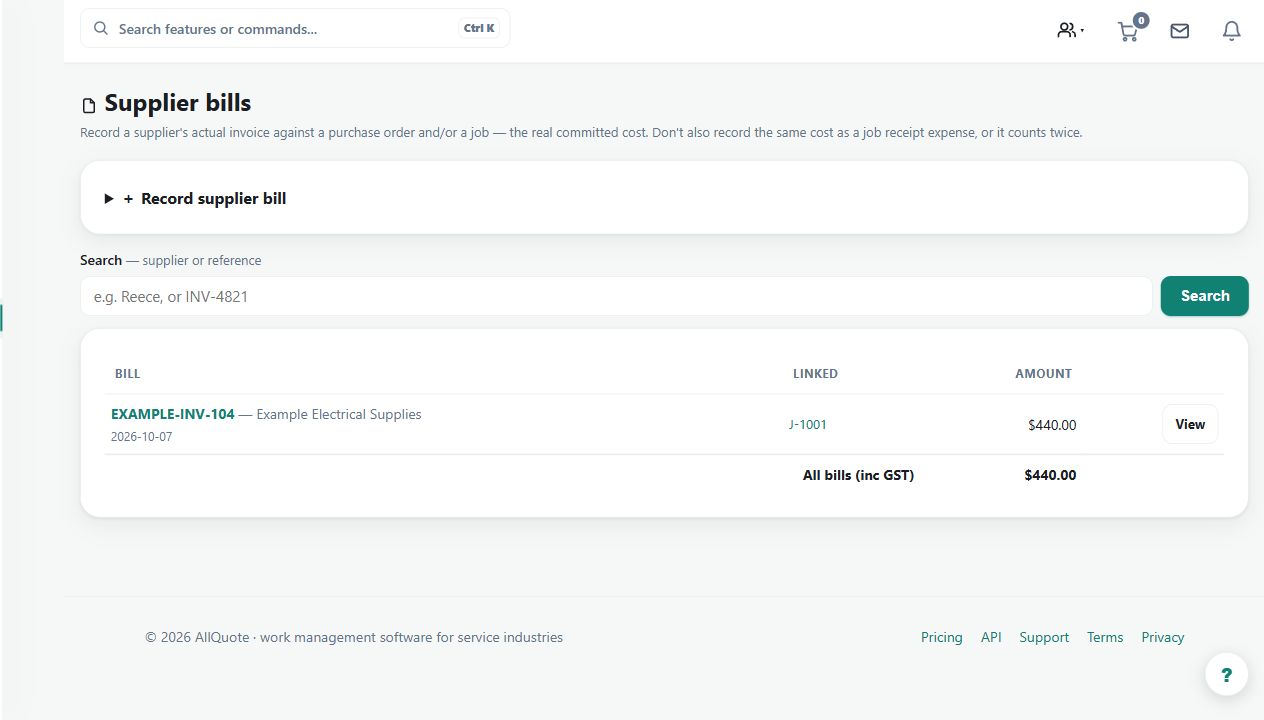
Demo screenshot. A fictional $440 supplier bill is linked to a job. Review tax, allocation and source evidence before exporting or marking a real bill paid. Select the image to enlarge.
What
Turns supplier invoice data into supplier bills, committed job costs, and draft accounting bills or credits where the accounting connection supports it.
Roles
owner
How
Open Reece or Supplier bills.
Enable job-costing bills when supplier invoices should attach landed costs to matching purchase orders and jobs.
Enable accounting sync only when AllQuote should push those bills or credits to the active accounting connection.
Review job profitability and accounting sync results after the supplier bills are recorded.
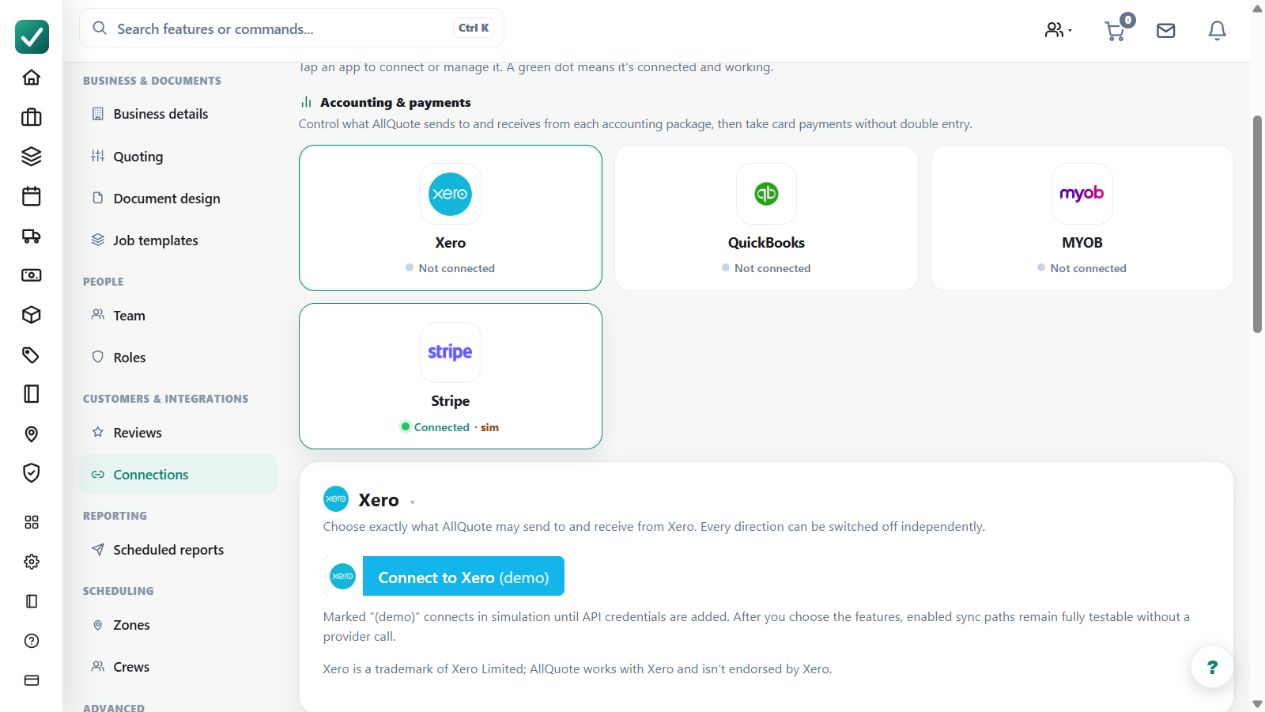
Demo screenshot. Accounting connections show their actual setup state, including explicit simulation labels. A listed provider is not a completed live connection, sync or payment. Select the image to enlarge.
What
Uses per-feature sync selectors when connecting Xero, QuickBooks or MYOB, with the same choices available later in settings.
Roles
owneroffice
How
Open Business settings > Connections at /group-settings?tab=connections.
Connect Xero, QuickBooks or MYOB, choose the organisation, then select the features that provider should sync.
Return to Connections whenever you need to change those selections. The selector registry is consistent across all three providers; payroll compatibility is configured separately.
When invoice sync is selected and its mode is Automatic, issued or finalised invoices auto-push; drafts do not. Manual mode queues ready invoices instead.
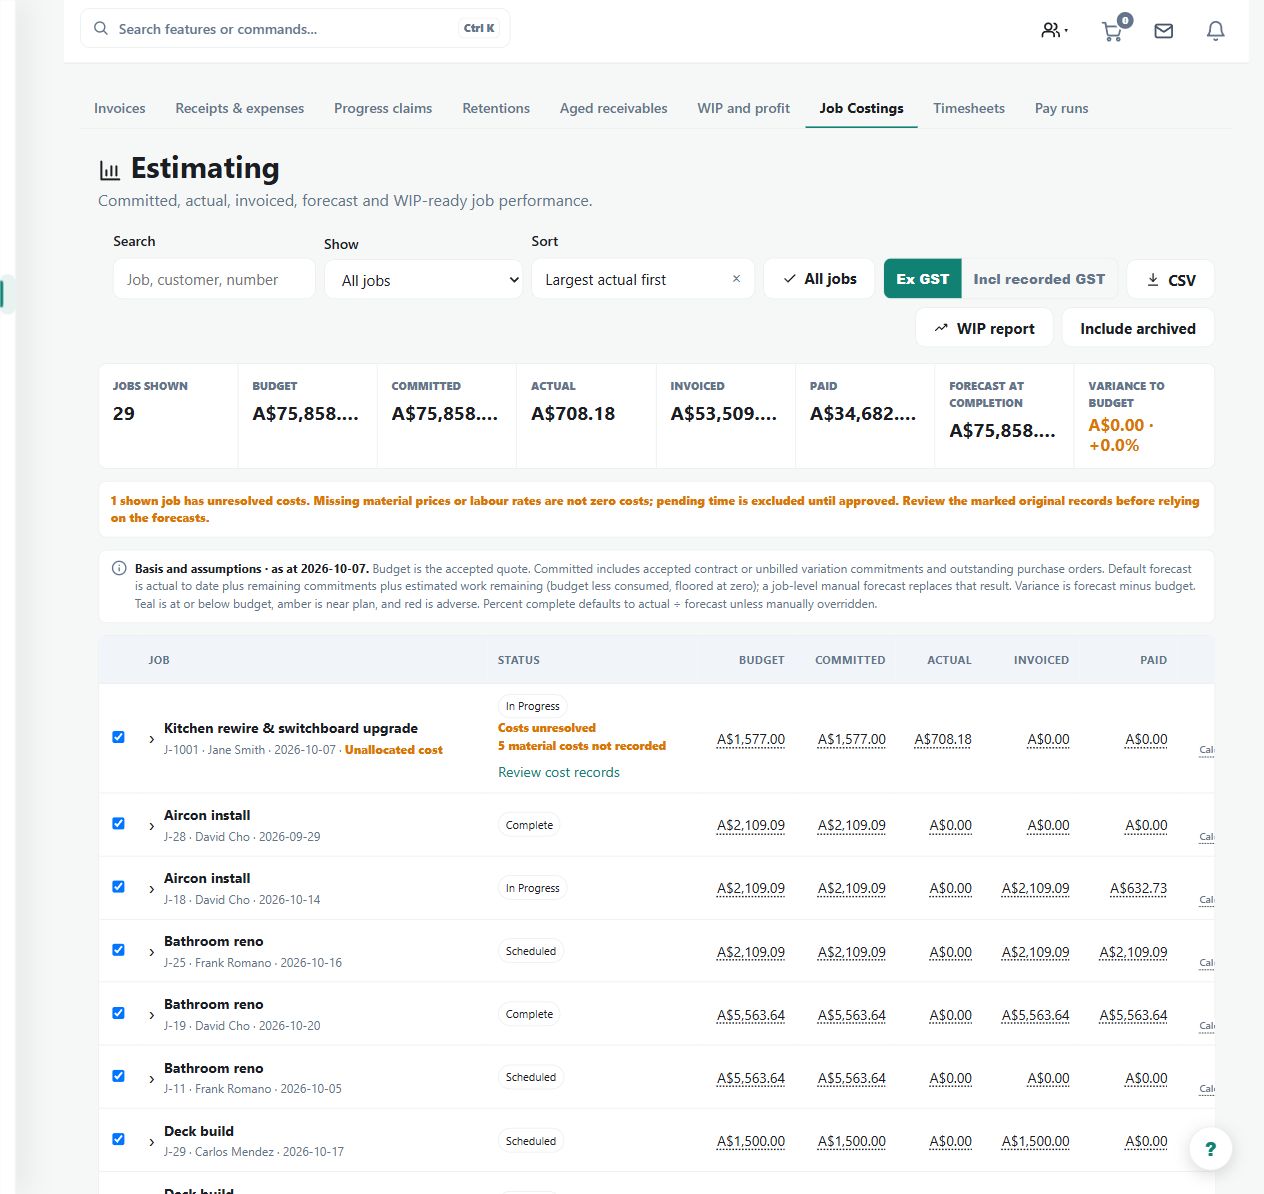
Demo screenshot. The job-costing report displays example job financials. Provider mappings and successful exports must be verified separately from the local costing view. Select the image to enlarge.
What
Compares budget, committed, actual and invoiced money, then shows forecast at completion and variance for Business-plan jobs.
Roles
owneroffice
How
Open Job Costings, choose the as-at date and the jobs you want to compare.
Check committed purchase orders, actual approved labour and recorded costs, and the amount invoiced to the customer.
Review forecast at completion and budget variance; use a manual forecast or percent-complete override only when the job record supports it.
Open a job's detail to trace each figure back to its invoice, supplier bill, receipt, expense, stock use or approved time entry.
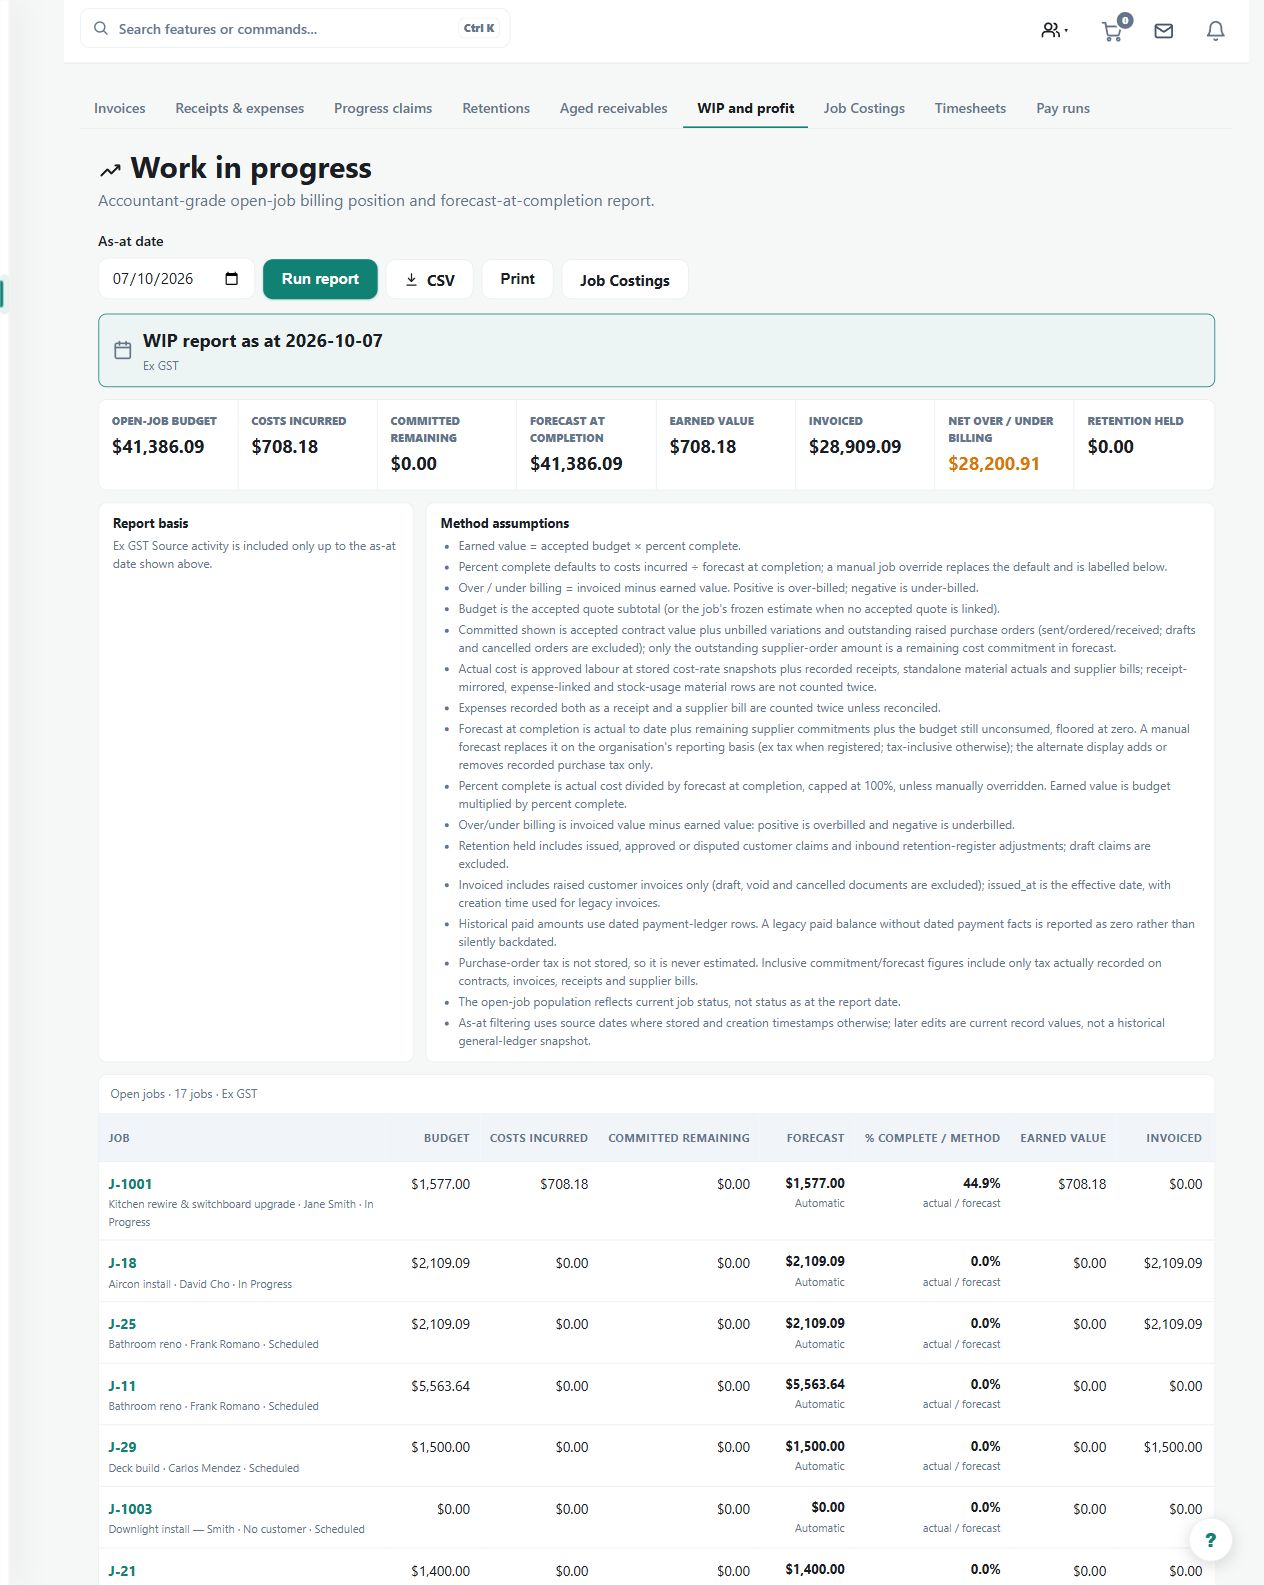
Demo screenshot. The detailed WIP report exposes job-level revenue, cost and billing measures for reconciliation. Validate the reporting date, source costs and contract values before an accounting close. Select the image to enlarge.
What
Adds the Business-plan deep WIP view with earned value, forecast, variance and over- or under-billing at an as-at date.
Roles
owneroffice
How
On the WIP & job profitability page, choose the Accountant-grade WIP report button, then set the as-at date.
Review budget, committed and actual costs beside invoiced revenue, earned value and forecast at completion.
Check variance and over- or under-billing job by job, then open Job Costings when a source figure needs tracing.
Correct the source job record rather than the report, then refresh or export the updated as-at view.
Demo screenshot. The connection panel is where accounting setup begins. This example is not connected to a live accounting ledger and does not demonstrate a completed reconciliation. Select the image to enlarge.
What
Surfaces sync exceptions and payment mismatches so invoice, payment, and accounting records can be accepted, resolved, or ignored.
Roles
owneroffice
How
Open Accounting reconciliation at /accounting/reconciliation.
Refresh the workbench to pull the latest accounting and payment state.
Review each exception, including amount differences, missing records, or duplicate matches.
Accept, resolve, or ignore the exception so the local invoice/payment trail stays explainable.
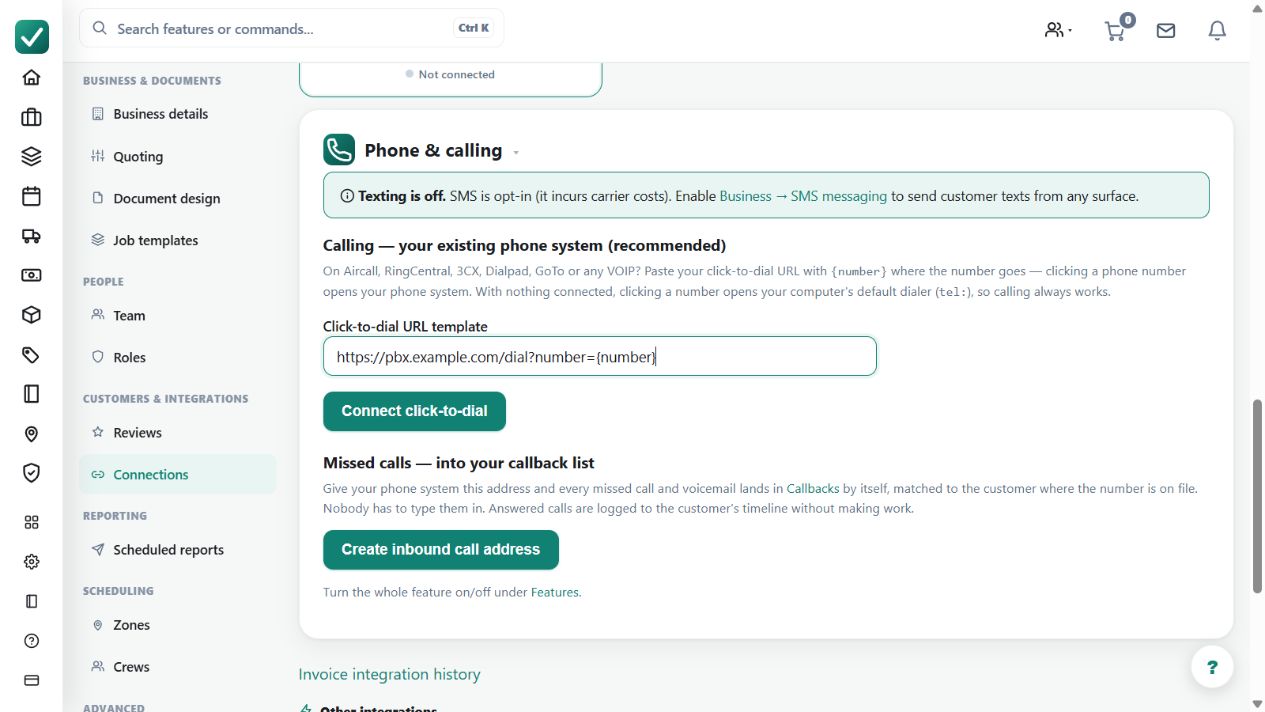
Demo screenshot. The calling panel contains an illustrative click-to-dial URL using the {number} placeholder. It has not been connected; real calling uses the configured provider or the device's dialler. Select the image to enlarge.
What
Provides click-to-call and click-to-SMS on contact and job phone numbers. Outbound call attempts are logged before opening the connected phone system or device dialer; external call outcomes need review.
How
Open Business settings > Connections and connect the phone integration, or rely on the device-dialer fallback.
Click any phone number on a contact or job to call or text.
Check the call logged against the customer and job afterwards.
Add a note to the call record where the conversation matters later.
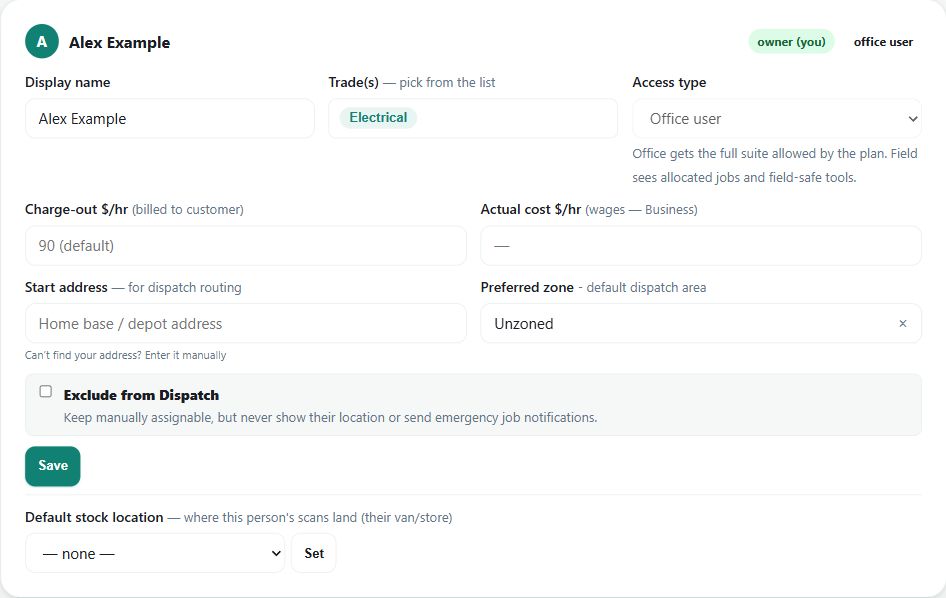
Demo screenshot. The team screen lists fictional workers and their business roles and rates. Review cost rates separately from charge-out rates and grant only the intended access. Select the image to enlarge.
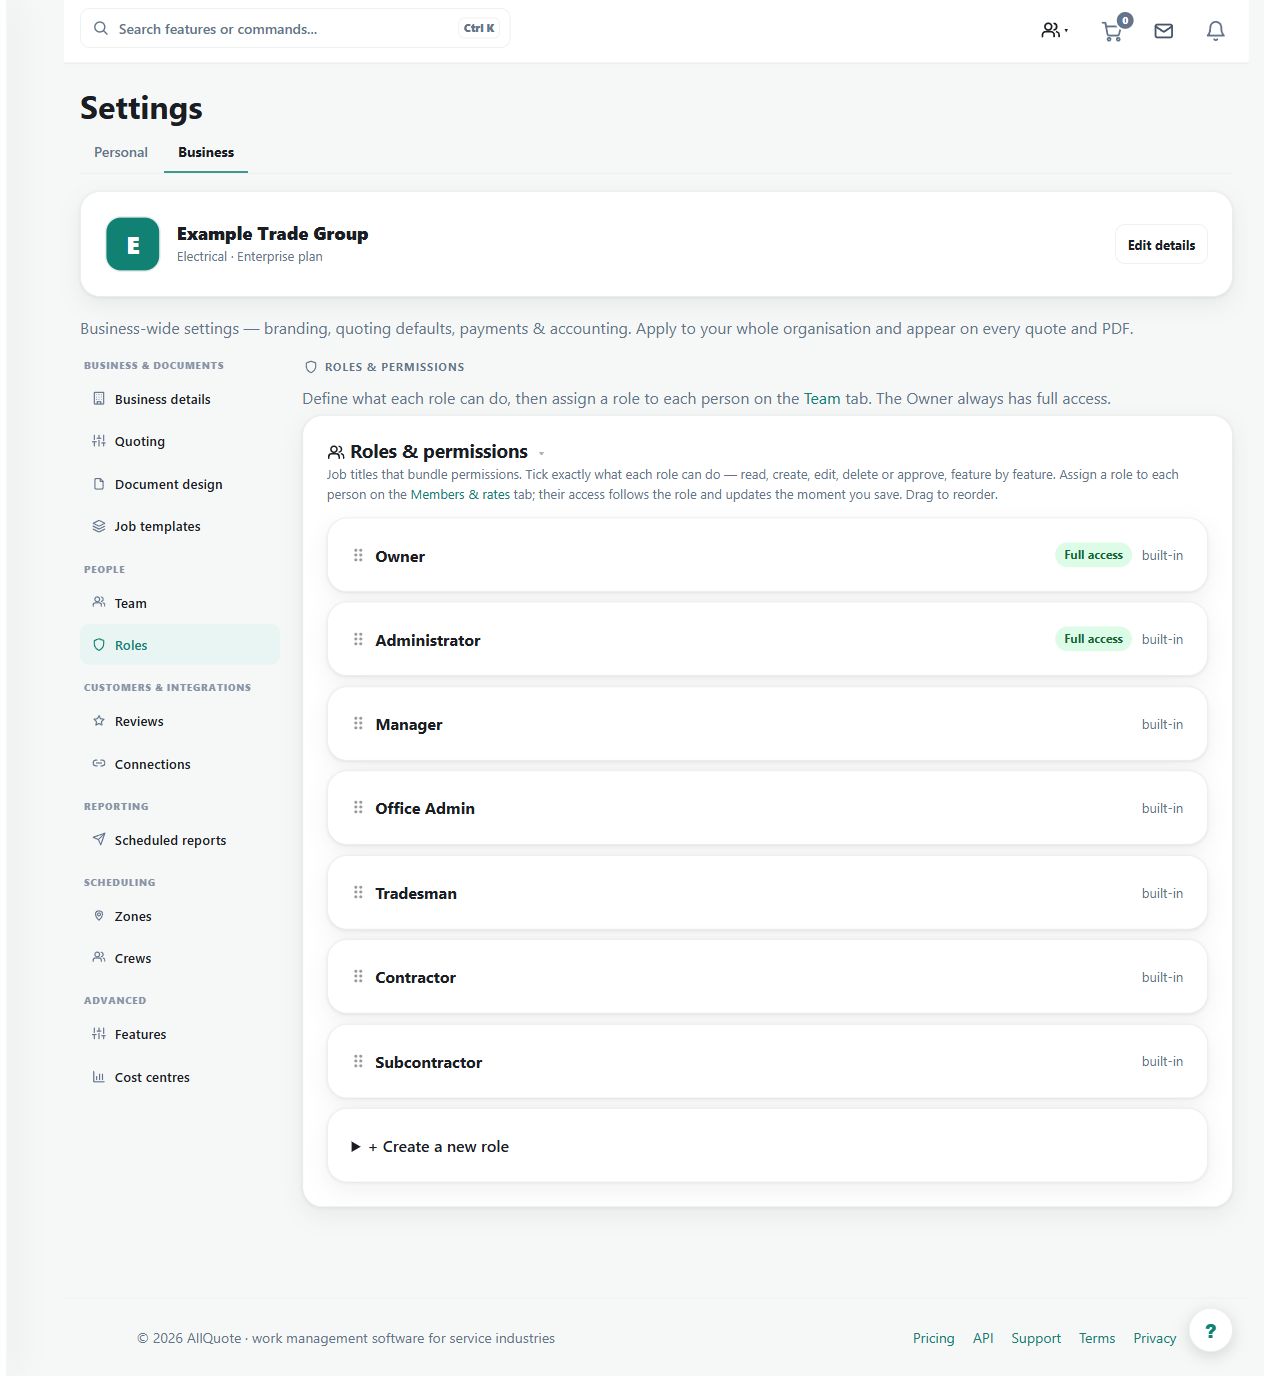
Demo screenshot. The role settings expose permissions for the example organisation. A screenshot of a role does not grant access; save and verify the intended permissions with that role. Select the image to enlarge.
What
Controls what each role can do, including business settings, team management, dispatch, reports, and operational access.
Roles
owneroffice
How
Open Business settings > Roles at /group-settings?tab=roles.
Create a role or edit an existing non-system role.
Tick the permission areas that role should have, such as team, dispatch, reports, stock, quoting, or business settings.
Return to Business settings > Team and assign the role to each person.
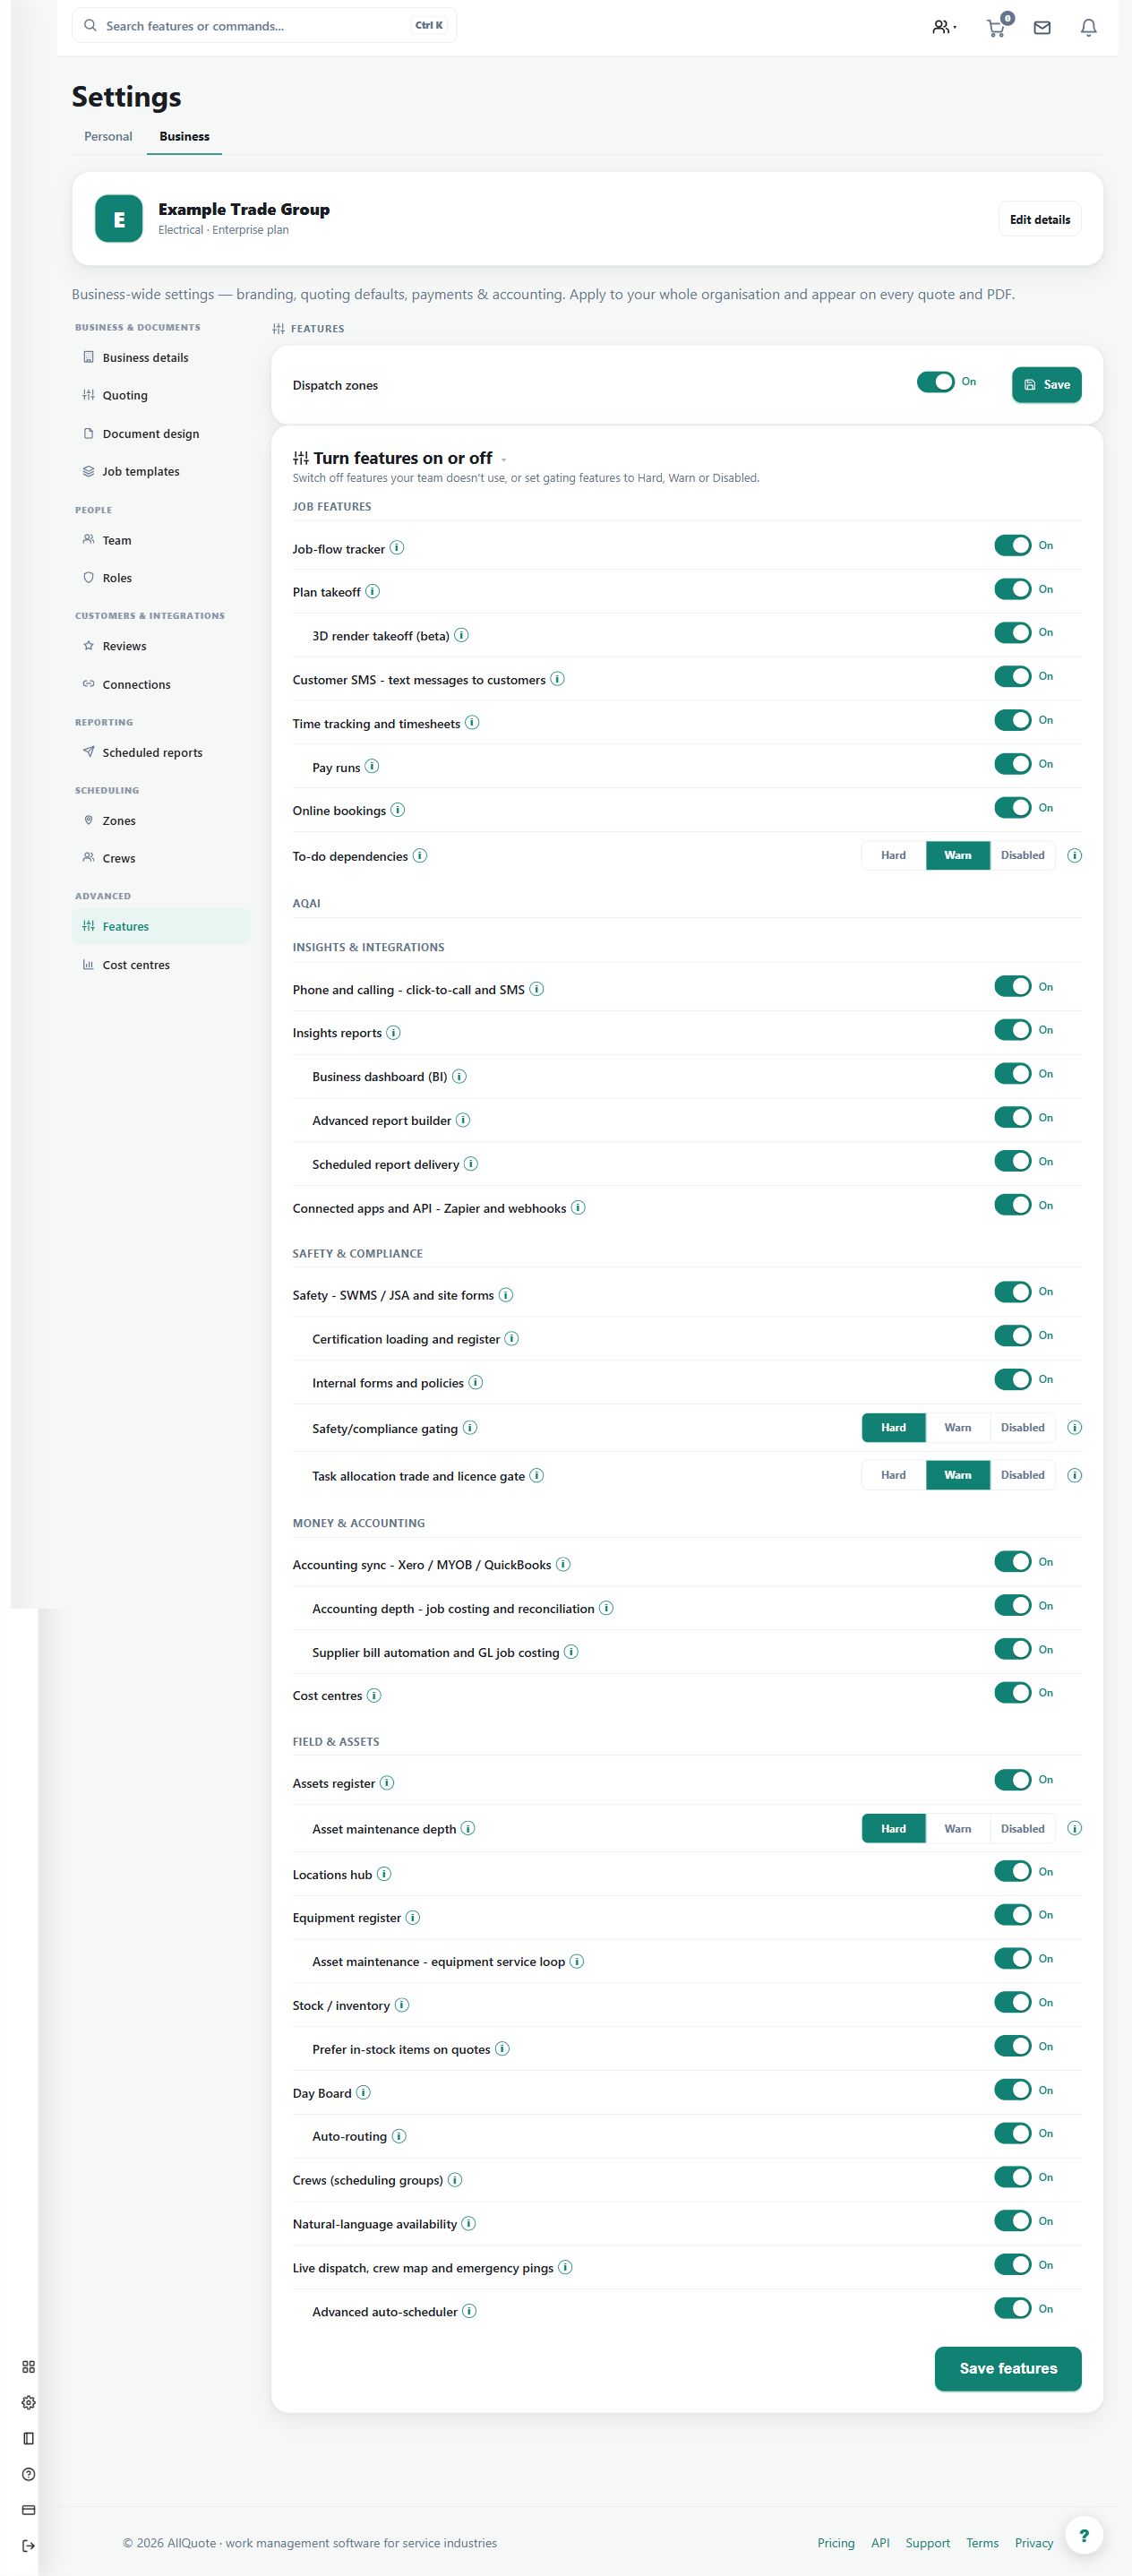
Demo screenshot. Business feature settings control which enabled areas appear for the organisation. Plan entitlements and role permissions still apply independently. Select the image to enlarge.
What
Lets a business hide or disable optional feature areas that are available on its plan.
Roles
owneroffice
How
Open Business settings > Features at /group-settings?tab=features.
Review the optional feature areas available on the business plan.
Switch optional areas on or off.
Reload the app navigation; matching menu entries and routes follow the feature setting.
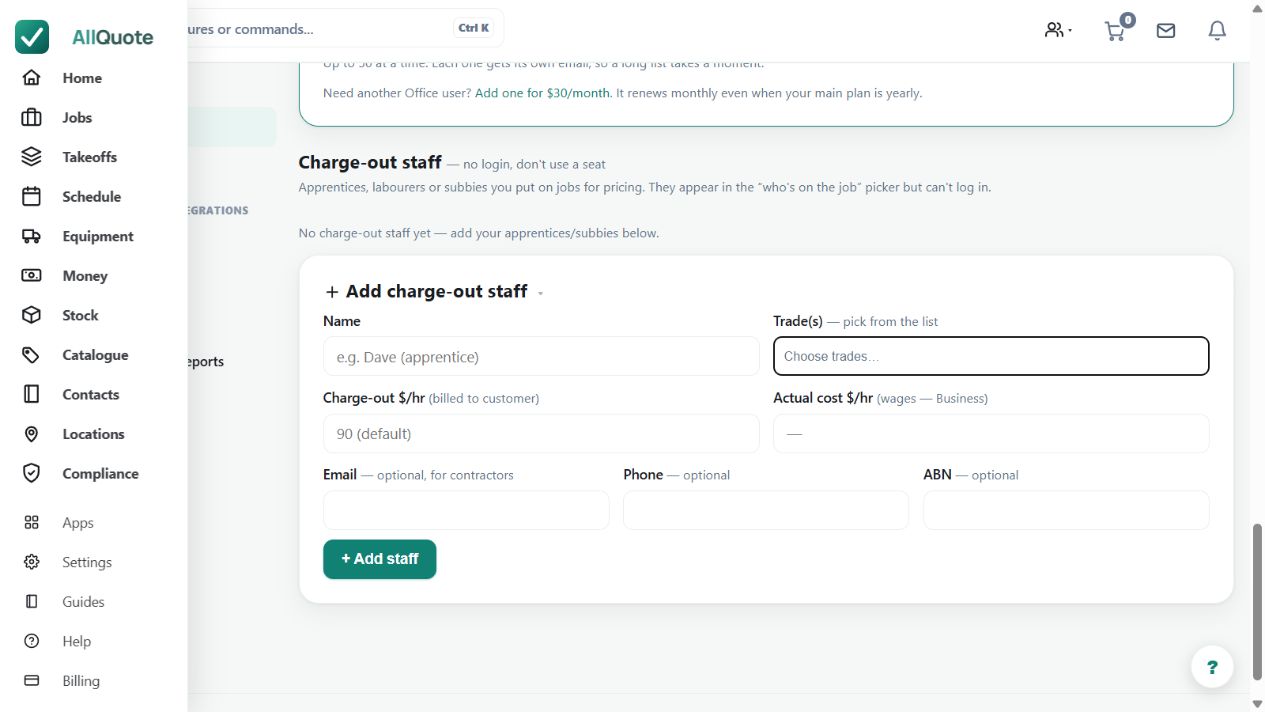
Demo screenshot. The charge-out staff form is the owner-side entry point for adding contractor details. This image does not depict a contractor's signed-in portal or prove access to an assigned job. Select the image to enlarge.
What
Gives a charge-out contractor a revocable link to their assigned work: job details without prices, photo upload, and accept/decline offers.
Roles
owneroffice
How
Open Team, choose the contractor's rate card, and issue the portal link.
Copy the link straight away - it is shown once and only its hash is stored, so it cannot be displayed again.
The contractor opens the link to see assigned jobs (no prices), upload photos, and accept or decline offers.
Revoke the link from the same rate card when access should end; the old link returns 404 on its next request.
Demo screenshot. The locations hub separates vans and warehouses from job sites. Use the intended location when receiving, transferring or consuming stock. Select the image to enlarge.
What
Tracks operational locations in one place: live sites, warehouses, vans, stock, equipment, installed assets and opted-in crew nearby.
Roles
owneroffice
How
Open Locations for job sites, warehouses, vans, crew map and dispatch context.
Use the Sites, Vans, and Warehouses tabs to inspect each location's photo, address, stock, equipment, assets, jobs and live staff.
Open a map pin or location row to see the full detail panel.
Use Stock > Restock when inventory needs moving between warehouses, vans, and sites.